In this Article
You’ve heard countless stories about creators who’ve grown their businesses by starting a newsletter.
And you want in.
The only problem?
You don’t know how to create a newsletter. And you’re overwhelmed trying to figure out where to start.
Fortunately, you don’t need any email marketing experience to start a newsletter.
All you need is an idea and a bit of grit.
What is an email newsletter?
An email newsletter is a regular digital publication sent via email to a group of subscribers.
It contains content like updates and news and is used as a tool to build rapport, connect with your audience, and cultivate brand loyalty—not selling.
Take SEO pro Aleyda Solis. She packs her newsletter with SEO-related news that her subscribers are eager to receive:
Selling (and promoting your products) is for other emails that fall under your overall email marketing strategy. These emails aren’t considered your newsletter.
For example, look at this promotional email from artist Dianuh Aerin:
This email differs from a newsletter as its goal is to sell.
The goal with your newsletter, however, is to share content and build rapport with your audience.
6 questions to ask before setting up an email newsletter
Before you put pen to paper, spend time fleshing out the overall idea of your newsletter. It won’t take much time, but the payoff is immense.
Here are six questions to ask before starting a newsletter.
1. What’s your newsletter’s goal?
Your newsletter’s goal is what you want to achieve every time you hit send.
With a clearly defined goal, you won’t waffle between ideas when you need to put together your newsletter.
Here are a few different goals, along with content ideas, to get you thinking:

Still not sure what your goal should be? Our list of newsletter examples will get the ball rolling.
2. Who are you creating your newsletter for?
Knowing what to write is much easier when you know who to write it for.
Take time to research your audience.
Make a note of their likes, dislikes, hopes, dreams, goals, and challenges. You can usually uncover this information by spending time where your audience hangs out. Think Facebook groups, Slack channels, or Reddit forums.
Even better, talk with your audience on social media. Ask them what they struggle with regarding your niche.
Once you have enough information on your audience, create a user persona—a fictional character that represents your audience.
Your persona will give you a detailed view of who you’re writing for. When you start to write your newsletter, you can revisit your persona and make sure it aligns with your content.
3. What’s your main newsletter topic?
The main topic for your newsletter is what you’ll frequently write about.
And because you’ve researched your audience, it will be easy to choose a main topic.
Choose a topic that relates to your user persona, like helping them overcome a challenge or sending them content that entertains.
For example: Your audience dreams of writing their first book but is unsure how to get there. So, a good topic could be teaching people how to write a polished manuscript and a compelling pitch.
Your newsletter’s main topic will be your north star—it will direct you down the right path every time you sit down to write an email.
Note: Your newsletter’s topic can eventually inspire your newsletter’s name. You don’t need to fret over finding a name to send out your first newsletter, but it’s something you can come back to later on.
4. How do you want to gather email addresses?
The heartbeat of every newsletter is the subscribers.
And you can collect subscribers in two efficient ways: a newsletter landing page or an opt-in form.
A landing page is a dedicated page you use to turn people into subscribers. Productivity expert Rich Webster promotes his newsletter through this simple landing page:
His landing page explains what people can expect each week from his newsletter.
An opt-in form, on the other hand, is an element you add to blogs and existing web pages. Like this one on blogger Just Jill’s about page:
With Kit, you can create on-brand landing pages and opt-in forms that collect email addresses. Try them both and grow your email list faster.
5. Why would people subscribe to your newsletter?
People need a reason to sign up for your newsletter.
And you can give them a reason with a lead magnet. A lead magnet is something free you give people in exchange for their email address.
Some examples of lead magnets include:
- Ebooks
- Printables
- Music
- Resource libraries
- Quizzes
Just make sure your lead magnet relates to your newsletter.
For example, if you send fitness tips through your newsletter, a suitable lead magnet could be a printable with different exercises.
This way, subscribers can get a taste of what you offer.
Then, use a landing page or an opt-in form (or both) to promote your lead magnet.
Here’s how brand designer Piper De Young uses a landing page to promote her free ebook:
6. What’s a realistic sending frequency for you?
Identify how many emails you can realistically send weekly or monthly.
Some creators send multiple newsletters per week, like this one from The Priority Academy:
Others send one per month, like this newsletter from The Growth Equation:
Just make sure you’re consistent. Send your emails on the same day(s) and the same time(s) so subscribers know when to expect your newsletter.
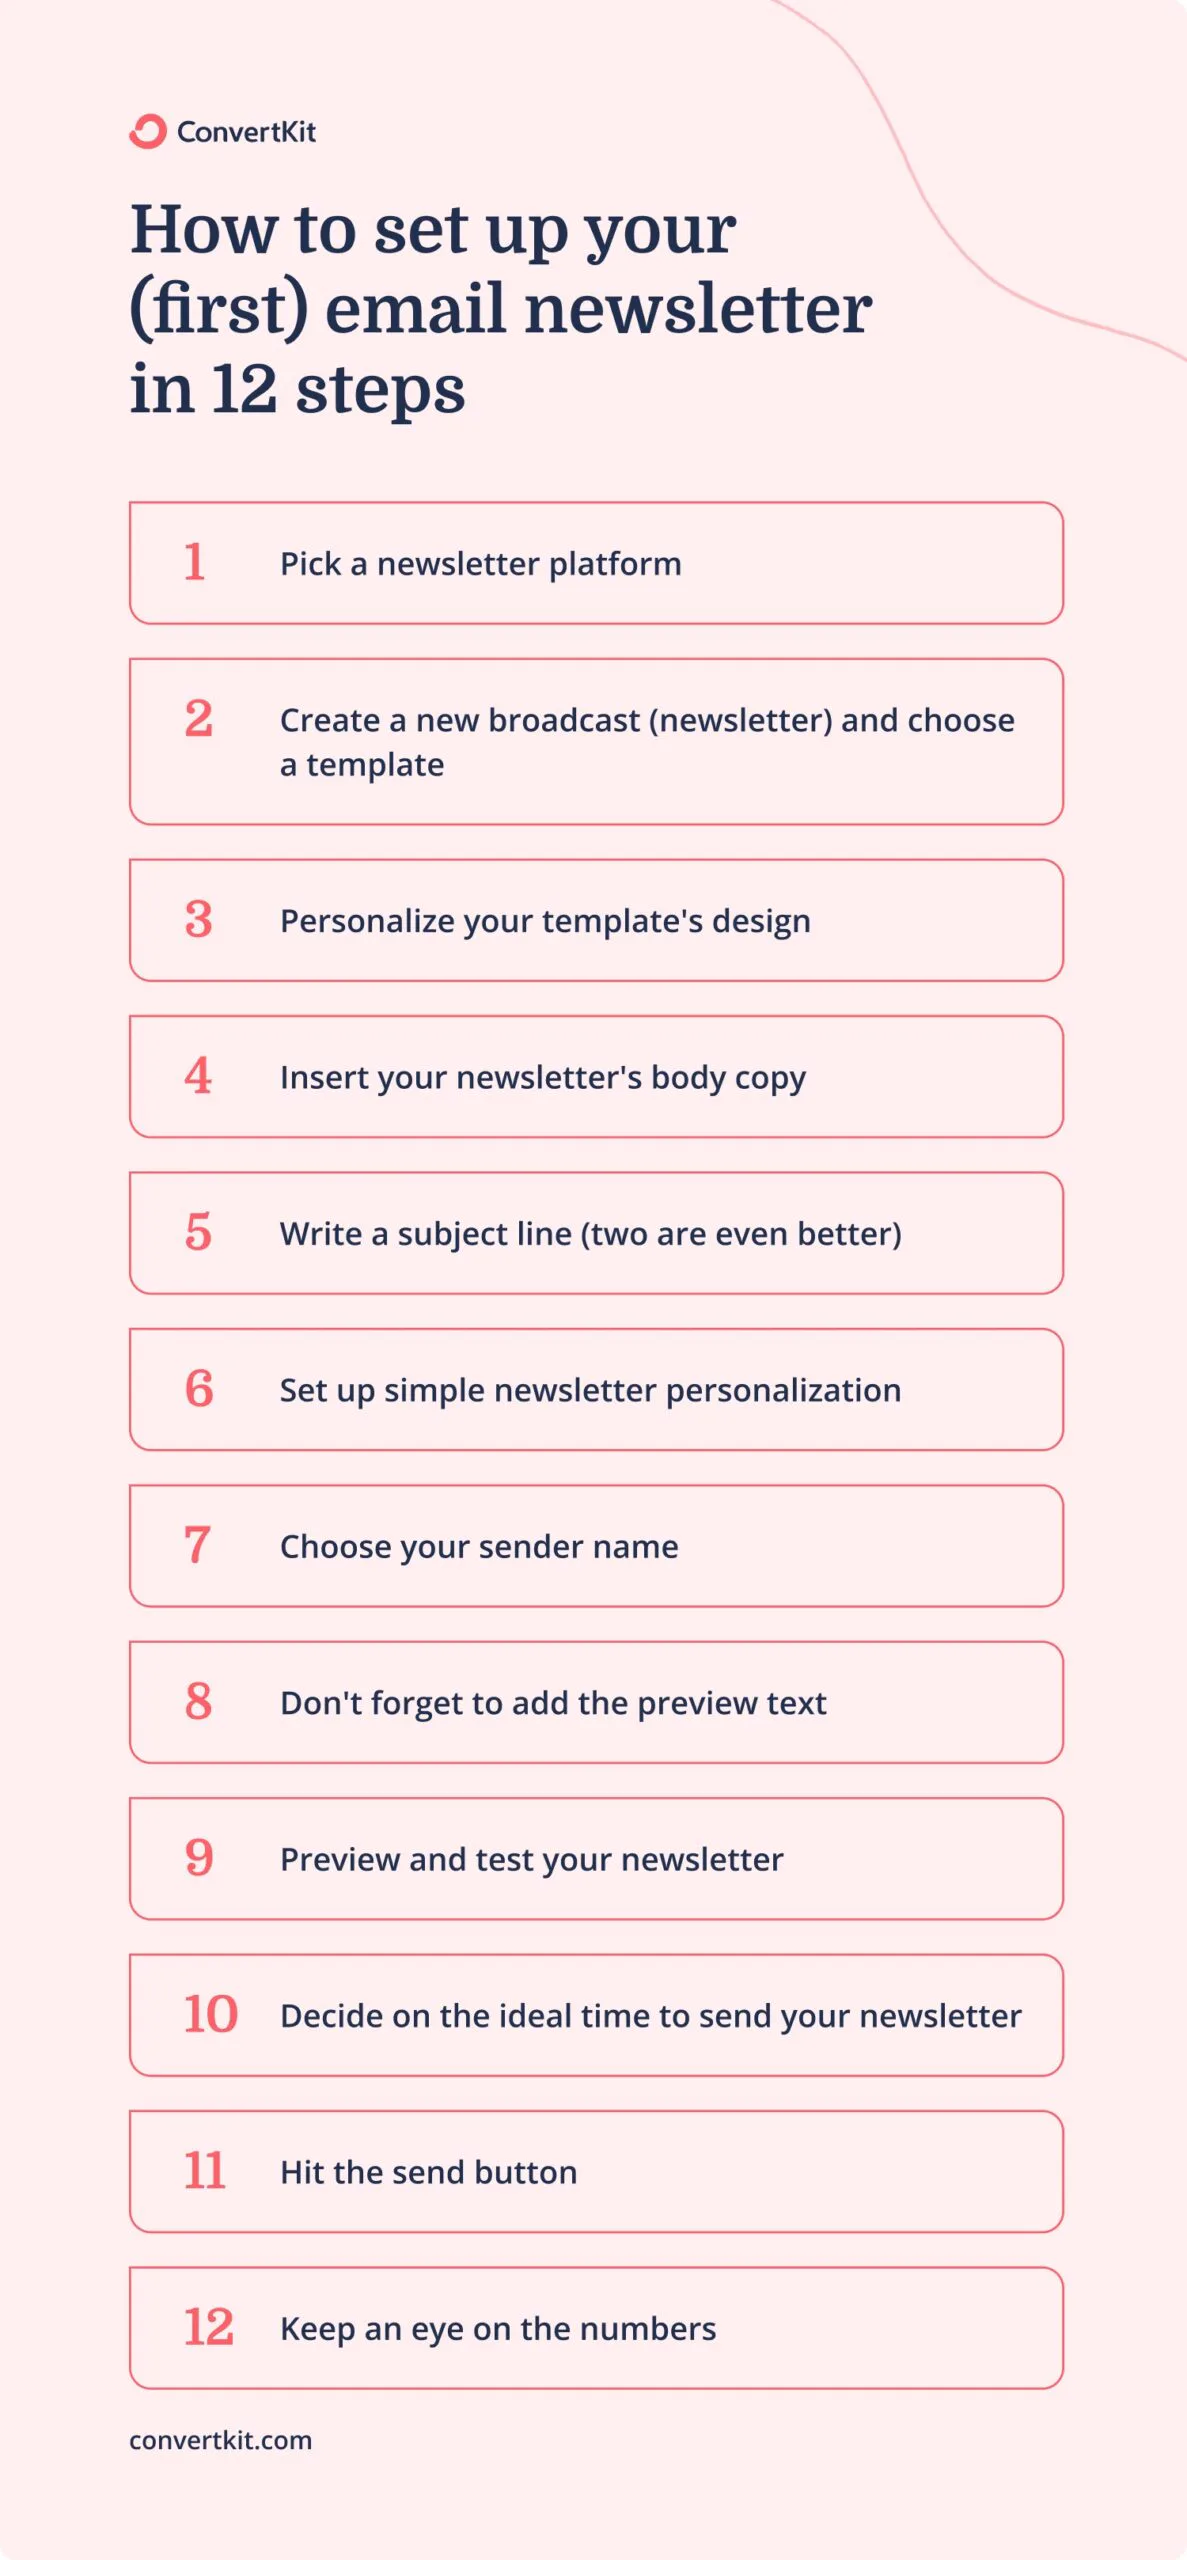
How to set up your (first) email newsletter in 12 steps
You don’t need a huge list to send your first newsletter.
Physical Therapist Nelly Darbois now has 1,400 subscribers, but she sent her first email newsletter to only three people.
Nelly tells me there are benefits to having a small list. Like being able to find your footing and focus on the content of your newsletter.
Plus, it’s less intimidating.
Whether you have one or 100 subscribers, follow these steps to create your first newsletter.
Step #1: Pick a newsletter platform
To start your newsletter on the right foot, make sure you pick the best newsletter platform for your needs.
- Kit is a great option for new and established creators. We offer:
- A free plan to take us for a spin
- Landing pages and opt-in forms
- Templates for landing pages and forms (no design experience required)
- Easy lead magnet delivery
- Subscriber segmentation
- Newsletter templates
- Automations
- Built-in ecommerce
- Paid newsletter.
And more.
Even better, our email delivery rate—the percentage of emails successfully delivered—hovers over 99%. That means you don’t need to worry whether your newsletter will make it to your subscribers.
Step #2: Create a new broadcast (newsletter) and choose a template
Next, you need to create a broadcast—that’s what we call a “newsletter” in Kit’s backend.
To get started, go to Send > Broadcasts.
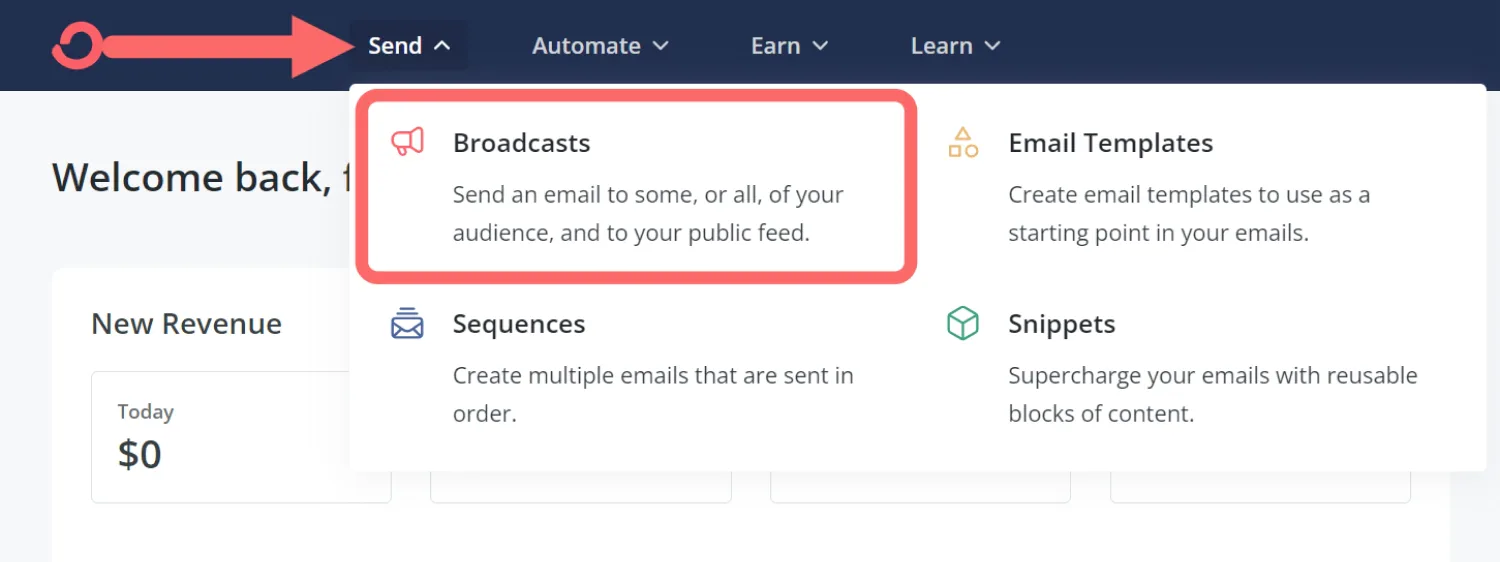
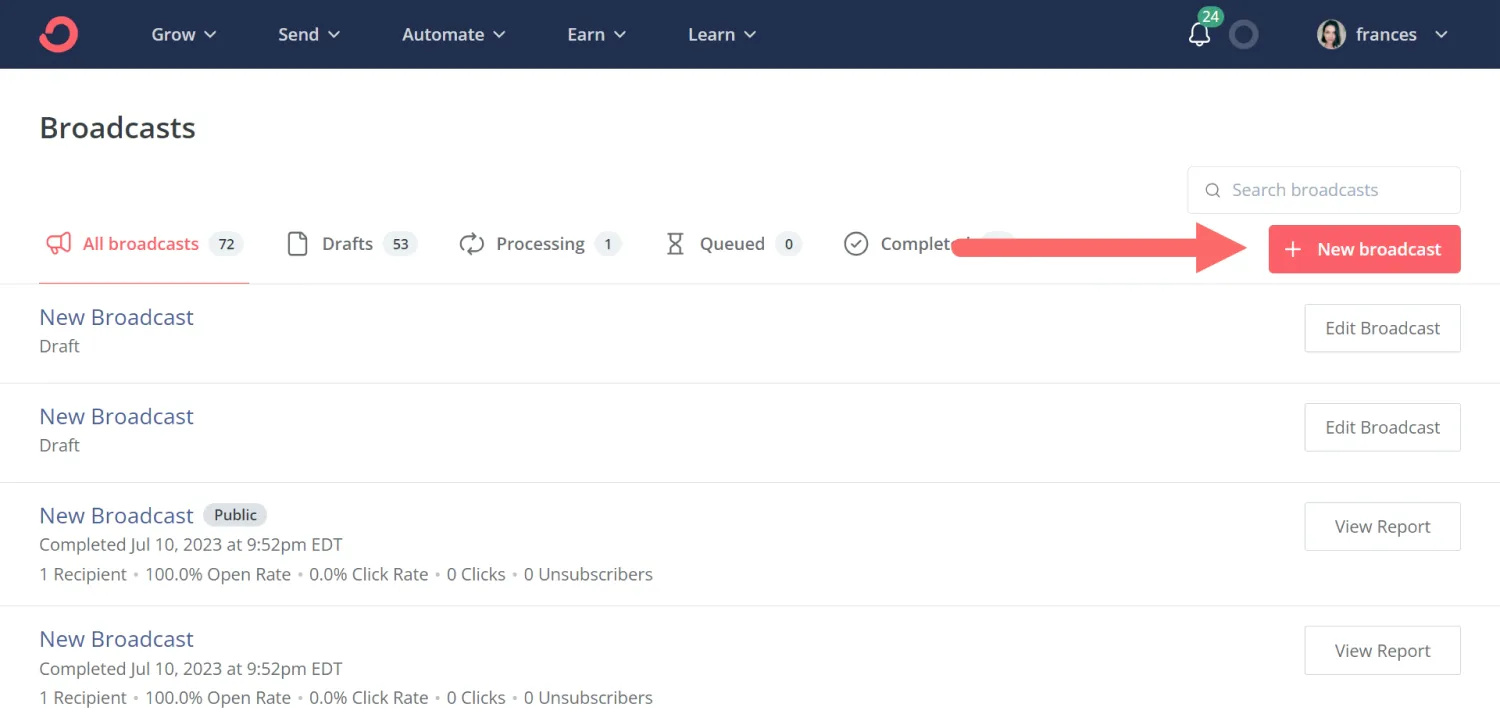
You’ll see a list of all your broadcasts along with their stats. (The stats will populate once you send out your newsletter.)
Then, click the + New broadcast button.
Once in the email designer, click Browse templates.
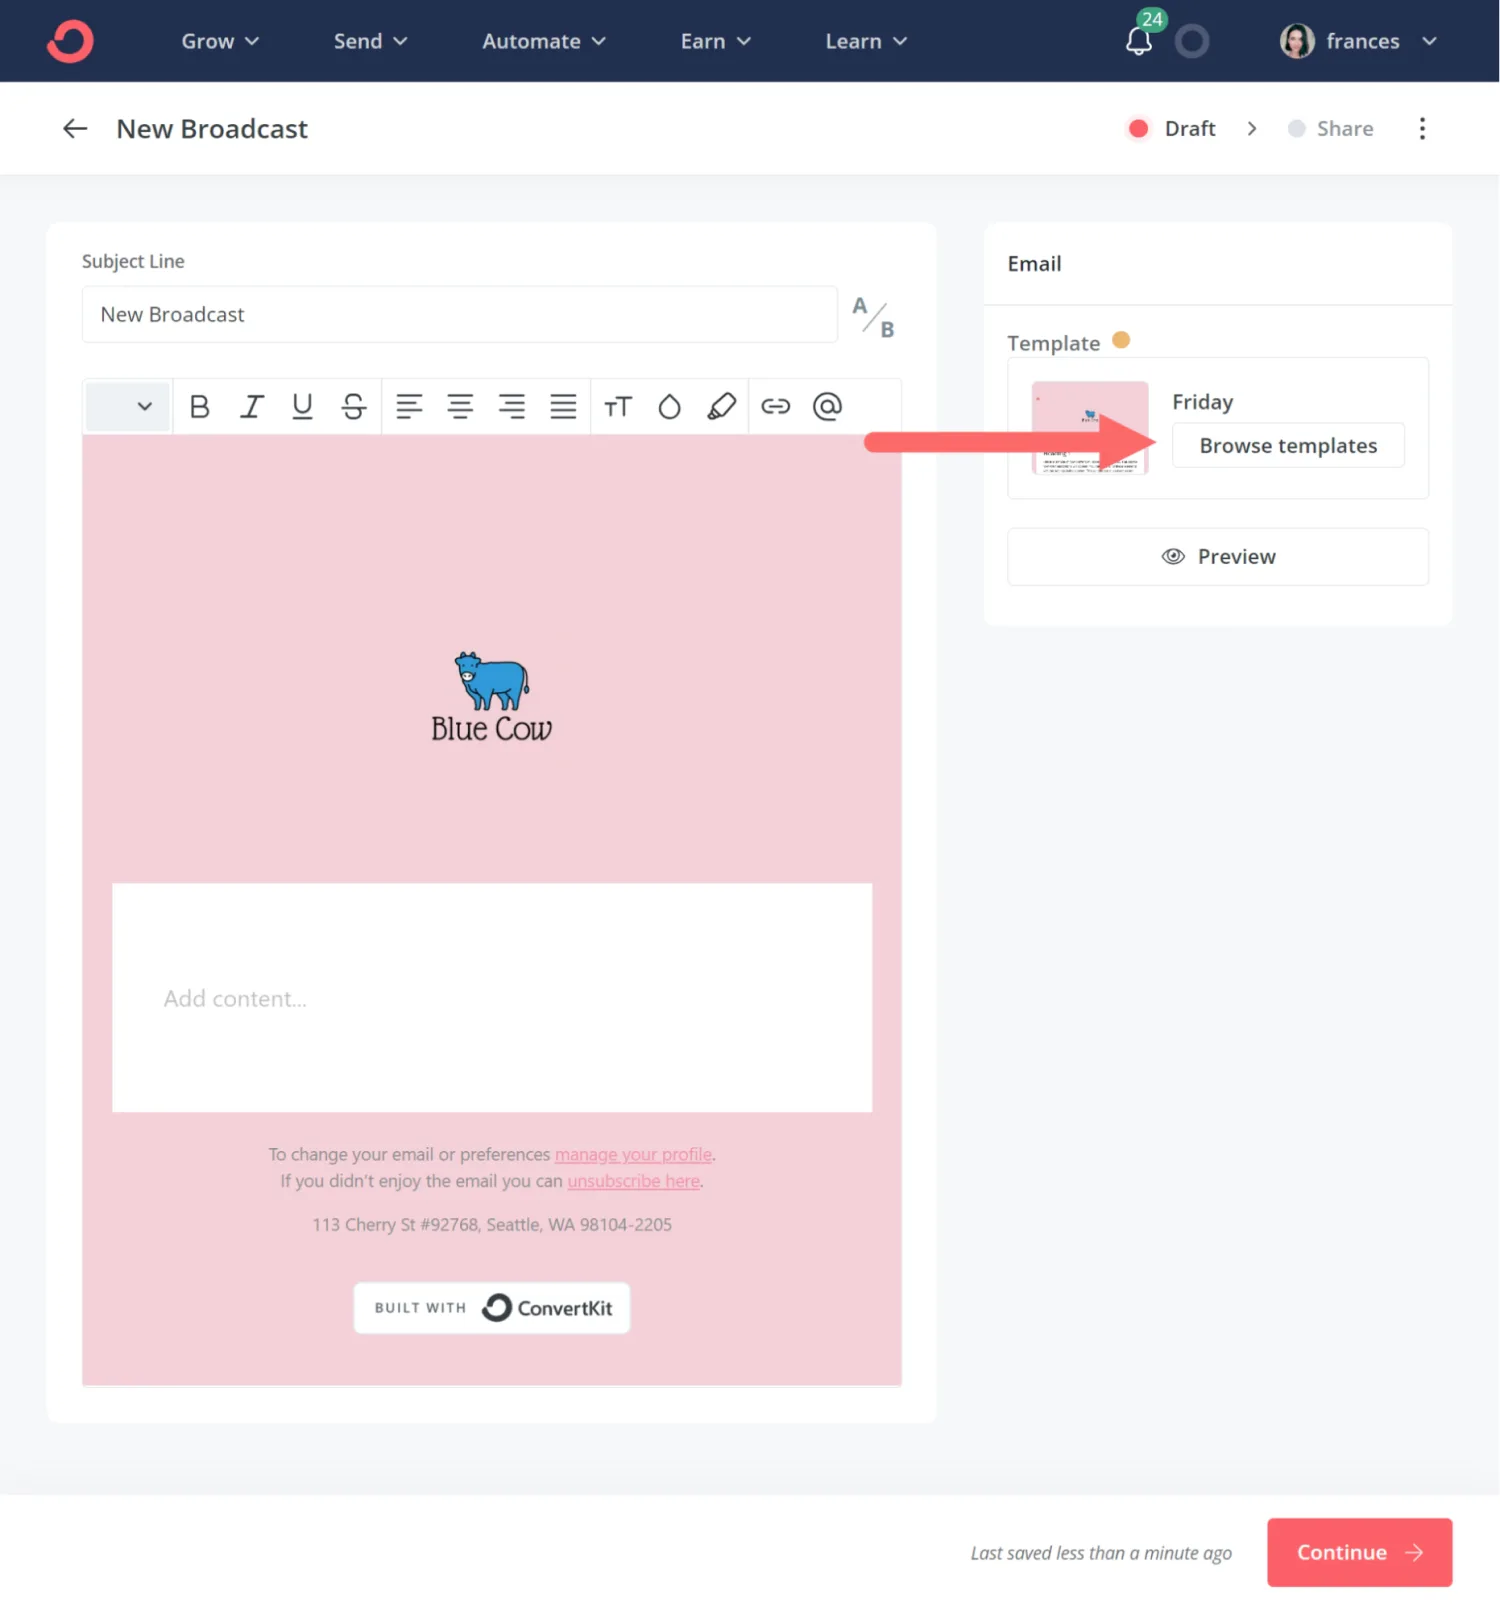
You can choose from a variety of templates that you can personalize to match your brand.
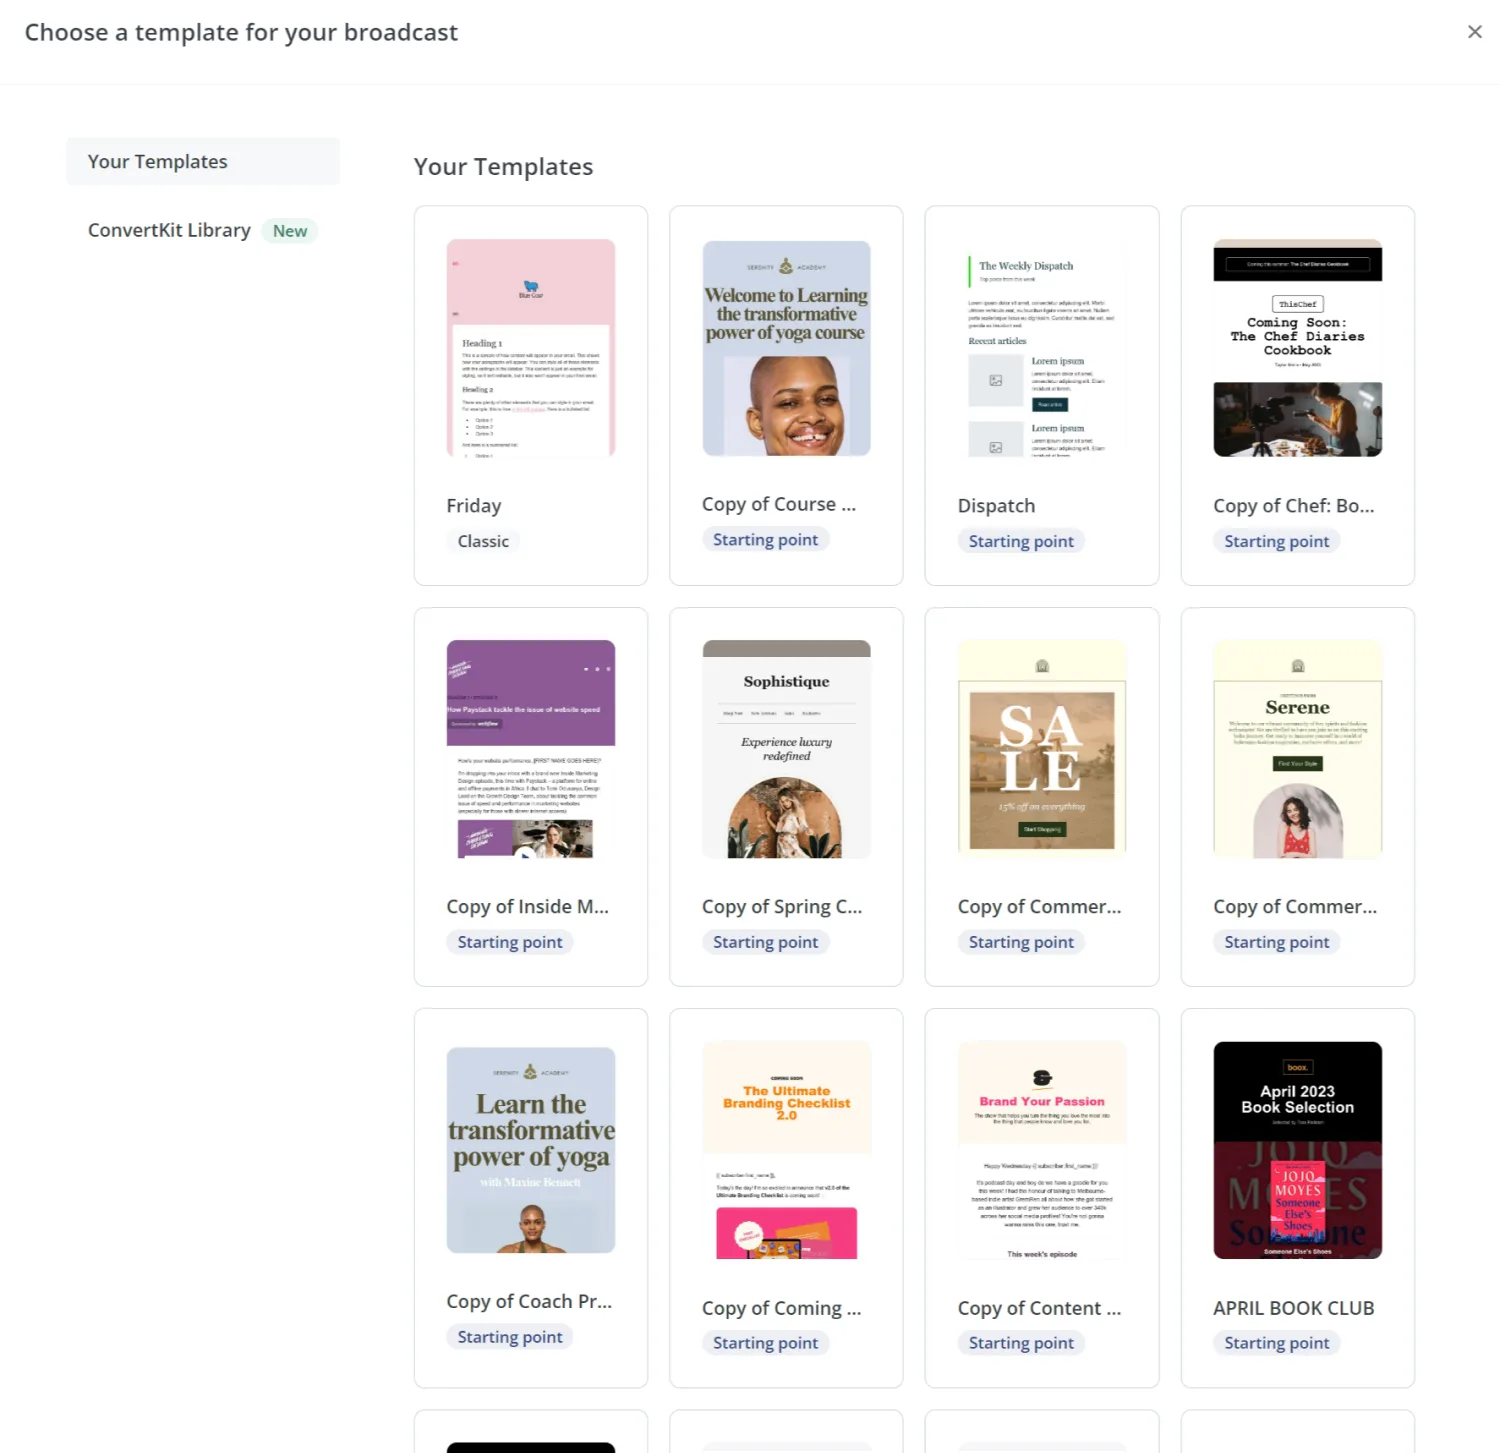
Step #3: Personalize your template’s design
After choosing a template, it’s time to customize your newsletter’s design. For that, head into the right-hand sidebar:
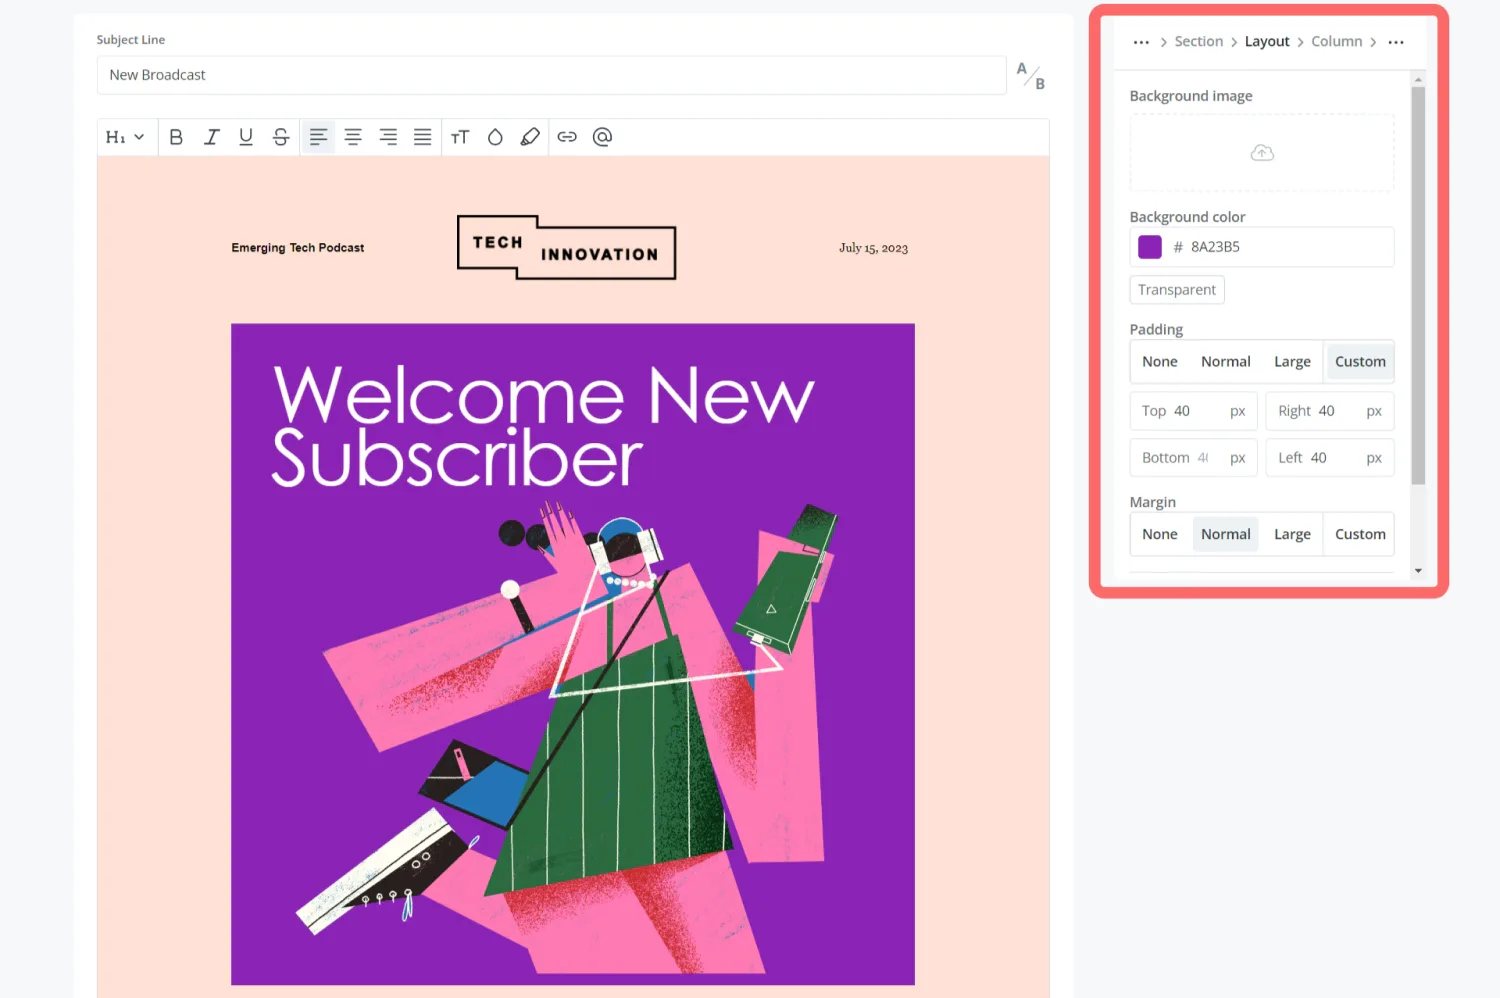
Adjust the font, colors, imagery, padding, margins, and more.
You can even adjust how your newsletter displays on mobile, ensuring it looks fantastic no matter which device subscribers use.
Step #4: Insert your newsletter’s body copy
Next, write your email directly in the newsletter editor. This way, you can see how your email will look and format it to your liking.
Here are a few tips for writing your newsletter:
- Make sure your newsletter content relates back to the goal and topic you set earlier
- Don’t worry about the length—there is no set word count for how long (or short) your newsletter should be. Just make sure you convey the main point effectively.
- Unless you’re curating lots of content, stick to one call-to-action (CTA). The CTA is what your readers should do after they read your newsletter, like click a link.
Step #5: Write a subject line (two are even better)
Your newsletter subject line is arguably the most important element of your email.
After all, if your subject line doesn’t entice subscribers, they have no incentive to open your email.
Play around with different styles of subject lines and see which ones result in the most clicks.
For example, do questions drive up opens? Or maybe adding an emoji will help.
With Kit, you can also A/B test your subject lines. To start, click on A/B beside the subject line input:

This gives you the option to write two subject lines to test.

Kit will send your newsletter to a subset of your subscribers. We’ll monitor which subject line results in the most opens.
Then, we’ll send your newsletter to your remaining subscribers with the winner.
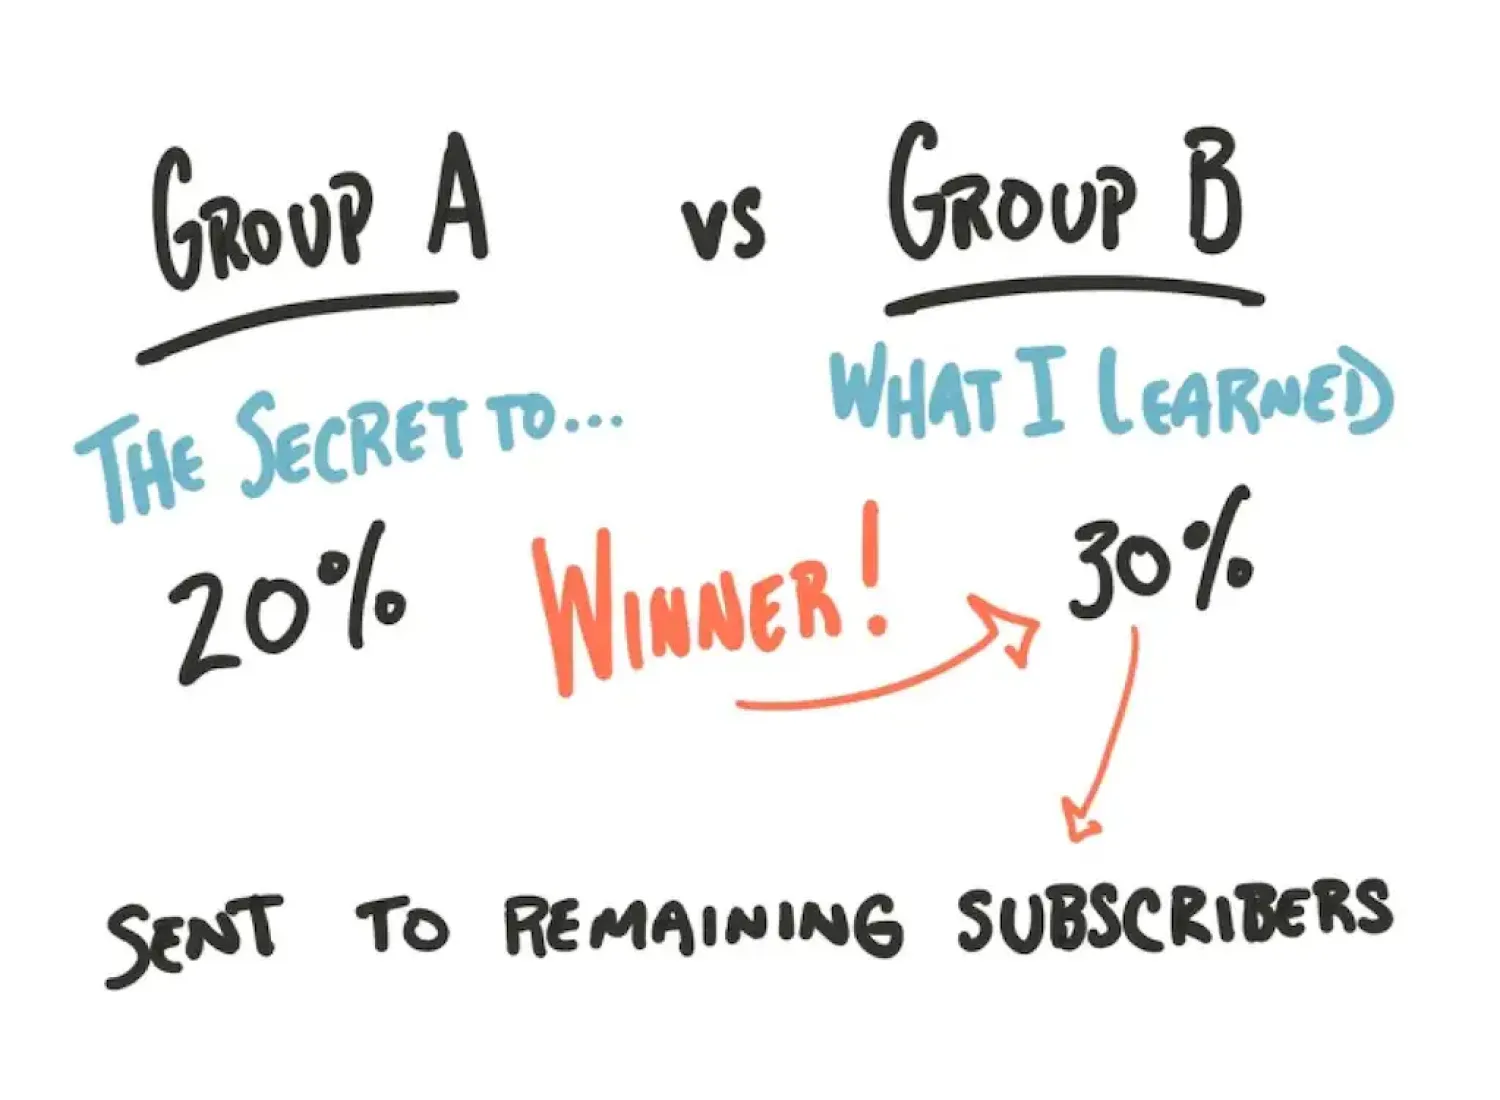
You can feel confident knowing you wrote the most clickable subject line possible.
Step #6: Set up simple newsletter personalization
Personalization provides a human touch to your email newsletters.
And while there are plenty of ways to create personalized emails, when you’re just starting, addressing your subscriber by their name is often enough.
In Kit, click the “@” button to add your subscribers’ first names.
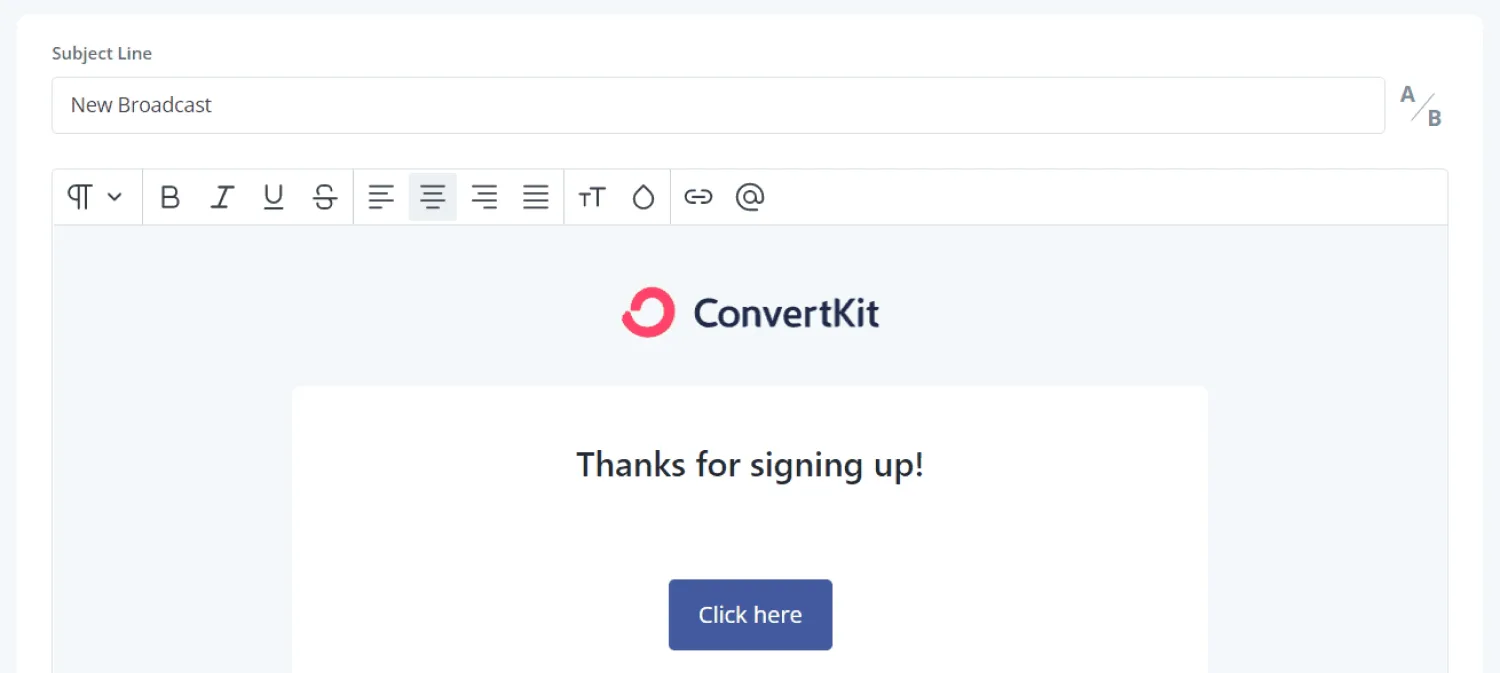
Now every time you pop into their inbox, it will feel like they’re getting an email from an old friend.
Step #7: Choose your sender name
A good sender name—the name that shows in an inbox—helps subscribers recognize your emails:

Make sure your sender name is the name you go by—whether that’s your full name or a brand name—so people know who you are.
Update your sender name in Kit by going into your Settings. Click Email and then click the pencil icon:
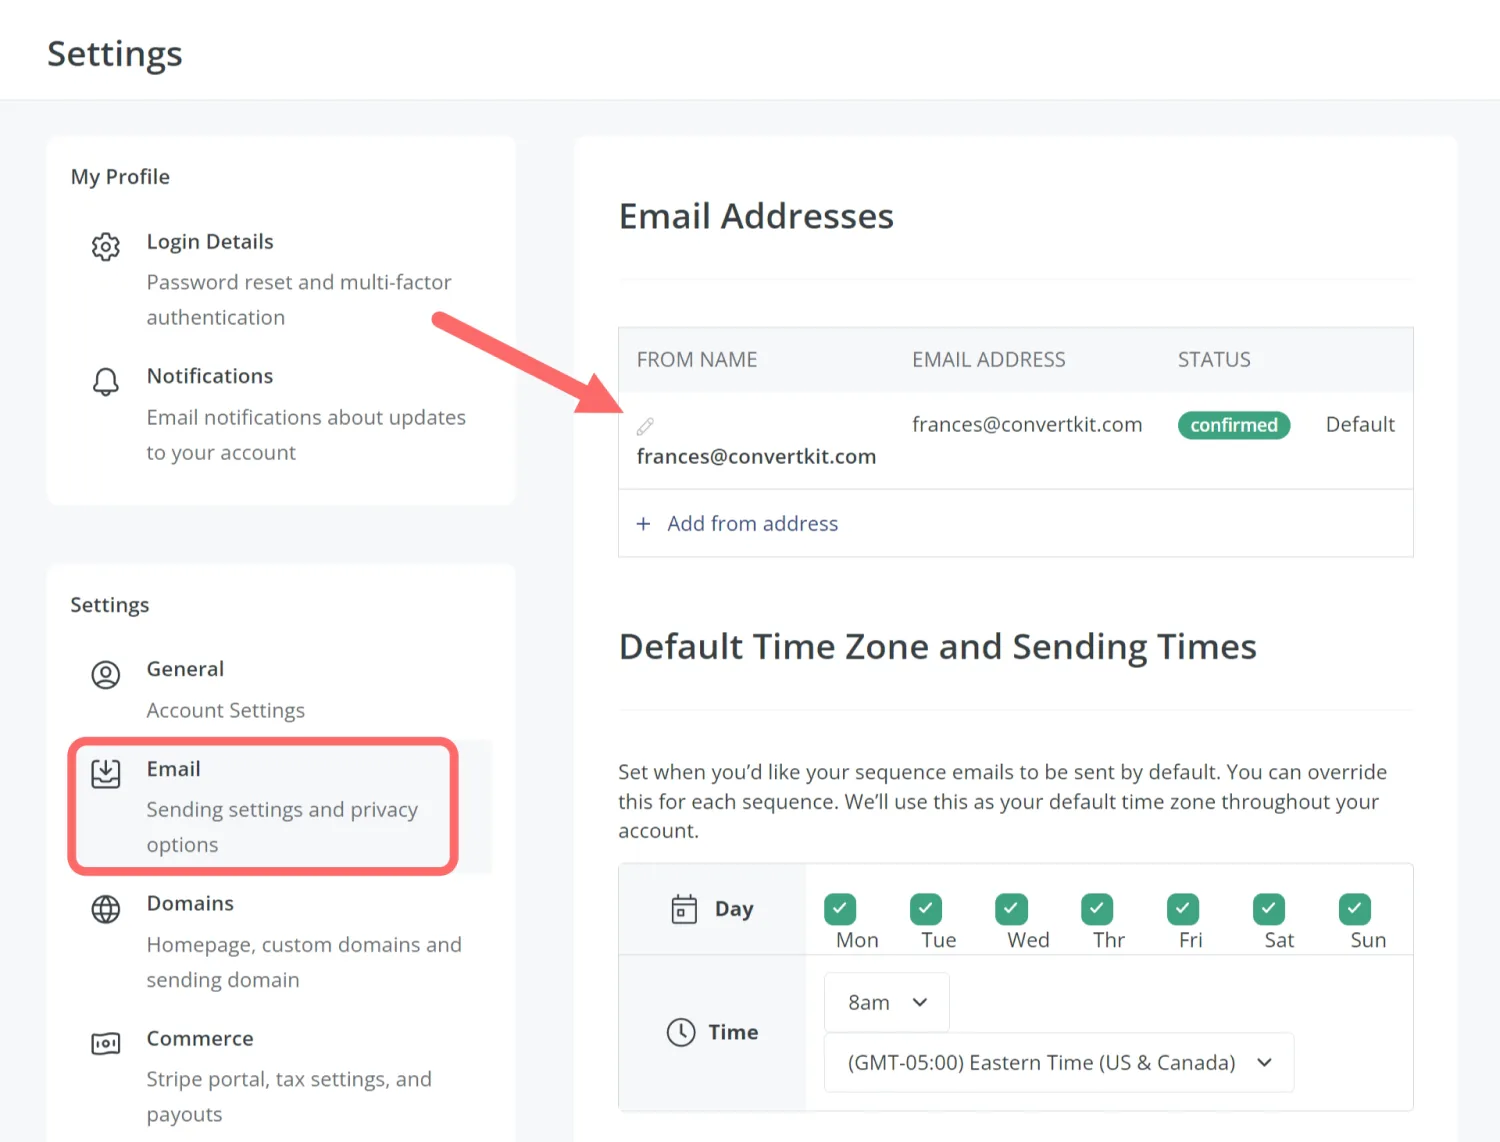
Then update your name as you’d like it to show in your subscribers’ inboxes and click the checkmark icon to save.

You should also send your emails from a branded domain instead of a generic email address (like Gmail).
A branded domain bumps up your credibility and helps you stay recognizable in your subscribers’ inboxes.
Step #8: Don’t forget to add the preview text
Preview text—the text that shows a preview of your email—is a powerful element. Use it to pique your readers’ curiosity and increase open rates.

To add preview text, click the Share tab in your broadcast email.

Then, under Advanced options fill out your preview text.
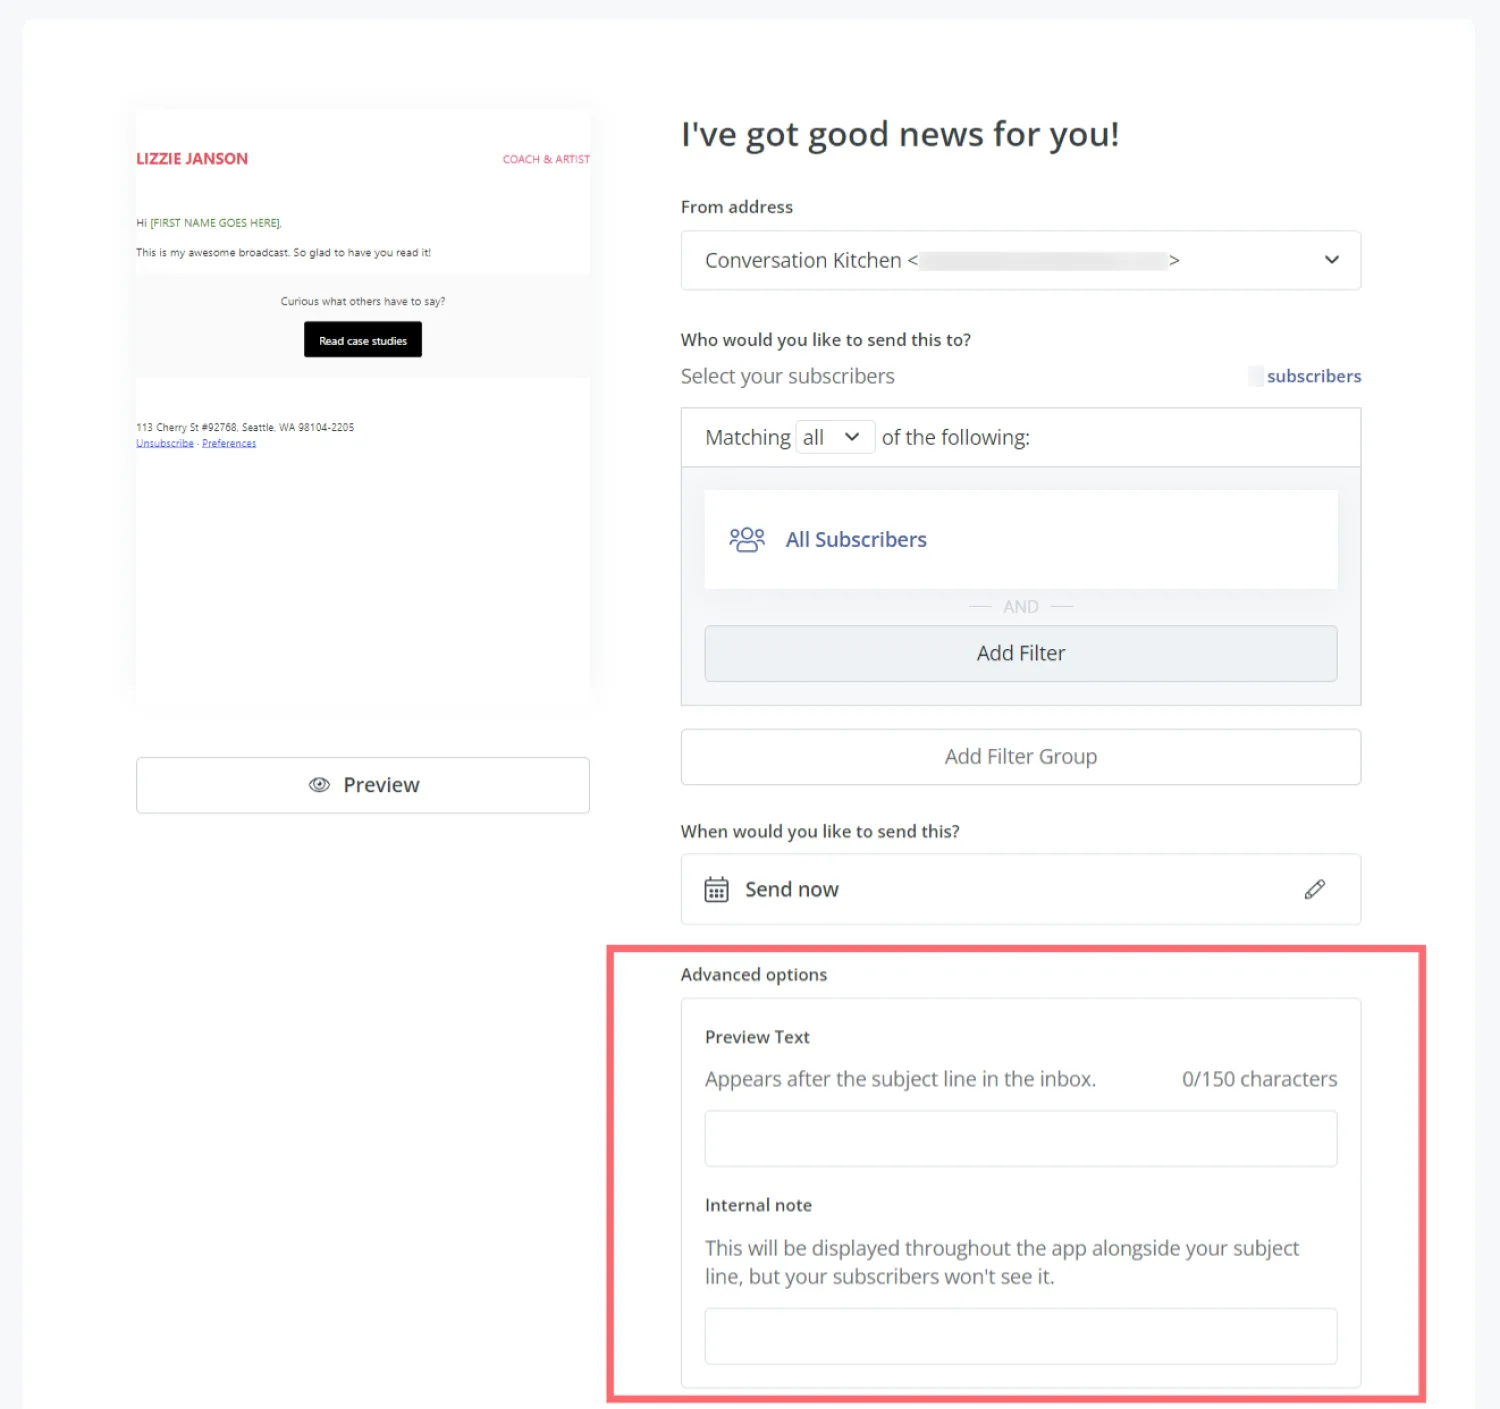
If you’re stuck, use a tool like ChatGPT to help you come up with preview text.
Copy and paste your newsletter to ChatGPT and ask it to write five to ten variations that are 150 characters or less. (If it’s longer than that, you risk it getting truncated.)
Step #9: Preview and test your newsletter
You want to make sure your newsletter makes it to your subscribers and looks great when they open it.
Before hitting send, double-check your newsletter on desktop and mobile devices by clicking the Preview button.
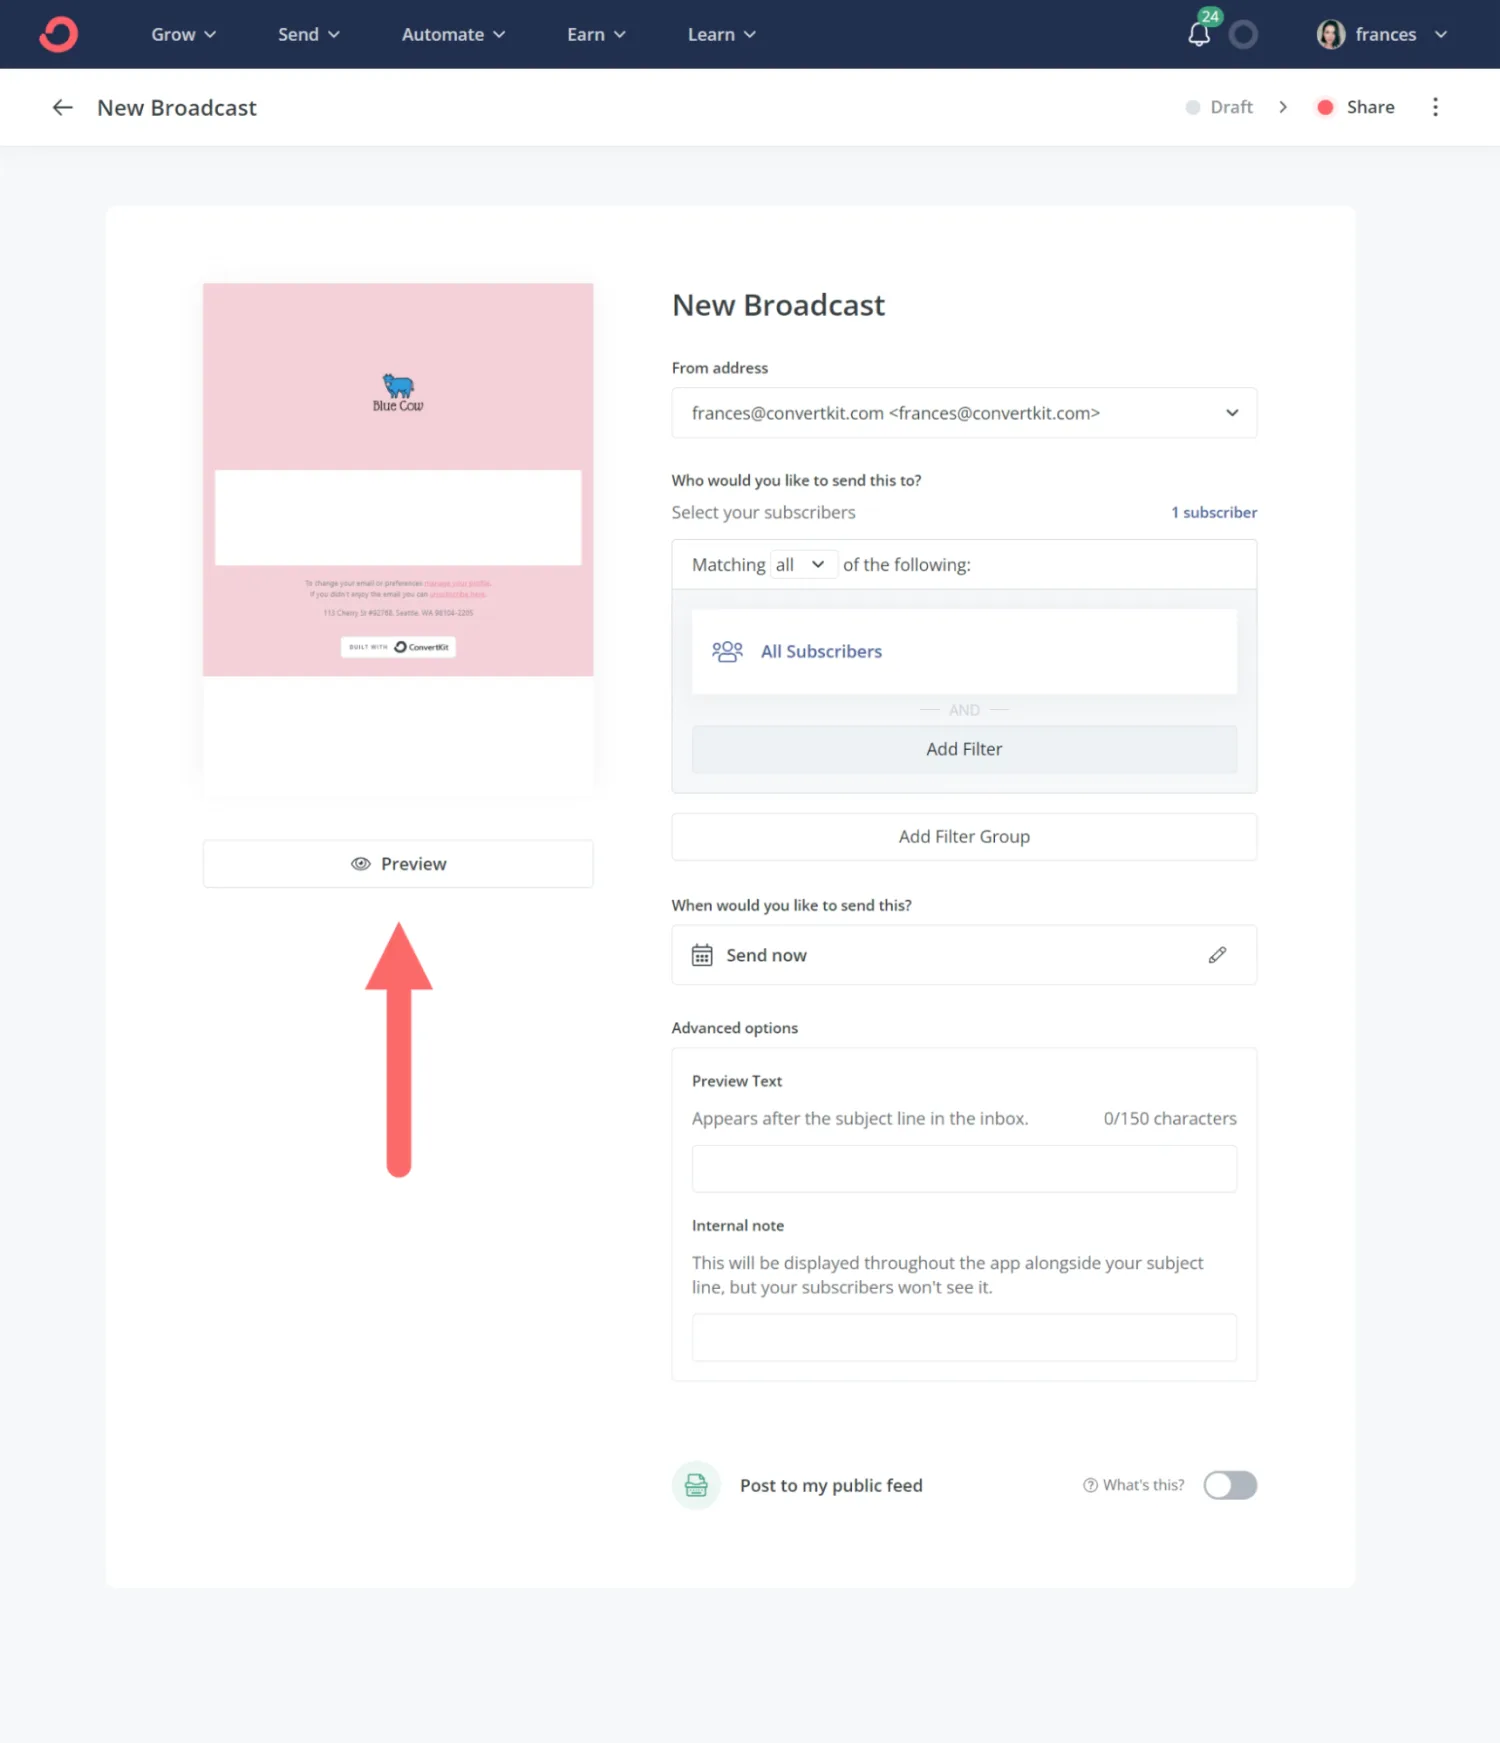
You can choose to preview your newsletter as a subscriber and through a test email.

Previewing as a subscriber lets you make sure your name tags and other personal elements work properly.
Next, send a test email. This way, you can make sure there are no errors preventing your newsletter from sending.
By sending a test email, you can also open your newsletter on different devices and check that it looks flawless.
Step #10: Decide on the ideal time to send your newsletter
Sending your email at the right time helps ensure more people open and read it.
Based on our research from various email marketing sources, we found the best time to send an email is Tuesday around 10 am. Typically, that’s when open rates are the highest.
But that might not be the case for you. You should experiment to pinpoint your ideal sending time.
For example, if you share weekly meal ideas, you’d want your emails to make it to subscribers before they go grocery shopping on the weekend (so they can use your meal ideas to inspire their grocery lists).
That means Tuesday at 10 am might not be the best time for you.
Using your broadcast analytics (found if you go to Send > Broadcasts) you can review your newsletters’ open rates to see which days and times yield the highest opens:

Play around with different days and times until you find the one that gives you the highest open rates.
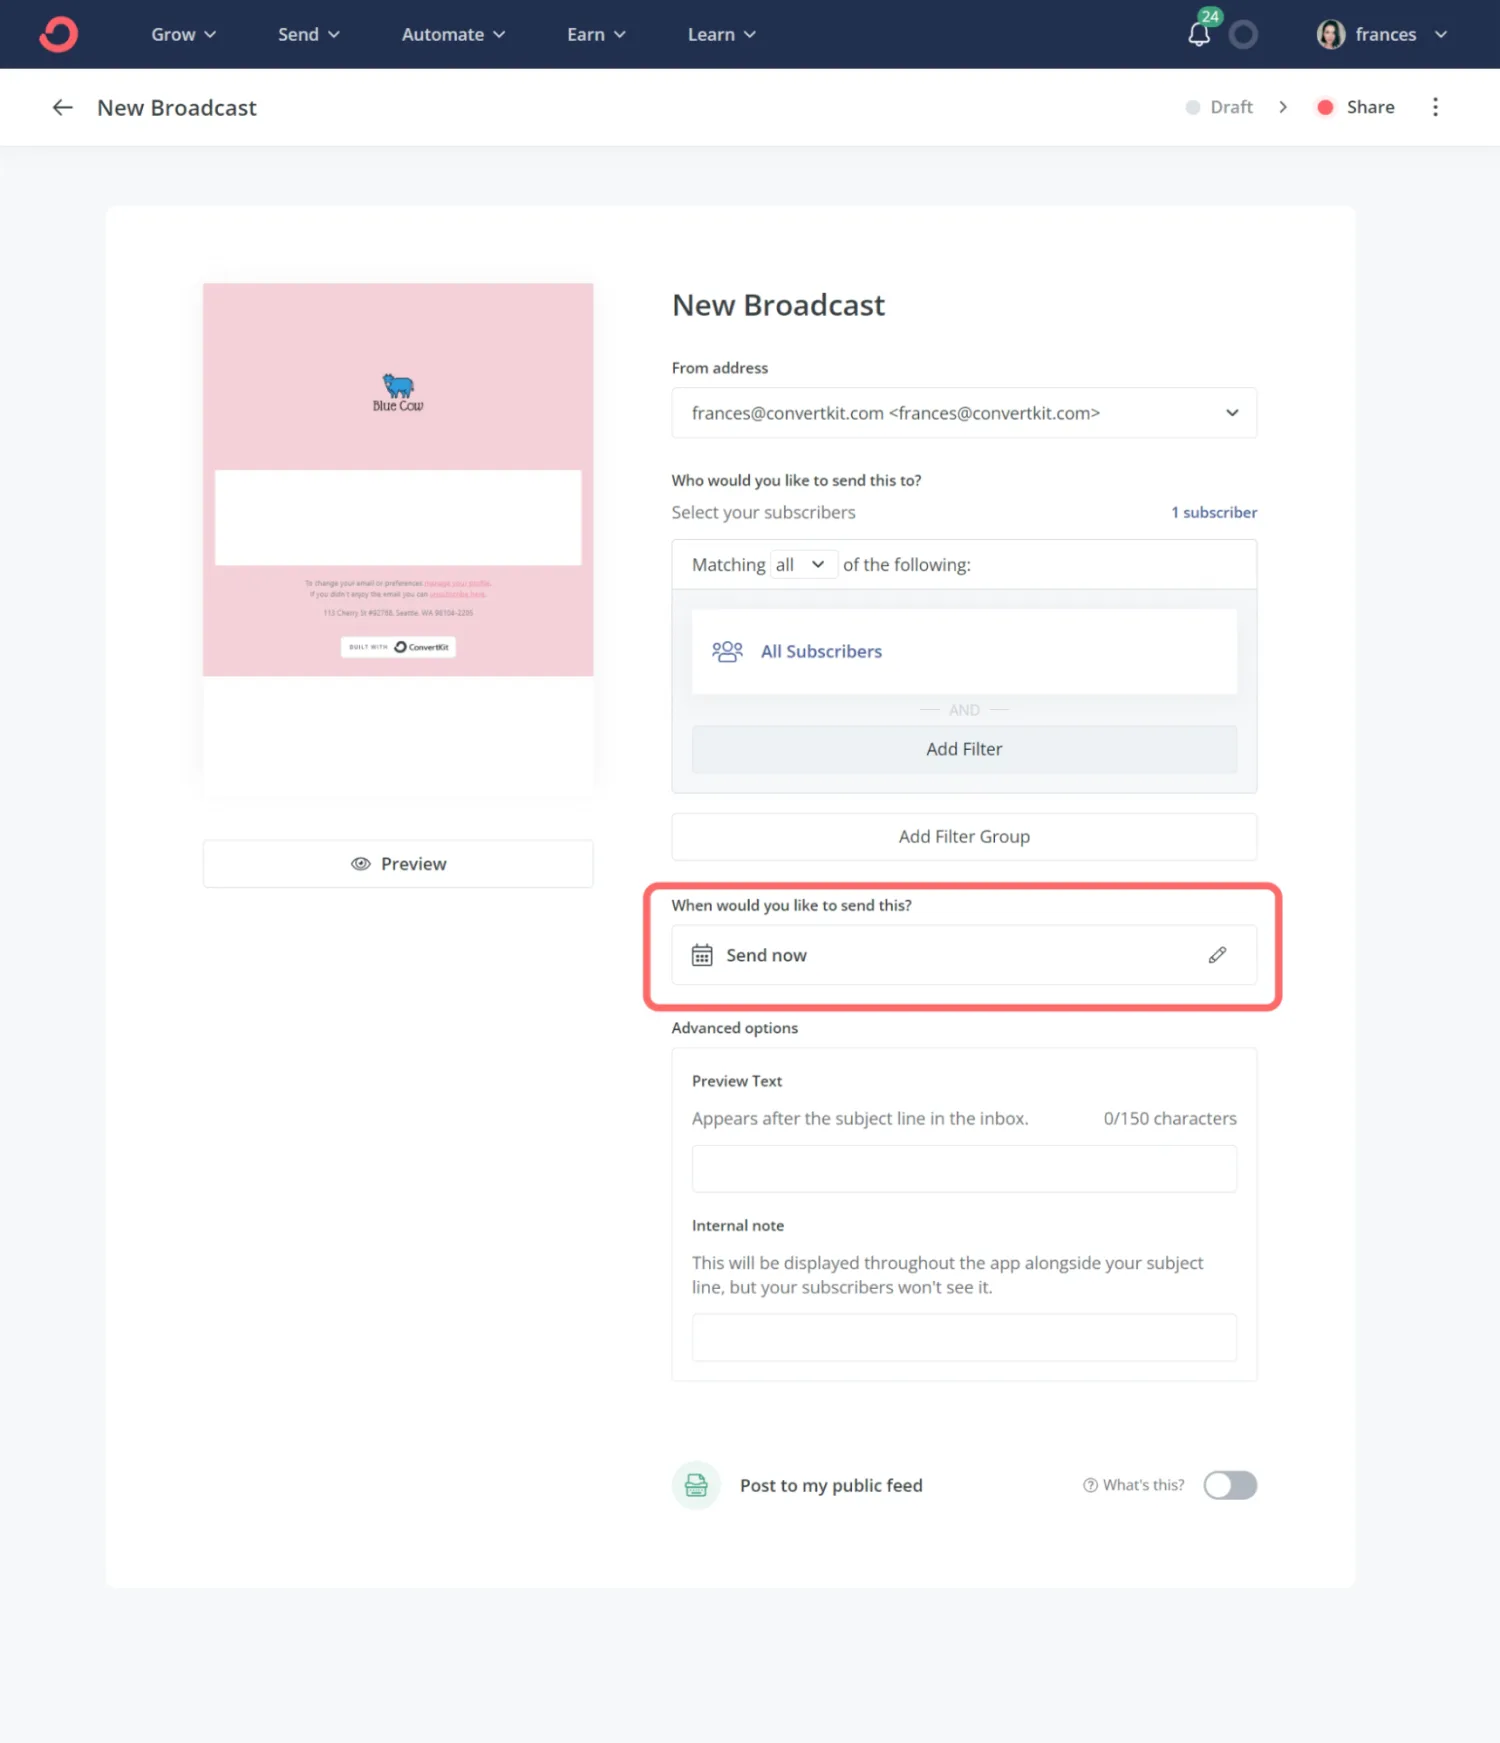
Step #11: Hit the send button
After confirming everything is in tip-top shape with your newsletter, you’re ready to blast it off (or schedule it for a later time).
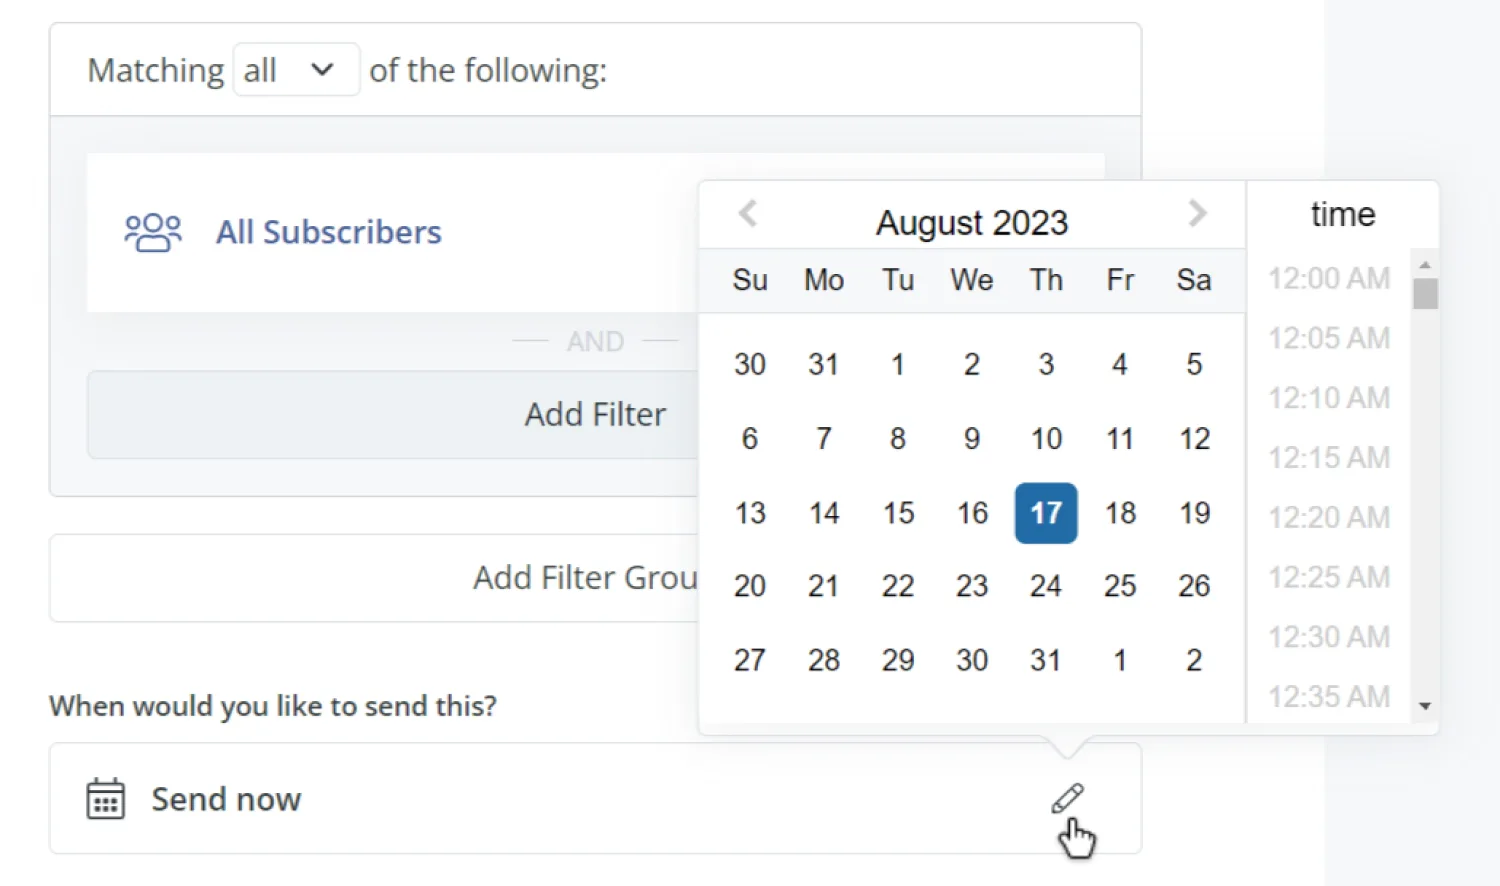
To schedule your newsletter for a later time, click the pencil icon beside Send now.
Then, choose your date and time.
Step #12: Keep an eye on the numbers
Keeping a watchful eye on key performance indicators (KPIs) helps you identify what you’re doing right and how to improve.
For example, if you notice your click-through rate starts to fall (the percentage of people who click a link in your emails) you’ll want to take a look at the CTAs in your emails. Are they clear? Do subscribers know what to click?
Some important email marketing metrics to track are:
- List growth rate: How fast your list is growing
- Unsubscribe rate: The percentage of people who unsubscribe from your emails
- Open rate: The percentage of people who open your emails
- Click-through rate: The percentage of people who click the links in your newsletters
- Spam rate: The percentage of subscribers who mark your emails as spam
7 reasons you should start a newsletter today
Aside from being an enjoyable way to grow your business, there are a few more reasons why you should start a newsletter:
- Audience engagement: Email marketing results in a highly-engaged audience. Why? Because people who’ve signed up for your list want to be there and hear from you. With a newsletter, you can increase audience engagement, which can help you sell products down the road.
- Content distribution: You have content that needs distribution. Newsletters give you direct access to your audience so you can easily distribute your content. No pesky algorithms getting in your way.
- Sales funnel automation: With automated email funnels you can develop a reliable and scalable process to grow and monetize your email list.
- Marketing psychology: Studies have shown that repetitive marketing messages increase brand perception. An email newsletter accomplishes this by allowing you to continually stay in touch with your audience.
- Engage site visitors: Opt-in forms collect site visitors who might otherwise bounce from your site (and never return). You can then warm up these visitors and turn them into customers down the road.
- Sense of community: Signing up for a newsletter instantly makes someone feel more “plugged in” to an online community, especially if it offers exclusive deals, and encourages referrals.
- Creates new revenue streams: Paid newsletters allow creators to monetize their content and establish a direct connection with subscribers, boosting income and creativity.
Create your next email newsletter with ease
You now know how to start an email newsletter.
Every time you hit “send” you have the opportunity to strengthen relationships, share valuable content, and open doors to more sales.
Ready to try it for yourself? Create your newsletter with Kit, for free.


