In this Article
Ready to grow your creator business?
Creators like Marie Poulin and Justin Moore make tens of thousands of dollars a month with online courses and products.
However, it takes time and effort to create, launch, and market a successful course.
This essential guide teaches you everything you need to know about how to create and sell an online course, including how to price, where to publish, and how to promote.
Is selling an online course profitable?
Yes! Selling online courses is profitable.
76% of creators made income last year through various digital products, and Kit Commerce users have surpassed $10 million in sales.
While creating an online course isn’t a guaranteed one-way ticket to financial freedom, the relatively low cost of creating your first course and free marketing strategies make it an exciting opportunity to grow your business.
How to create your online course
A new course is an opportunity for a new income stream. So it’s important to properly plan your content and ensure high-quality production so that your course is worth your audience investing in.
Here’s how:
1. Research and validate your topic
It all starts with an idea. Setting and validating your course topic before you write a single outline or record a welcome video helps you do the best work the first time.
A lucrative course idea is one that:
- Excites you. After all, you’re going to spend hours creating and marketing it!
- Helps your audience. The topic and lessons need to do something valuable for your audience, like help them get organized or learn a new skill.
- Is worth paying for. This seems obvious, but it’s important to consider which content ideas are best for small, free lead magnets versus paid online courses.
Since your online course needs to work for both you and your audience, look for where the two intersect to find course ideas.
Inspiration for topics can come from:
- Your most popular blog posts
- The lead magnets that drive the most new sign-ups
- Questions your audience asks below blog posts or in response to emails
- Comments left below videos or book reviews in your niche that mention what they wish they had learned
Once you have a short list of online course ideas, validate them. It’s tempting to skip this step and go straight into planning when you’re excited about an idea, but a little effort at this stage can mean the difference between a fortune and a flop.
Here’s how to test whether your topic would make a profitable course:
- Set up a landing page: Use a link trigger to collect email addresses for people who are interested in a course on that topic to gauge interest.
- Survey your audience: Ask them what they want to learn or if your topic resonates.
- Look for existing courses: Are there any on a similar topic (that you can add your own twist to!) that sell well?
2. Write the outline for your digital course
Course outlines let you know what content to create and record so you don’t accidentally forget important details in your lessons.
It’s helpful to start your course outline with high-level milestones and then fill in the details later—sort of like how you need to frame a house before installing kitchen tile.
Start with three to eight steps that take brand-new students to the end of what you want to teach them—these are modules.
For example, suppose you teach students how to bake their own wedding cake. In that case, you may have modules for designing the cake, buying supplies, mixing the batter and frosting, baking the cake, assembling the cake, and adding final decorations.
Next, break your modules into lessons. Don’t assume anything about your audience’s previous knowledge or experience. Break down a single step into smaller bite-size chunks that give them the literal roadmap.
If we go back to our wedding cake example, the designing a cake module could have lessons on popular cake shapes, how to calculate how much cake you need to feed guests, and basic tips for making a structurally sound sweet.
As you outline your modules and lessons, keep in mind:
- More isn’t always better. It might seem like more lessons means more value, but it could overwhelm students.
- People like it bite-sized. If each lesson could only be 3-15 minutes long, would you break it up even more so people could skim through and find what they need faster?
Template for online course outline
Let’s look at the wedding cake course example even more—here’s what a full outline would look like.
Module 1: How to Design Your Wedding Cake
- Lesson: Five popular cake styles
- Lesson: How much cake do you need?
- Lesson: Adding structure to your design
Module 2: Buying Supplies To Make Your Life Easier
Module 3: Prep Your Batter and Frosting
- Lesson: My basic cake recipe
- Lesson: How to switch up your flavors
- Lesson: The two types of frosting I recommend
Module 4: How to Bake Your Cake to Perfection
- Lesson: Prep your pan
- Lesson: Baking tips
- Lesson: Troubleshooting common issues
Module 5: Assemble Your Cake Layers (No Engineering Degree Required!)
- Lesson: Chill and prep your cake
- Lesson: How to add supports
- Lesson: Applying the right amount of frosting
Module 6: Adding final touches
- Lesson: How to pipe three basic designs
- Lesson: My favorite edible additions
- Lesson: How to transport your cake on the big day
3. Choose your online course format
Online courses come in all shapes and sizes. You can teach each lesson using written materials, video lessons, recorded audio lessons, a slideshow, a live workshop or webinar, or even a combination of some (or all!) of them.
Video lessons are usually the most engaging course content—video is a great way to build a lasting relationship with your students, giving your course a “premium” feel (and letting you charge more for your course).
Unfortunately, video is also the most time-consuming format to create and edit.
Text is the opposite. Written materials are easy to produce and edit—in fact, you can put together an email course in a single weekend.
Compared to video, though, text is less engaging for your students.
Consider some of the following questions when choosing a format for your course:
- What format are you most comfortable creating? Do you love being on camera, or are you already a strong writer? Try to leverage your skills and personal interests to choose the best course format.
- Think about how your students like to learn. Do they prefer reading material at their own pace or binge-watching lessons and applying all their learnings at once?
- Consider the types of lessons you’re teaching. If you’re showing someone how to master a skill or perform an action, video is the obvious choice. Written might be a better option if your students need to refer back to your material regularly.
Pro tip: Mix and match different formats to get the best of both worlds. For example, Shawn Blanc originally released The Focus Course with one introductory video for each module plus written lessons. After the course started selling, he revised the material with video lessons for each course.
4. Create your online course materials
Now that you have your outline and chosen course format, you’re finally ready to begin creating your course!
Pick one of the lessons from your course outline and jot down all your ideas for that lesson. You don’t have to create each lesson in order. It’s okay to start with the lesson you know the best or the lesson you find the most interesting.
After you’ve outlined the lesson, either flesh out your outline into a complete written lesson or use your notes as the basis for your first video lesson.
A few more things to think about as you begin creating your course material:
- You don’t need all the fancy video gear to get started. In fact, you probably have everything you need in front of you right now. Start with just your webcam or phone camera, then re-invest revenue from your course into new gear as your course starts to sell.
- Look for opportunities to add even more value to each lesson. Extra materials like workbooks, live sessions, community access, and high production quality all allow you to charge a premium for your course, helping to make your investment worthwhile.
Rinse and repeat for every lesson until your course is ready to publish!
Where to publish and sell your online course
Once you’ve created all your materials, you’ll need a way to get them into your customers’ hands and get paid for all your hard work.
The three choices for publishing your online course are hosting it on your website, using an online course platform, or adding it to a course marketplace.
1. Sell online courses from your own website
Selling an online course on your website gives it a home amongst all your other content, and technical setup doesn’t have to be difficult. This route lets you reap the benefits of SEO on your sales page, reduce fees associated with external tools, and avoid having to stand out side-by-side with your competition.
Now, for the technical details. There are two ways to accept sales on your site: self-hosting or using a tool like Kit Commerce to manage sales.
Self-host
Self-hosting can help you save a few dollars, but it is often a complicated option, especially if it’s your first time taking an online course.
There are several different ways to self-host your own course:
- Create a members portal yourself: if you’re a coding whiz, build your own members portal to house your course.
- Hire a web developer: if you don’t know how to code, hire a web developer to work with you. The price ranges for custom websites. As a reference, Web Design Island builds custom membership websites starting at $2,800.
- Use a plug-in: Popular WordPress plug-ins like Memberpress, WP Courseware, and aMember will help you create an online course platform DIY-style, although this can still be fairly time-consuming.
On top of building out your own members platform, you also need to build checkout pages and connect those pages with secure payment processors. All of this can be expensive or time-consuming (or both).
Use Kit Commerce
If you want more control and higher profit margins (and who doesn’t?!), the best option is to sell online courses from your own website.
With Kit Commerce, you can create landing pages, collect payment, and deliver your course content all in one platform, straight from your site (no coding required)!
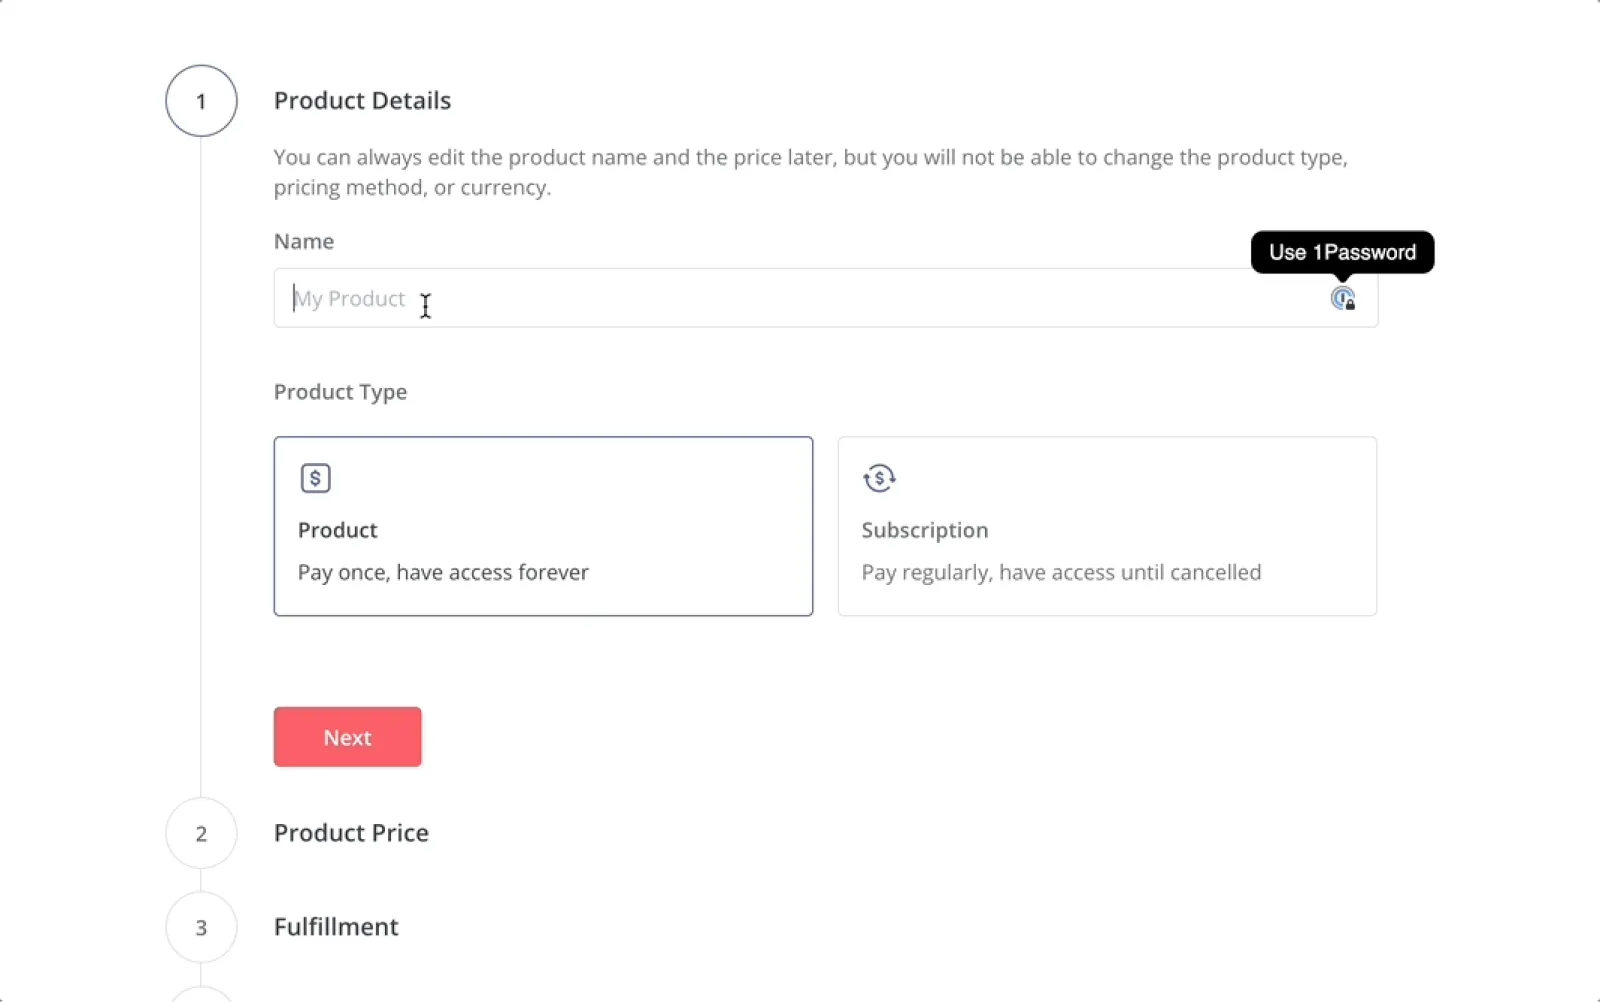
And because Kit Commerce isn’t limited to online courses, you can use it to sell all your digital products. It’s the perfect option if you plan to grow your offerings in the future or if you have multiple digital products you’d like to sell right now. Setting up a course on Kit Commerce is easy:
- Click ‘Create a product’ from the Products page
- Fill in your course details, like the name and price
- Decide how to deliver your course—either as a digital download with all course materials in a zip folder or through a students-only email sequence
- Set up a domain name for your product listing
- Add a product image and description
- Personalize the checkout and confirmation experience
2. Consider online course platforms
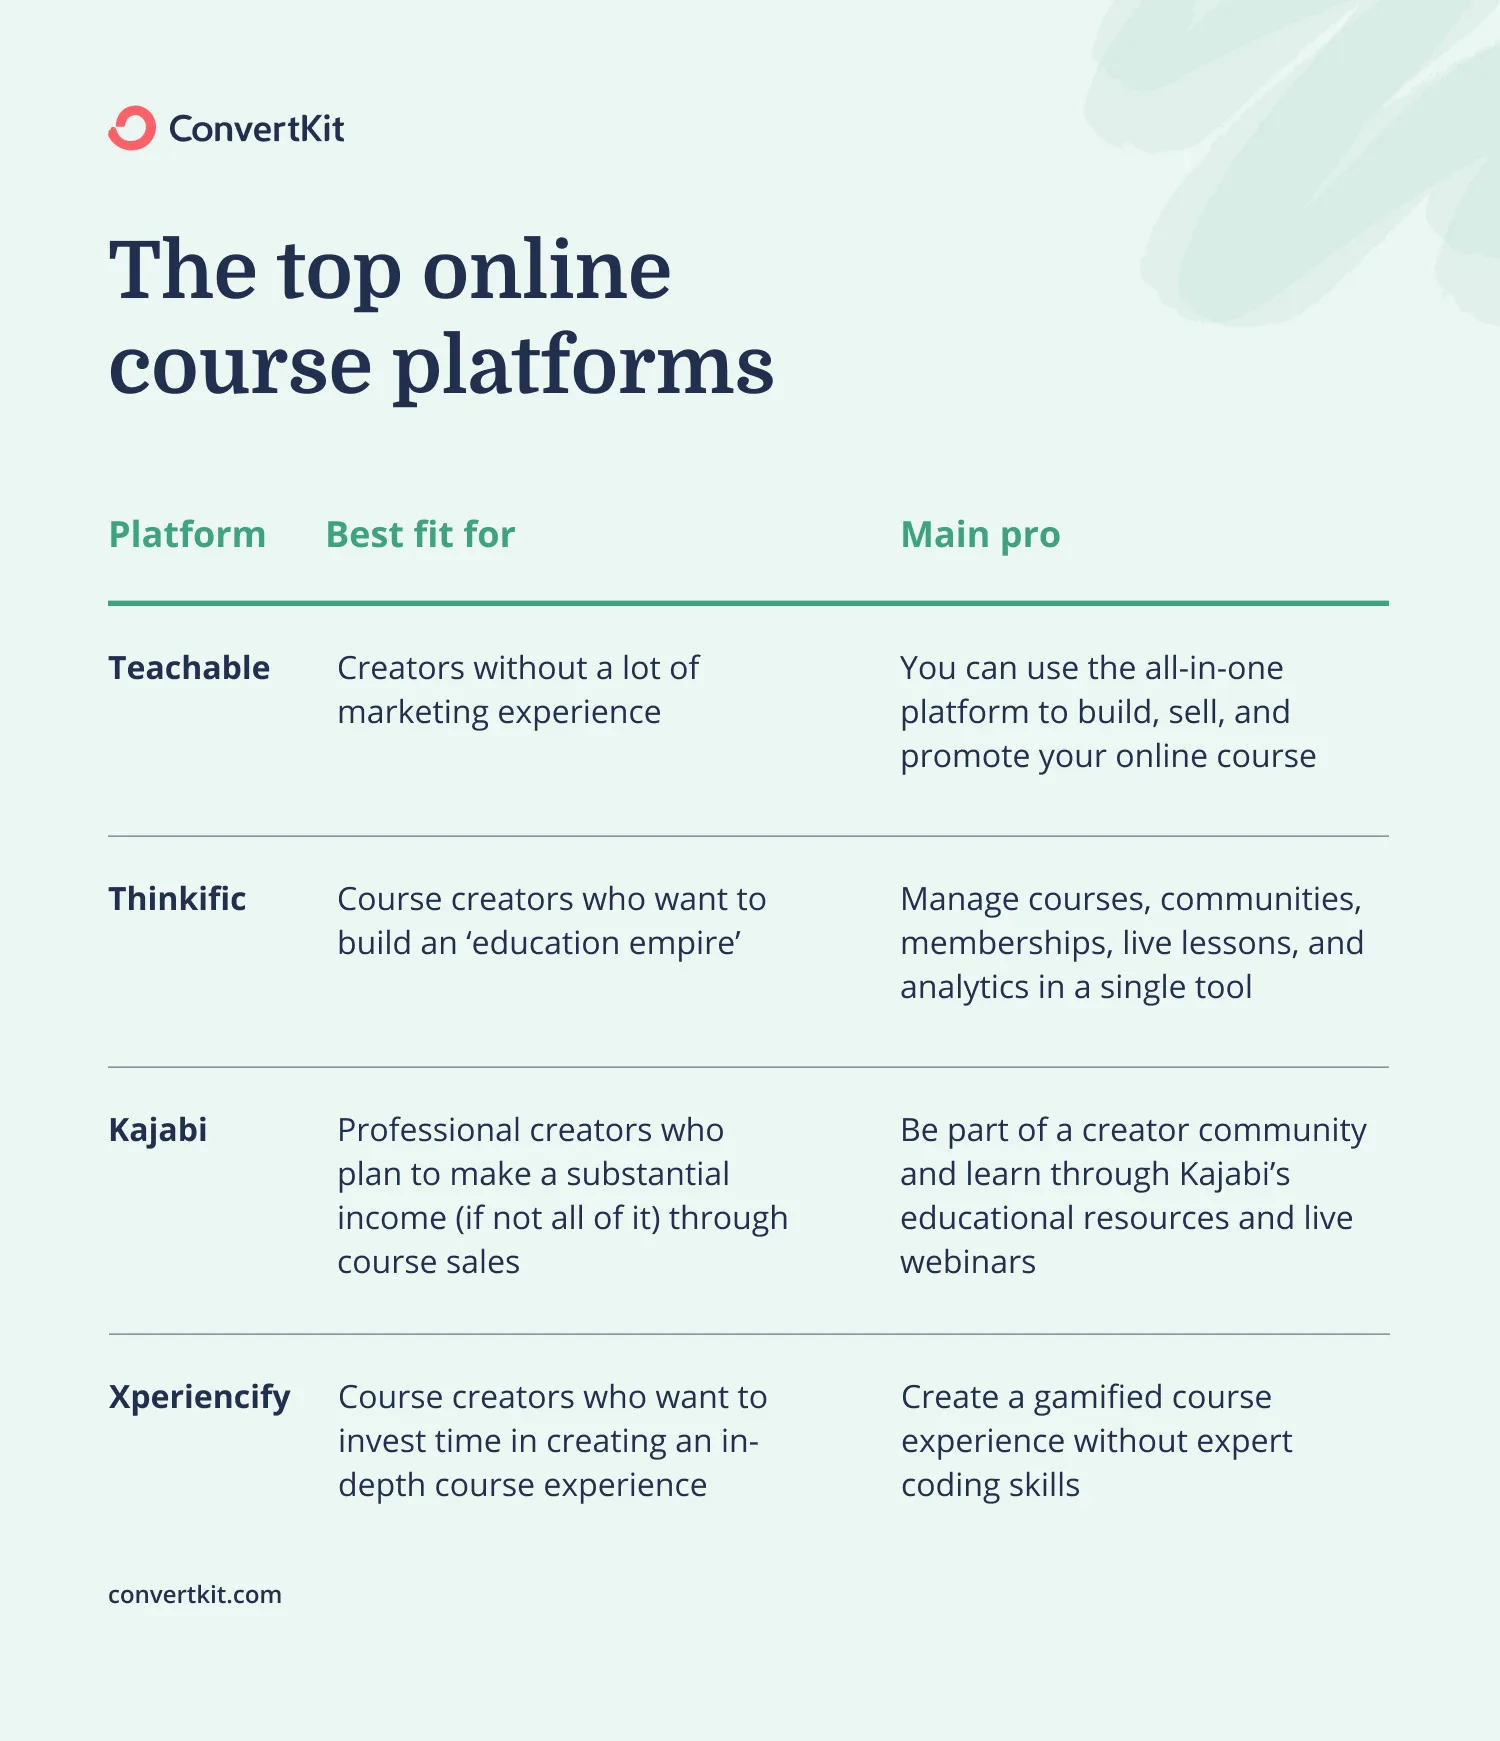
Online course platforms are purpose-built tools that let you sell and serve up your online course. While you can integrate course platforms with your other apps, like email marketing, your students have to go to a dedicated website to access content.
The best online course platforms for creators include:
Pro: Course creators like online course platforms because they’re ready to use and easy to setup.
Con: The convenience comes with a price, though, since you may have to pay a monthly fee plus transaction fees for each course or digital product sale.
3. Check out online course marketplaces
The final option creators have for selling their online courses is through course marketplaces. Much like a digital marketplace like Amazon or a physical marketplace like a flea market, online course marketplaces let many creators sell in one place.
The best online course marketplaces for creators include:
Pro: Course marketplaces generate their own traffic, so you’ll reach a new audience without promoting your work.
Con: You’ll have to work to stand out against the other course listings, and the marketplace might take a cut of your sales.
How to price your online course
Here’s the thing: No one really knows the value of a course.
There’s no hard and fast rule that a course of eight modules with four videos each should be X amount of dollars. And there’s no perfect way to compare the prices of your content versus someone else’s.
So how do you do it? How can you accurately price out a course? Start by looking at your course and goals:
- Online course length and material: The more material, the higher your price. Your audience will see more value if there is a list of activities they can be a part of and projects to cross off a list.
- Value and impact: People might place a different importance or budget to different topics or areas of their life.
- Expenses: What will it cost to produce the course? Factor any payments to collaborators and editors or rental fees for recording space into the price.
- Income goal: Do you want the online course to bring in a little extra cash or replace your full-time income? Consider your income goal versus how many courses you think you’ll sell a month to reverse engineer your online course price.
Increase the value of your online course with extras
Extras, bonuses, or content upgrades; whatever you call them, they help you add some hype and bonus value to your course. When it seems like your course content goes above and beyond the expected, then you can charge a bit more.
Here are a few ways to increase the value of your online course (without doubling your workload).
- Workbooks (incl. cheat sheets, downloadable, etc.): Documents and guides that students use alongside your course content make the experience feel more comprehensive and involved.
- 1×1 Time: Getting face-to-face with students, even for a single introduction call, makes it feel like they’re getting free consulting time on top of the course.
- Private groups and communities: Accountability and comradery make digital content feel more tangible.
- Live group calls: Problem-solving and celebrating with others keeps students moving forward.
- Workshops: Some students want to see a lesson in real-time.
- Expert Interviews: Bringing in other experts makes the content feel even more reliable and impactful.
Pricing models for online courses
Just like course pricing varies between creators, so does the pricing model. For example, 66% of creators selling through Kit Commerce choose a standard one-time payment option for students, but just over 3% offer payment installments.
You can set up your course to let students pay:
- A single upfront fee
- A series of payment installations
- A recurring subscription to access your course catalog
- A custom ‘pay what you can’ fee
Let’s look at a few pricing models in a little more detail.
1. Free online course
There’s a time and a place for free, and that’s using a lead magnet to grow your email list. However, listing your in-depth online course at no cost can actually make students feel it isn’t worth their time.
Our friends at Teachable did a study to find out if this sentiment was true. They wanted to know if there was a difference in engagement between a free course vs. a paid course. And guess what? There was!
When you give a coupon for a free class, the completion rate can be in the low single digits. When you charge for the same course, the completion rate can be 30% or 40%. The more you charge for a course, the more people actually complete it.
– Ankur Nagpal, Teachable CEO and Founder
When you give your online course away, it’s like you’re telling your audience that it’s not worth their time or that there’s no value to it – and that’s just not true. By giving it a price tag, you’re automatically showing value.
2. One-off payments for baseline online courses
So you don’t want to set your course as free, but what about a low cost? Making your course affordable to the majority means more people can take your course.
However, unless you have a huge audience, it might not generate enough to replace your income fully.
If you plan to offer a few online courses, or your class is just one of your income streams, a one-off payment for a more entry-level price can still be a good move for you and your audience.
3. Premium online course pricing
You can charge a high ticket price when you create a high-ticket product. A premium online course should have lots of valuable information and some extras like customer support, community groups, and multiple types of content and resources.
If you’ve got the content and potential to hit those higher price points, you can create a higher expectation of value, increased engagement rates, and the possibility to meet your revenue goals quicker without needing as many subscribers.
Keep in mind that higher prices do mean fewer sales. Are you ready to cut out a large portion of potential students because they can’t afford your course? If you have other resources for people who aren’t ready for your high ticket offer, your answer might be yes.
You can also offer installment payments to help students spread the investment over a few months or more.
How to market and promote your online course
Think of promoting your online course like building a new road—you need to lay the foundation and then set up signs to point people where to go.
Promoting your online course requires a sales page and a few promotion tactics, like turning a chapter into a lead magnet, running a giveaway, and pitching your course at the end of a free webinar.
Here’s how to do it.
1. Build a sales page for your course and share its URL everywhere
After you create and price your course, you need a course sales page, which explains what the course is, who it’s for, what they’ll learn, what content and extras it has, and how much it costs.
Once you have a course sales page, share a link to it everywhere. If there’s a place where your audience interacts with your content, there should be a link to check out your course. Mention and link to your course:
- In your social media bios (grab a landing page template for your own link in bio here!)
- In your email newsletter footer
- Within related blog posts
- On website banners and pop-ups
- In the video description of your YouTube videos
- In the resources section of your podcast episode pages
2. Turn an online course lesson into a free lead magnet
Giving a course lesson for free is a win-win situation: you gain a new subscriber, and your new subscriber gets a quick and easy improvement.
Lead magnets help you grow trust from subscribers and position you as an expert in your field. And once they get a win from your free lesson, they’re likely to want more!
A great example comes from Creatorialz. By signing up, you get a first lesson about Canva for free.
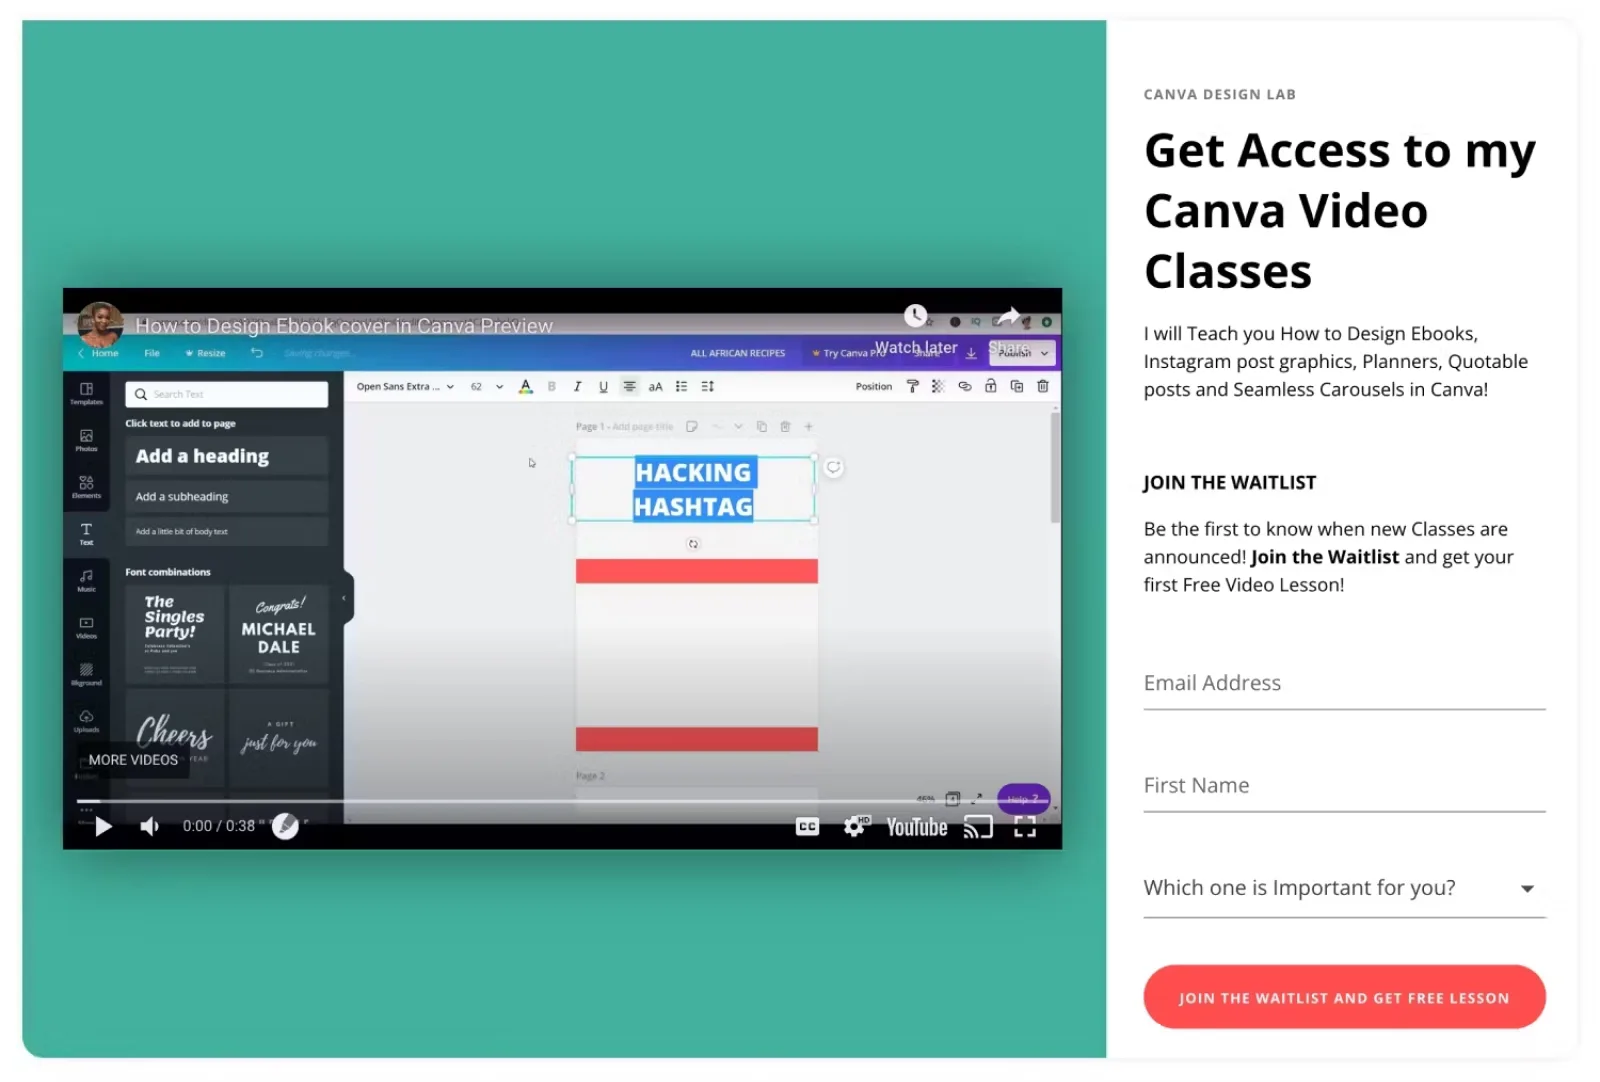
Free lesson landing page by Creatorialz. Image via Creatorialz.
3. Post student testimonials on social media
Social proof is powerful. It shows potential customers what’s possible if they join your course.
And while testimonials are among best practices for landing pages, this strategy also works on social media.
Check out how Nesha Woolery, a business mentor, did this when running a Black Friday discount for her courses.
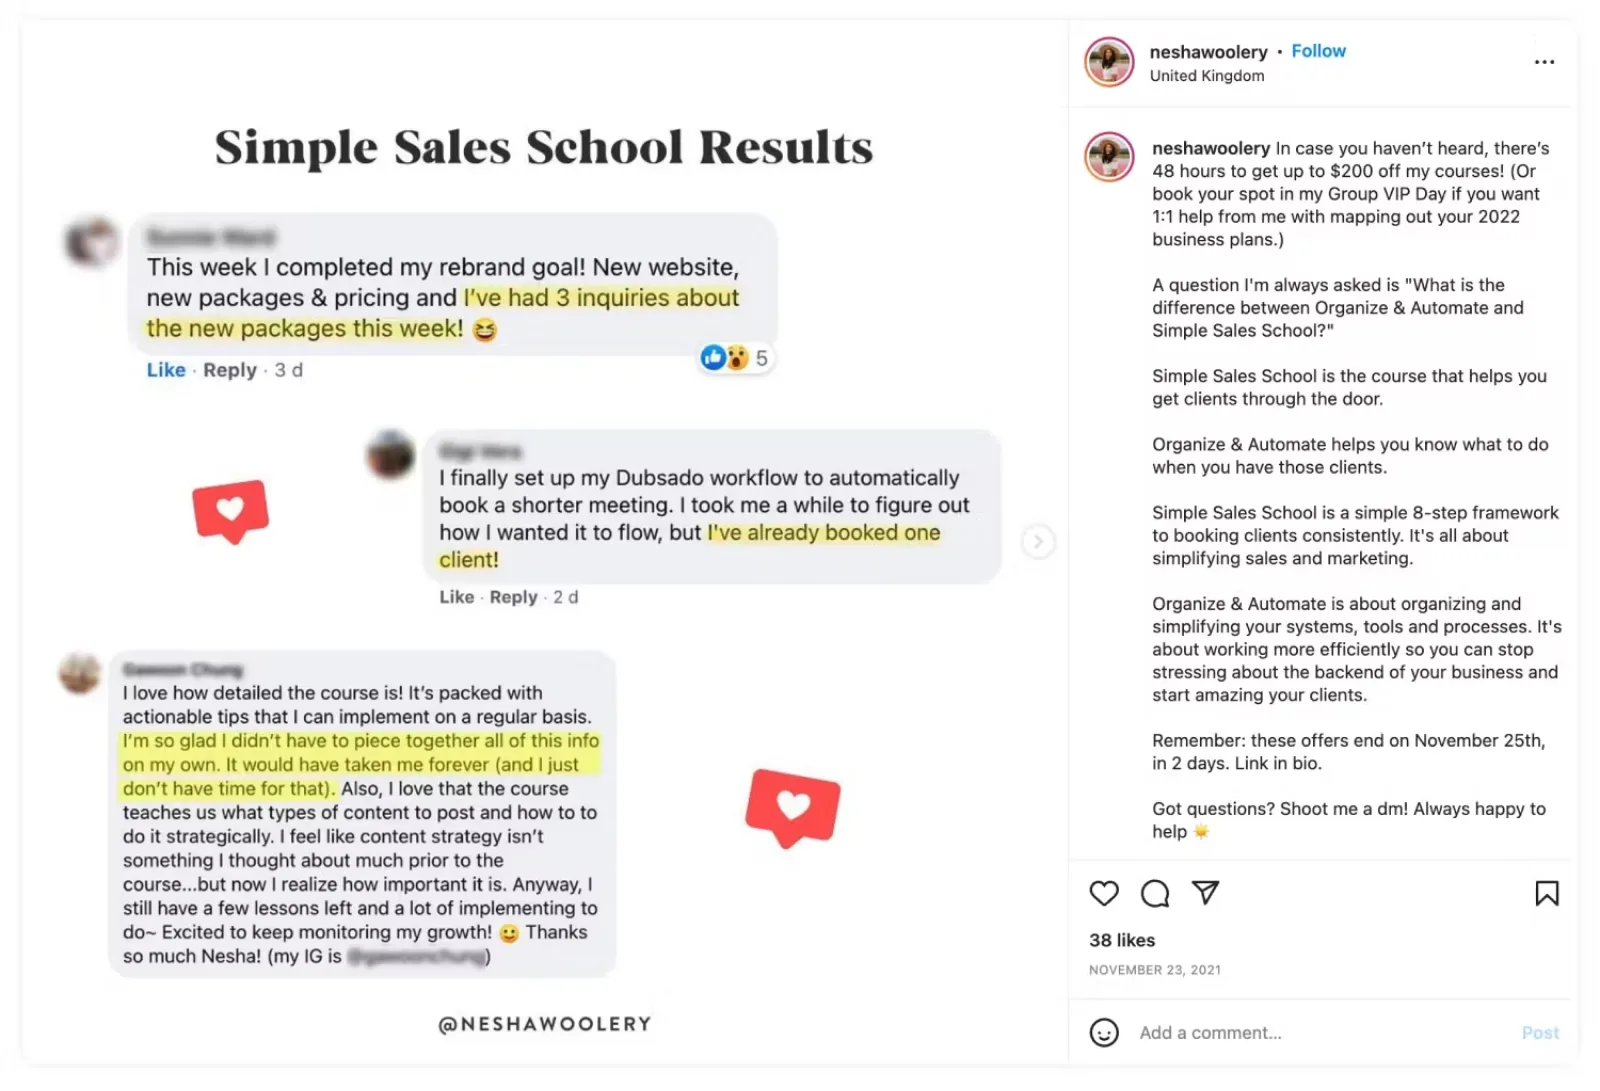
Nesha Woolery’s Instagram post with student testimonials. Image via Nesha Woolery.
Pro tip: If this is your first time launching this course and you still need testimonials, ask your subscribers or past customers to write one about your teaching. Then, once you have a few happy students in your new course, ask them for testimonials.
4. Run a giveaway and gift free access to your course to a winner
Giveaways can do two things at once: grow your audience (on social media or email list) and create buzz around your course.
For example, when one of your rewards is free access to a paid course, people will want to know more about it. And if they need to follow you or subscribe to enter, they’ll be easy to reach when you want to promote your course again.
A great example comes from Mariah Coz, the founder of Fearless CEO, who gave away free access to two of her courses that otherwise cost $5,400.

Course giveaway by Mariah Coz. Image via Mariah Coz.
5. Teach a free webinar and pitch your online course at the end
Planning a webinar is a bit easier when you have a clear vision of the content and goal—like promoting your new course!
Hosting a free webinar on a topic related to your course gives students a quick win and an intro to your content.
At the end of the webinar, you can pitch your online course as the next logical step from what they’ve learned. Even if they don’t buy it right away, you can give them a replay through a webinar email automation with a chance to revisit your free teaching and reconsider your course.
You can also turn the webinar replay into an evergreen lead magnet, so you can repeat this process on autopilot and grow subscribers and sales without extra work.
This is exactly what Cara Chace does with her free Pinterest masterclass, which then pitches her Pin Power Method course and membership:
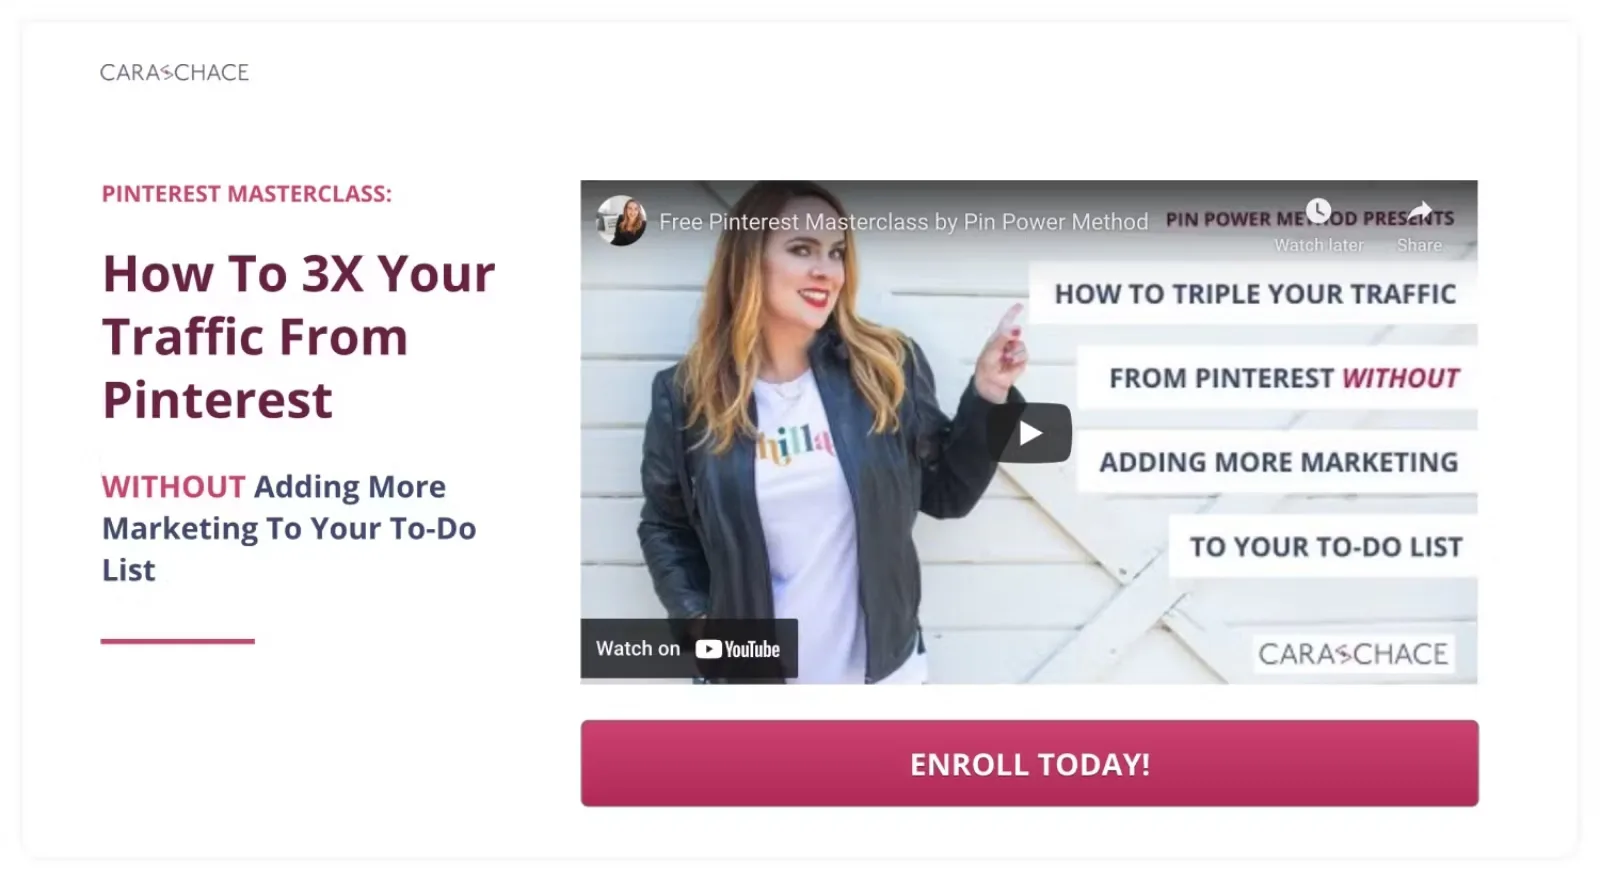
Cara Chace’s free Pinterest masterclass with a course upgrade. Image via Cara Chace.
Sell your next online course with Kit Commerce
We understand how much heart and soul you put into your business, so we want you to keep as much of your course profits as possible!
Using Kit Commerce, you can easily launch and sell your online course from your website.
Ready to get started? Try it for free!


