In this Article
So, you want to know how to create a website from scratch.
Good news: It’s not only possible, but it’s also easy and doesn’t require you to write an ounce of code.
Building a free website is perfect for people who:
- Are part-time/full-time creators
- Want to launch their online presence quickly
- Are looking for budget-friendly solutions
- Want a low-maintenance and mobile-responsive site
- Wish to create content like newsletters or blog posts
- Aim to sell their services, products, and subscriptions
- Want to grow a newsletter and use email marketing and automations to scale their business
All you need to make your site? A free Kit plan.
We’ll show you a step-by-step process so you can sign up and follow along.
Steps one to five will get your homepage up and running (so prioritize those first), while steps six to eight show you how to customize your site further.
Step #1: Select your default domain
The first line of business: get yourself a domain.
You have two options:
- Use a Kit domain (free): You’ll get a free domain to host all your pages within Kit that looks like this: [your-text].kit.com. Go with this option if you want to get up and running right away and don’t want to purchase a domain.
- Buy a custom domain through Kit: Set up a custom domain and connect it to your account for something branded and custom.
To set your domain, log into your account and go to “Settings” > “Domains.” Then, customize your Kit domain. Or follow the prompts to connect an existing domain or buy and connect a new domain.
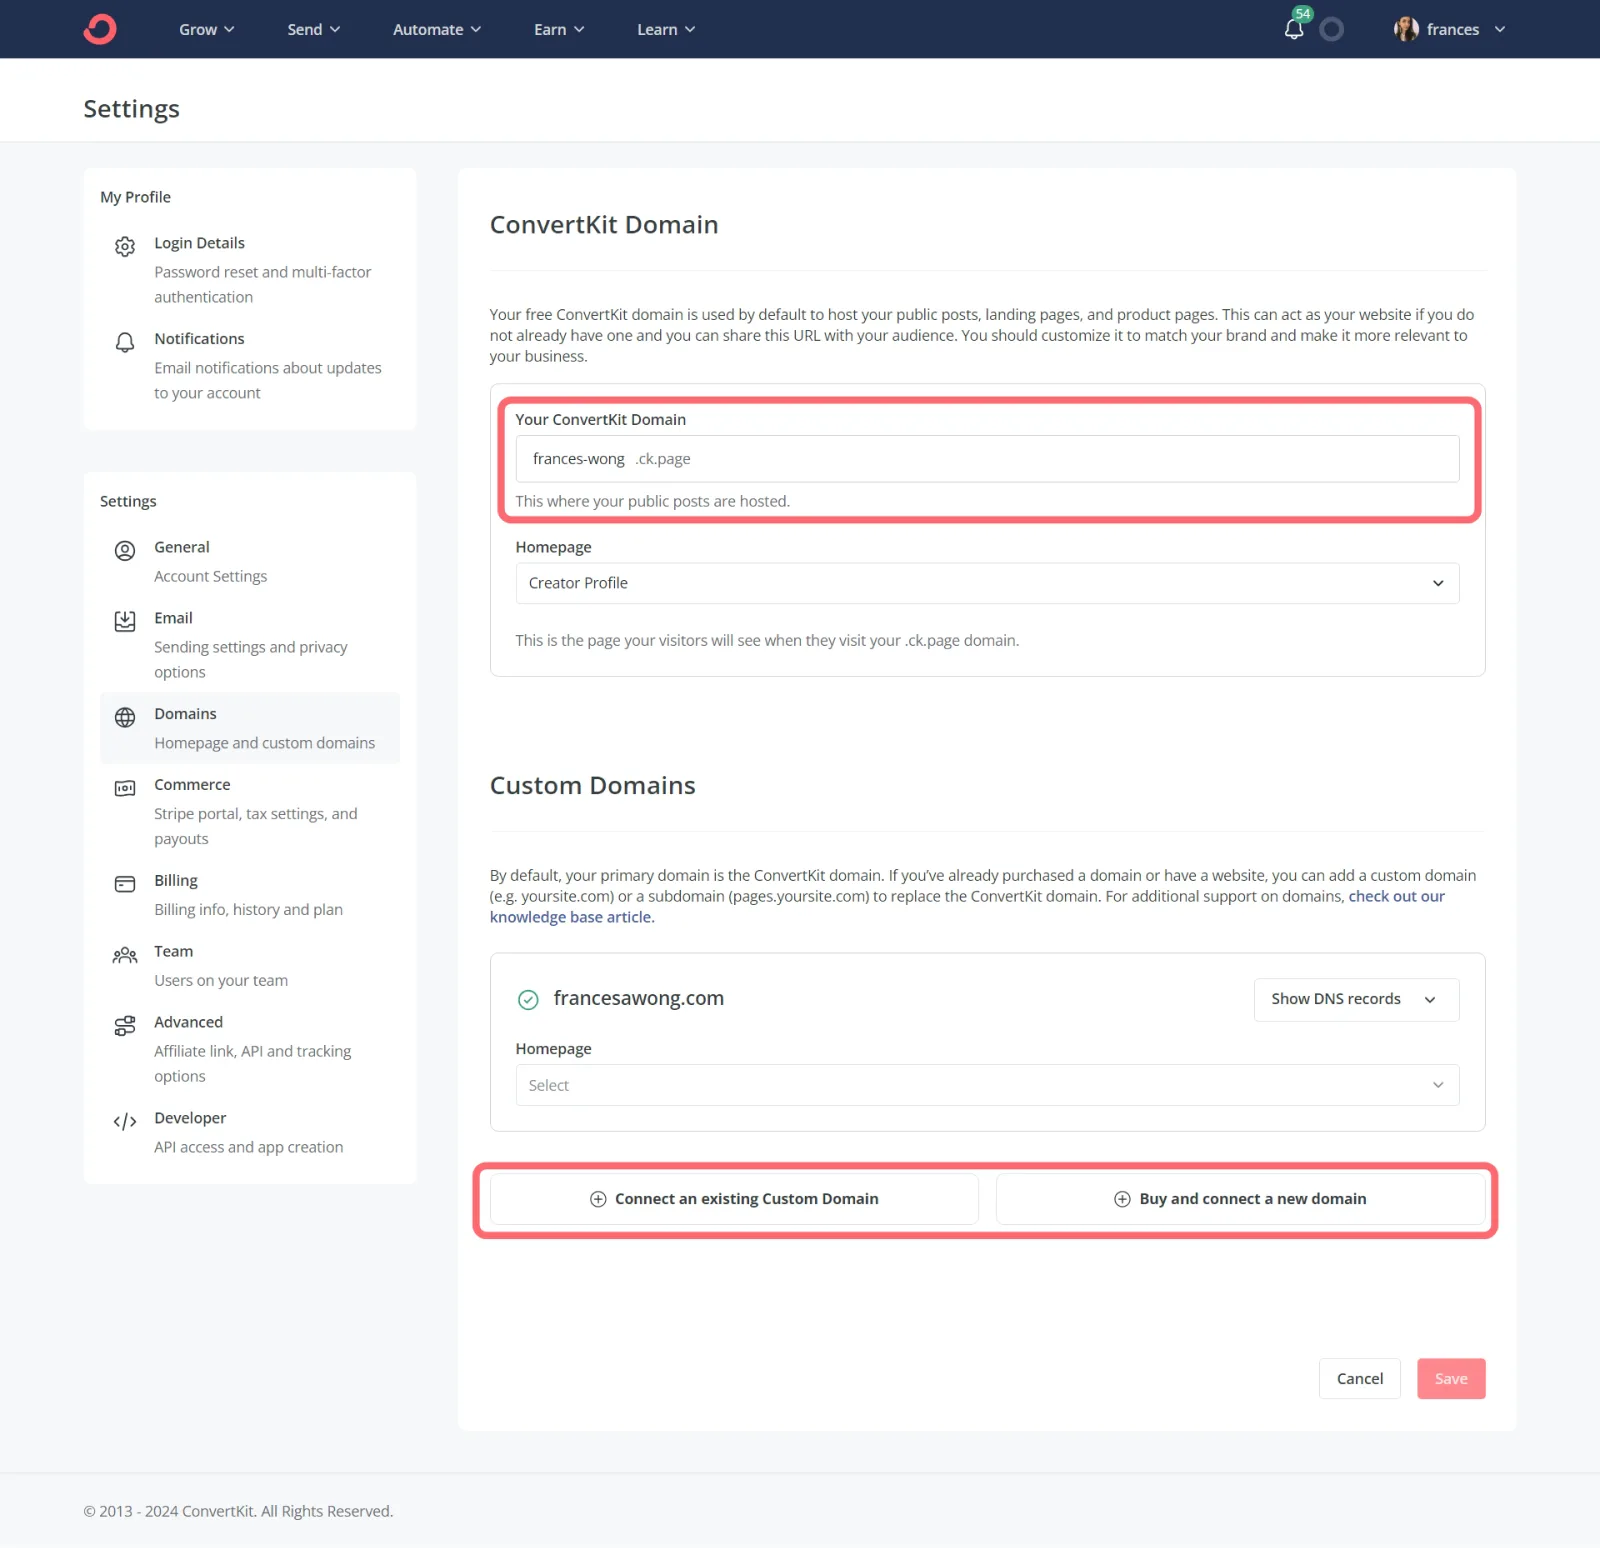
Then, change the homepage to the “Creator Profile” option (pictured below).
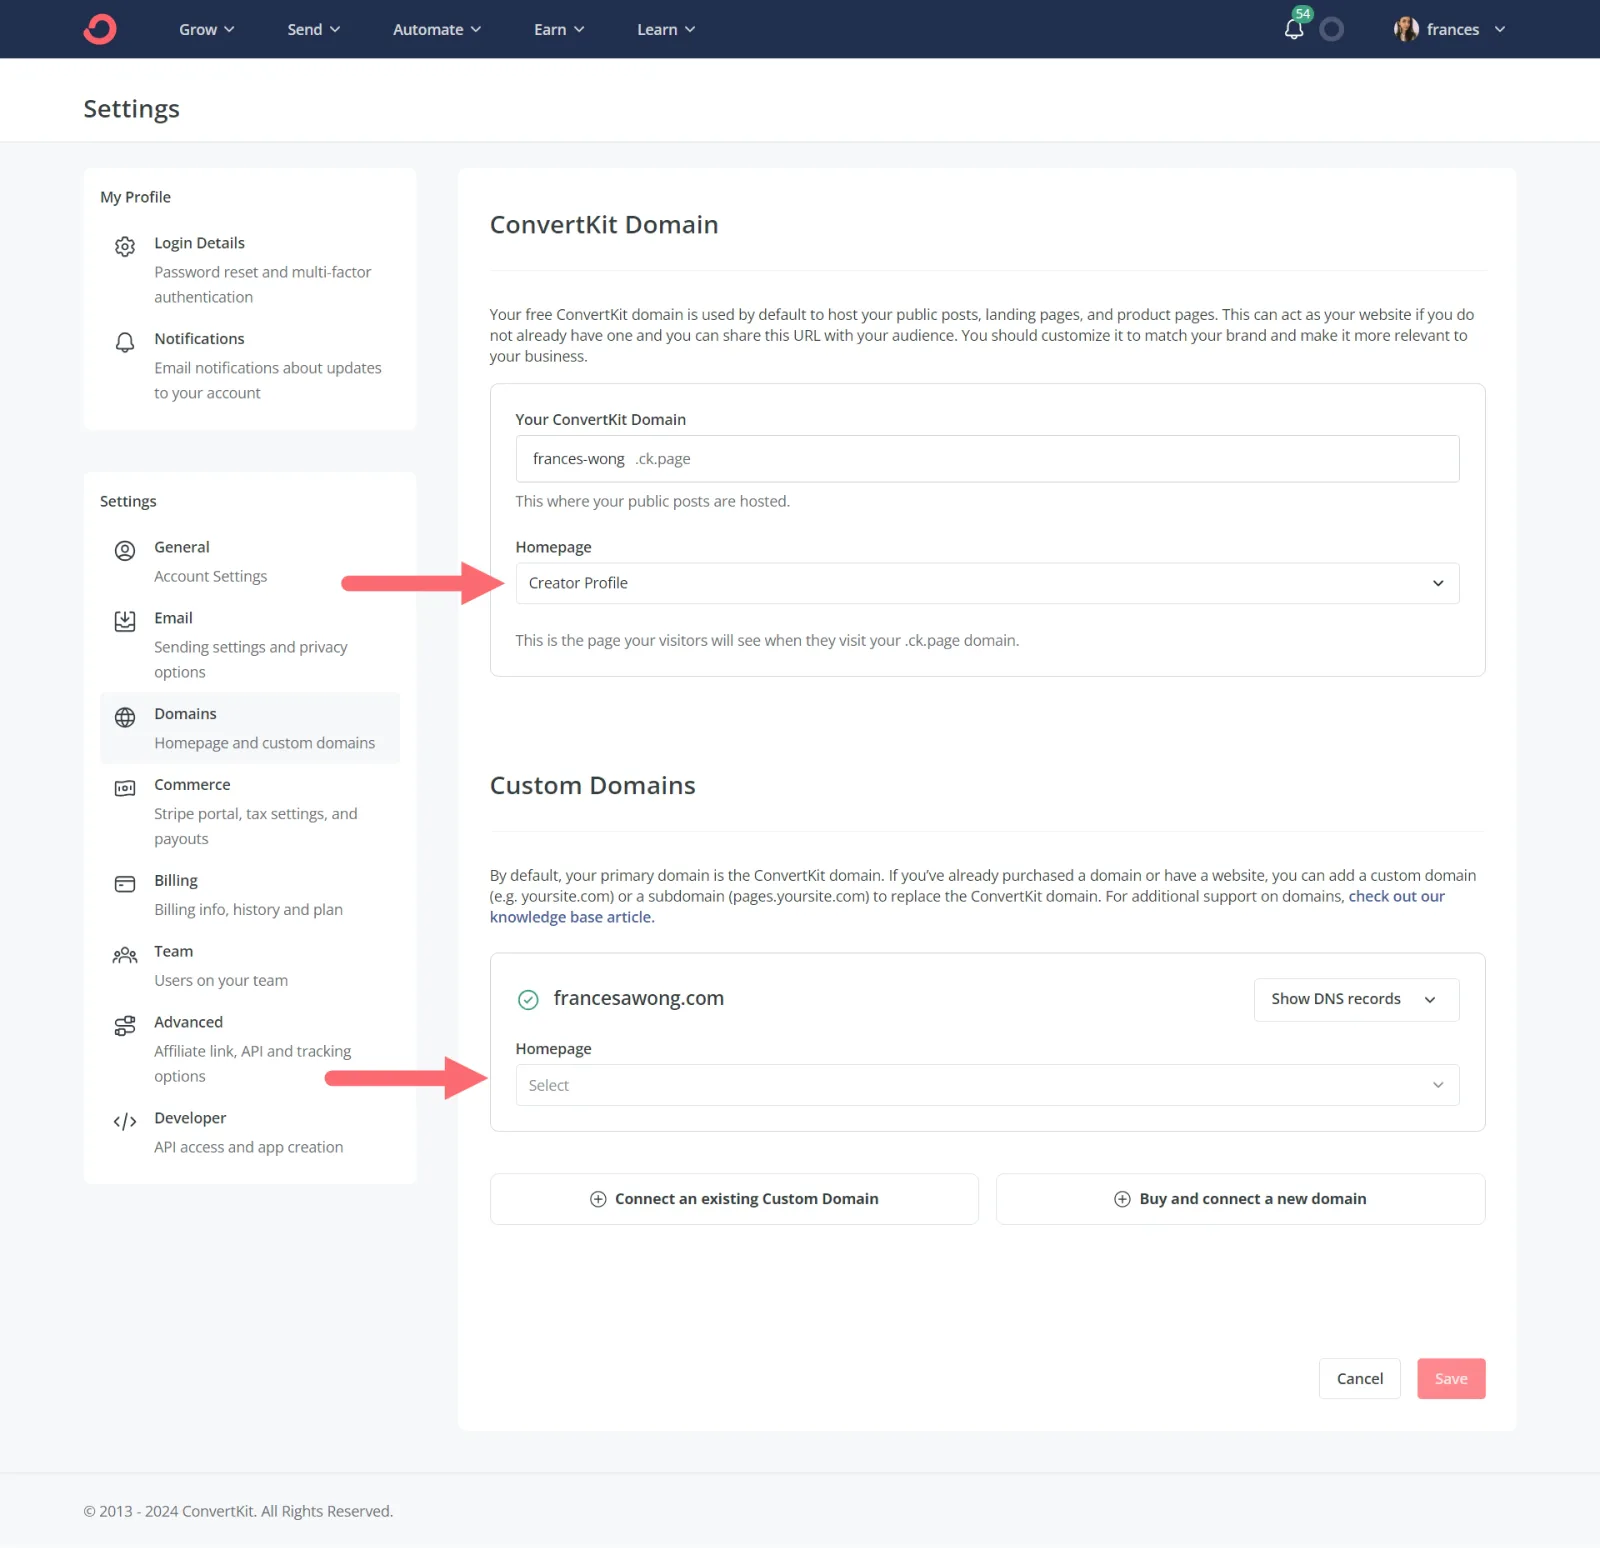
That way, when someone goes to your domain, they’ll be shown your Creator Profile (which we’ll go over next).
Step #2: Set up your Creator Profile basics
Think of your Creator Profile as your entire site. It’s where visitors can learn more about you, read your content, view your products, and more.
Make your Creator Profile by heading to “Grow” > “Creator Profile.”
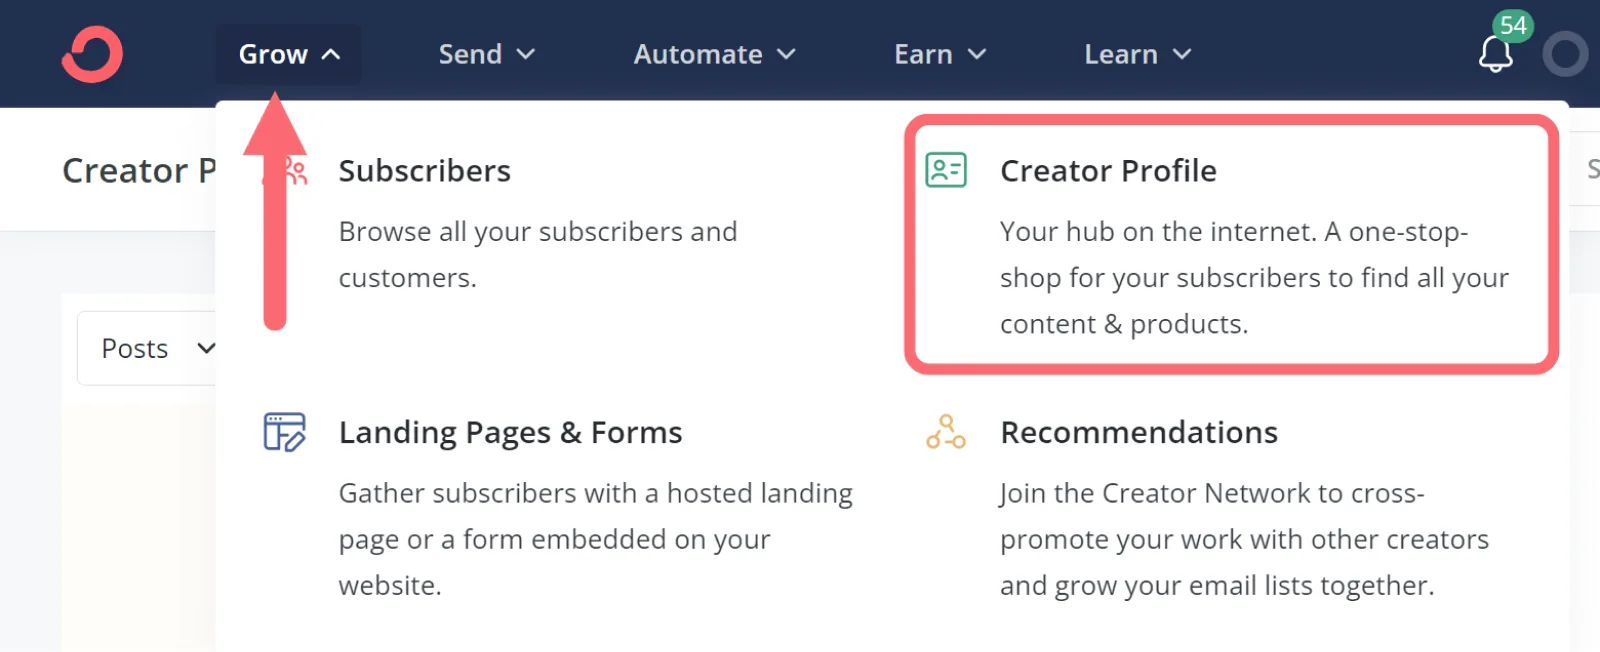
The first page of your Creator Profile will serve as your homepage and should have:
- A headshot so people can connect with you
- Your name
- A short description of who you are and what you do
- Links to your social profiles so people can find you across different platforms.
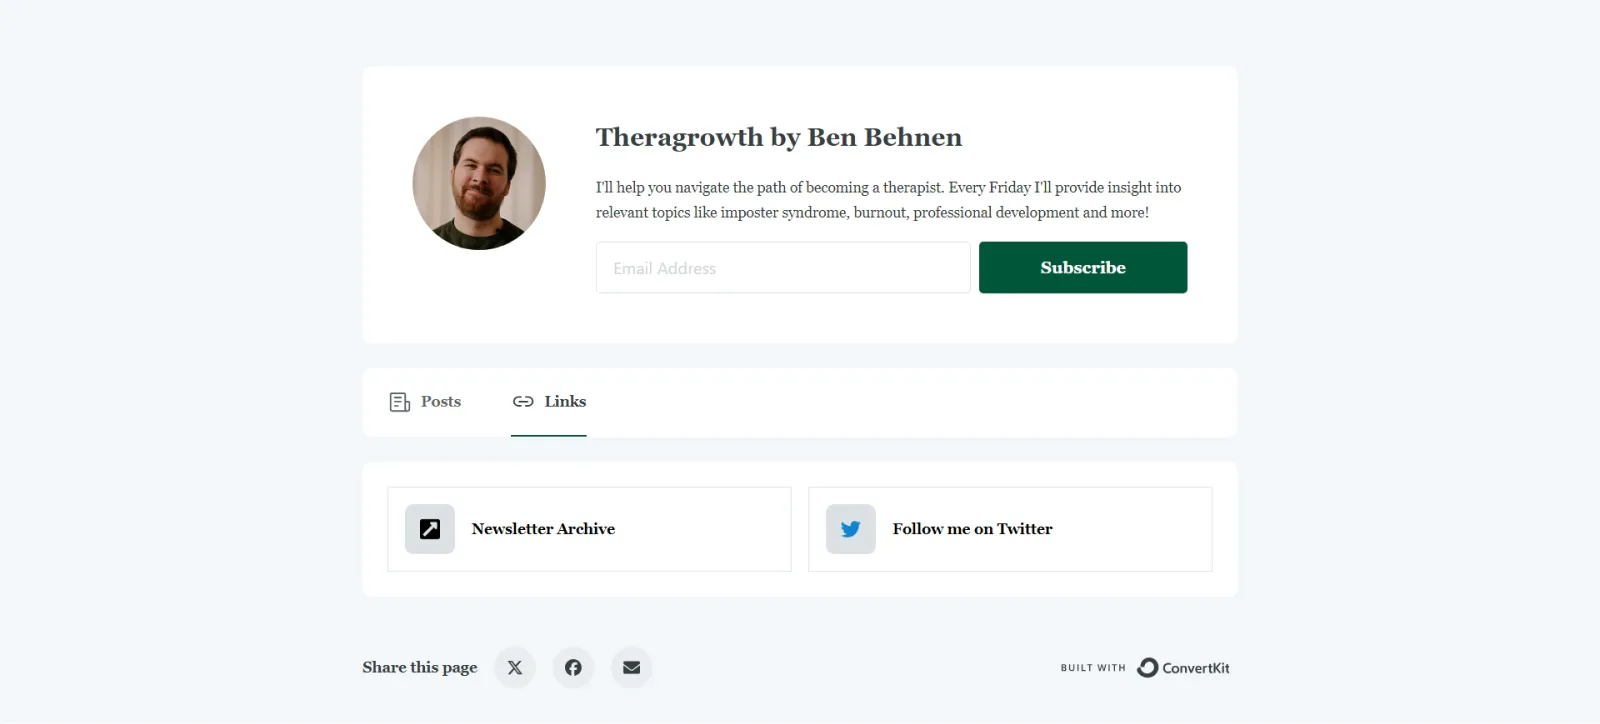
Example of a great creator profile by Ben Behnen
Ben Behnen’s profile describes who he is, the benefit of subscribing to his newsletter, lists his recent posts, plus has links to his X/Twitter profile and his newsletter archive.
Step #3: Adjust your branding and style
Just because you want to create a free site doesn’t mean you need it to be custom and true to your brand.
Next, customize your Creator Profile to match your brand by heading into “Design & Templates.”
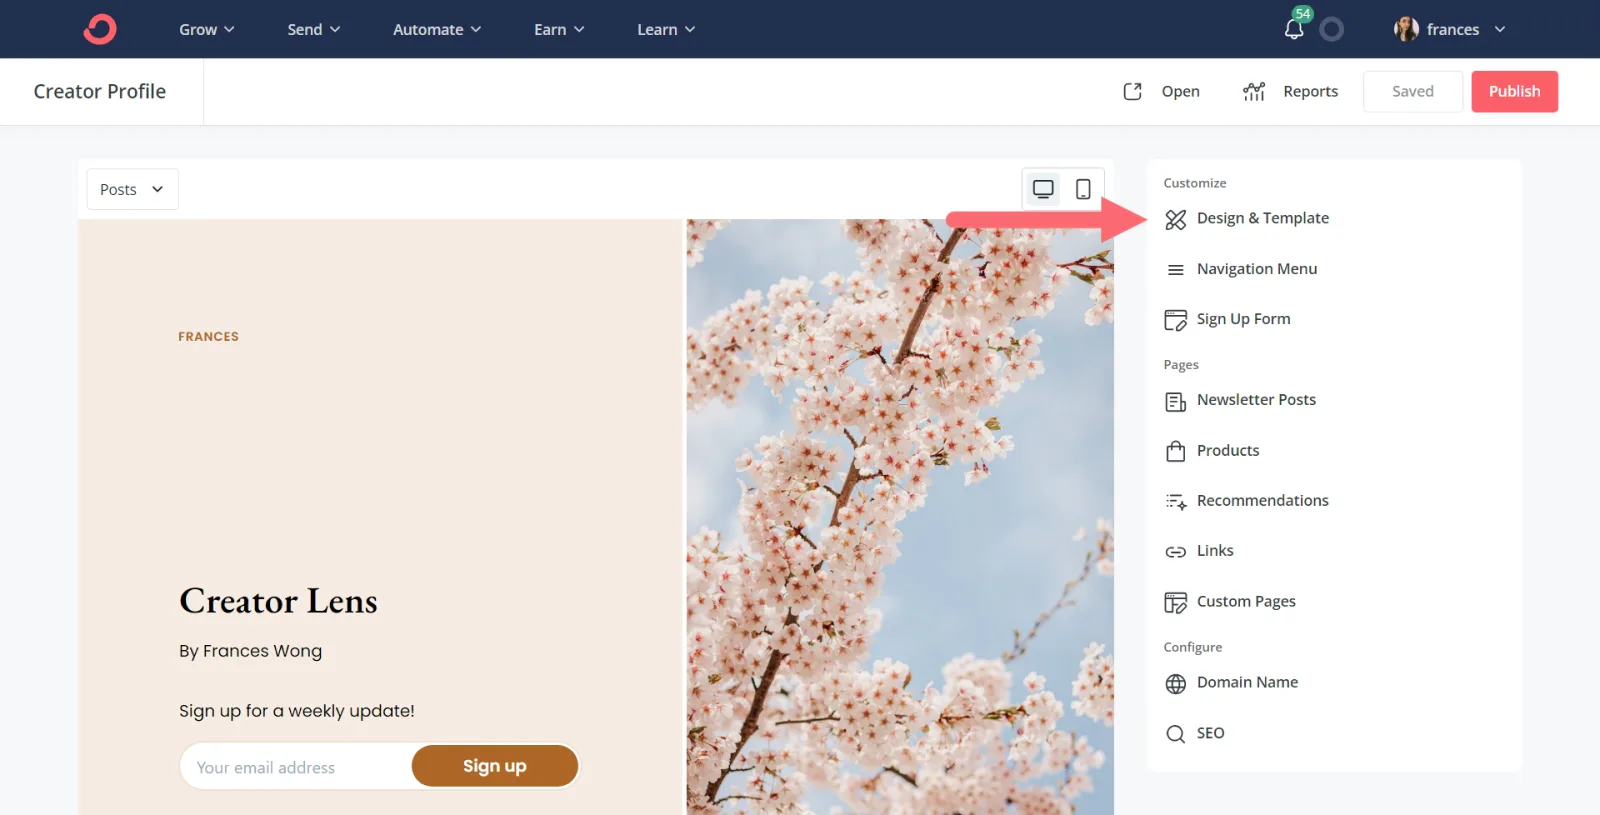
Pick a template and adjust its colors and fonts with the customizer to the right.
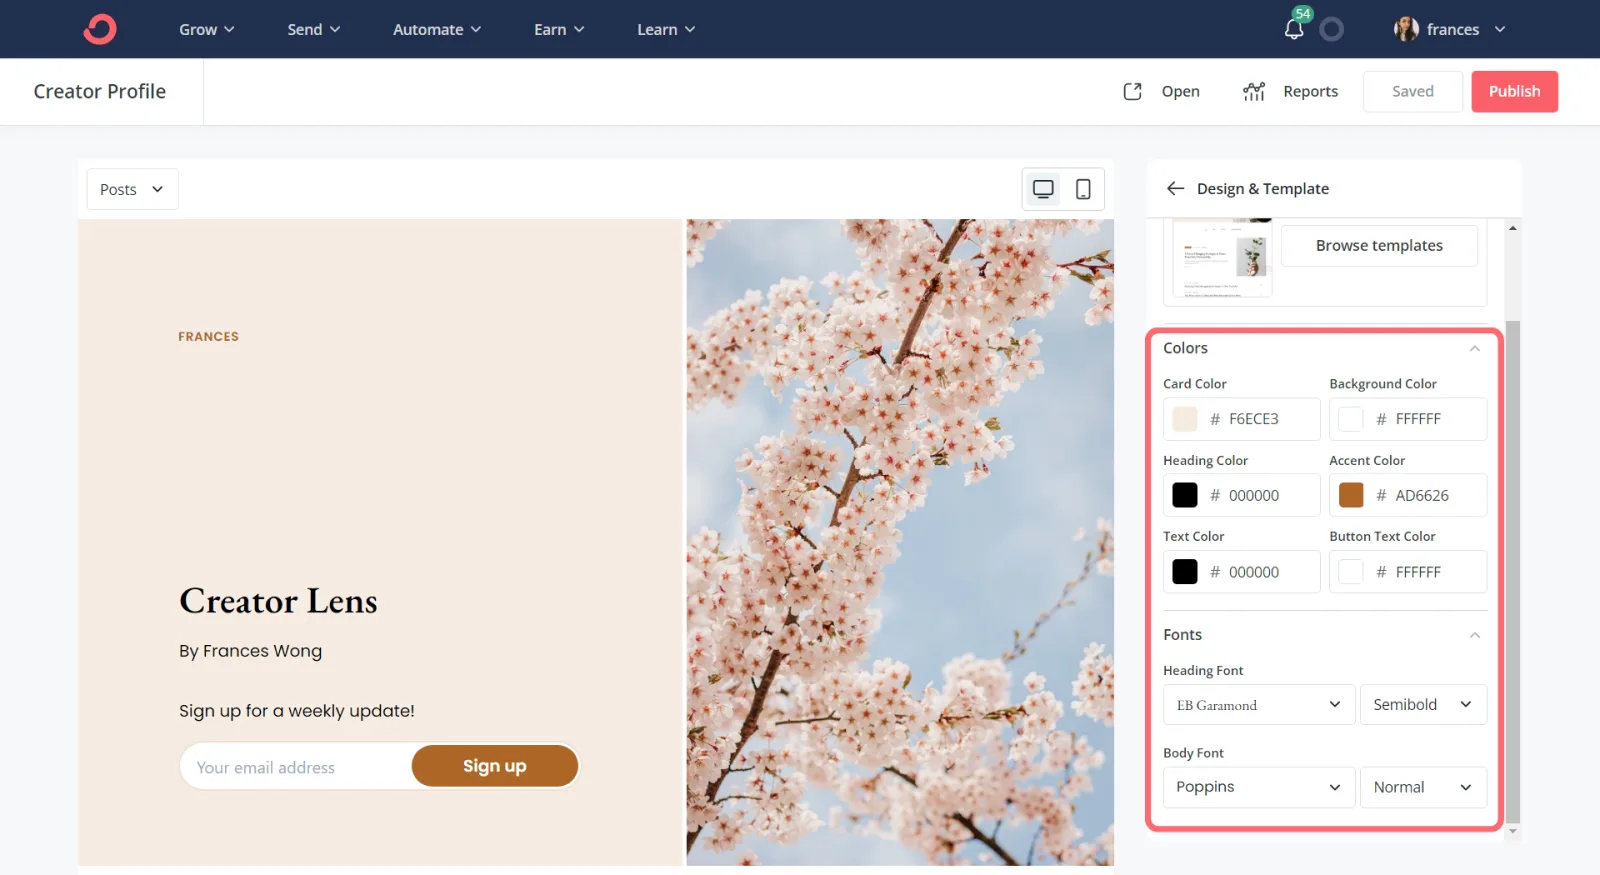
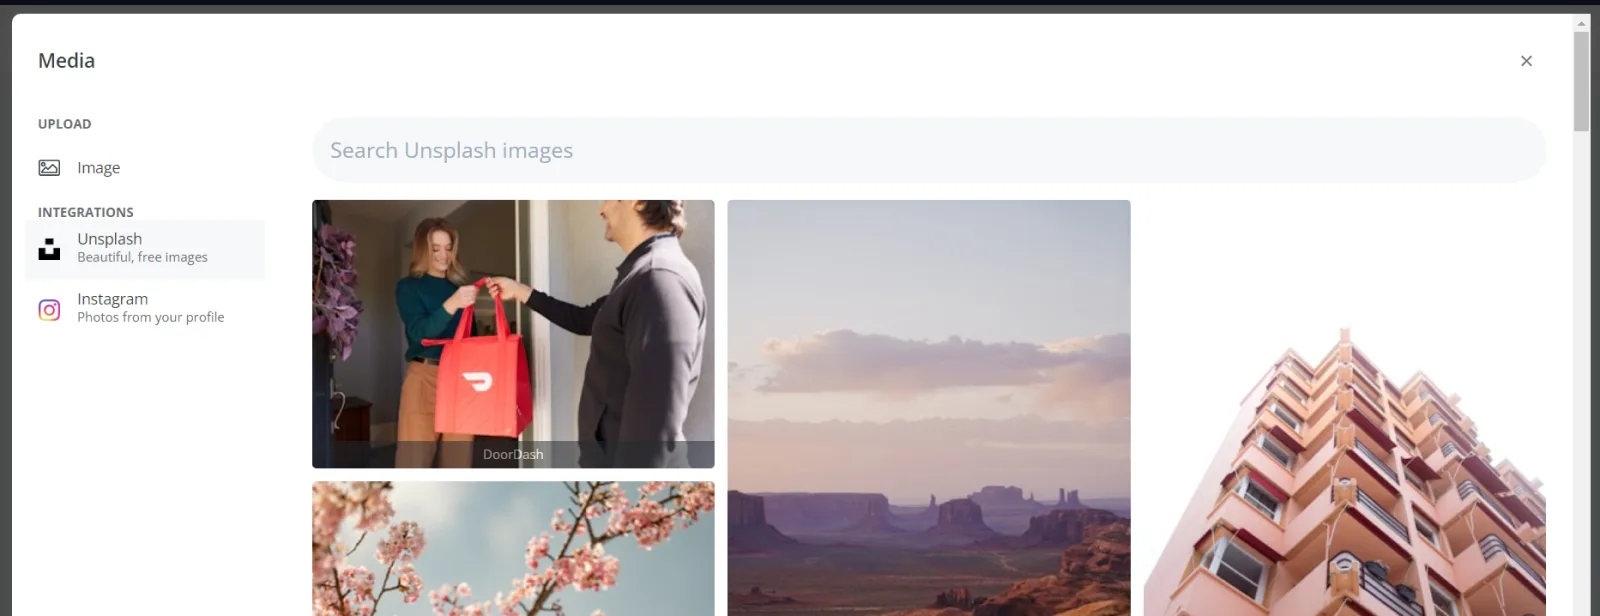
You can also upload your own imagery, use our Unsplash integration, or pull photos straight from your Instagram account.
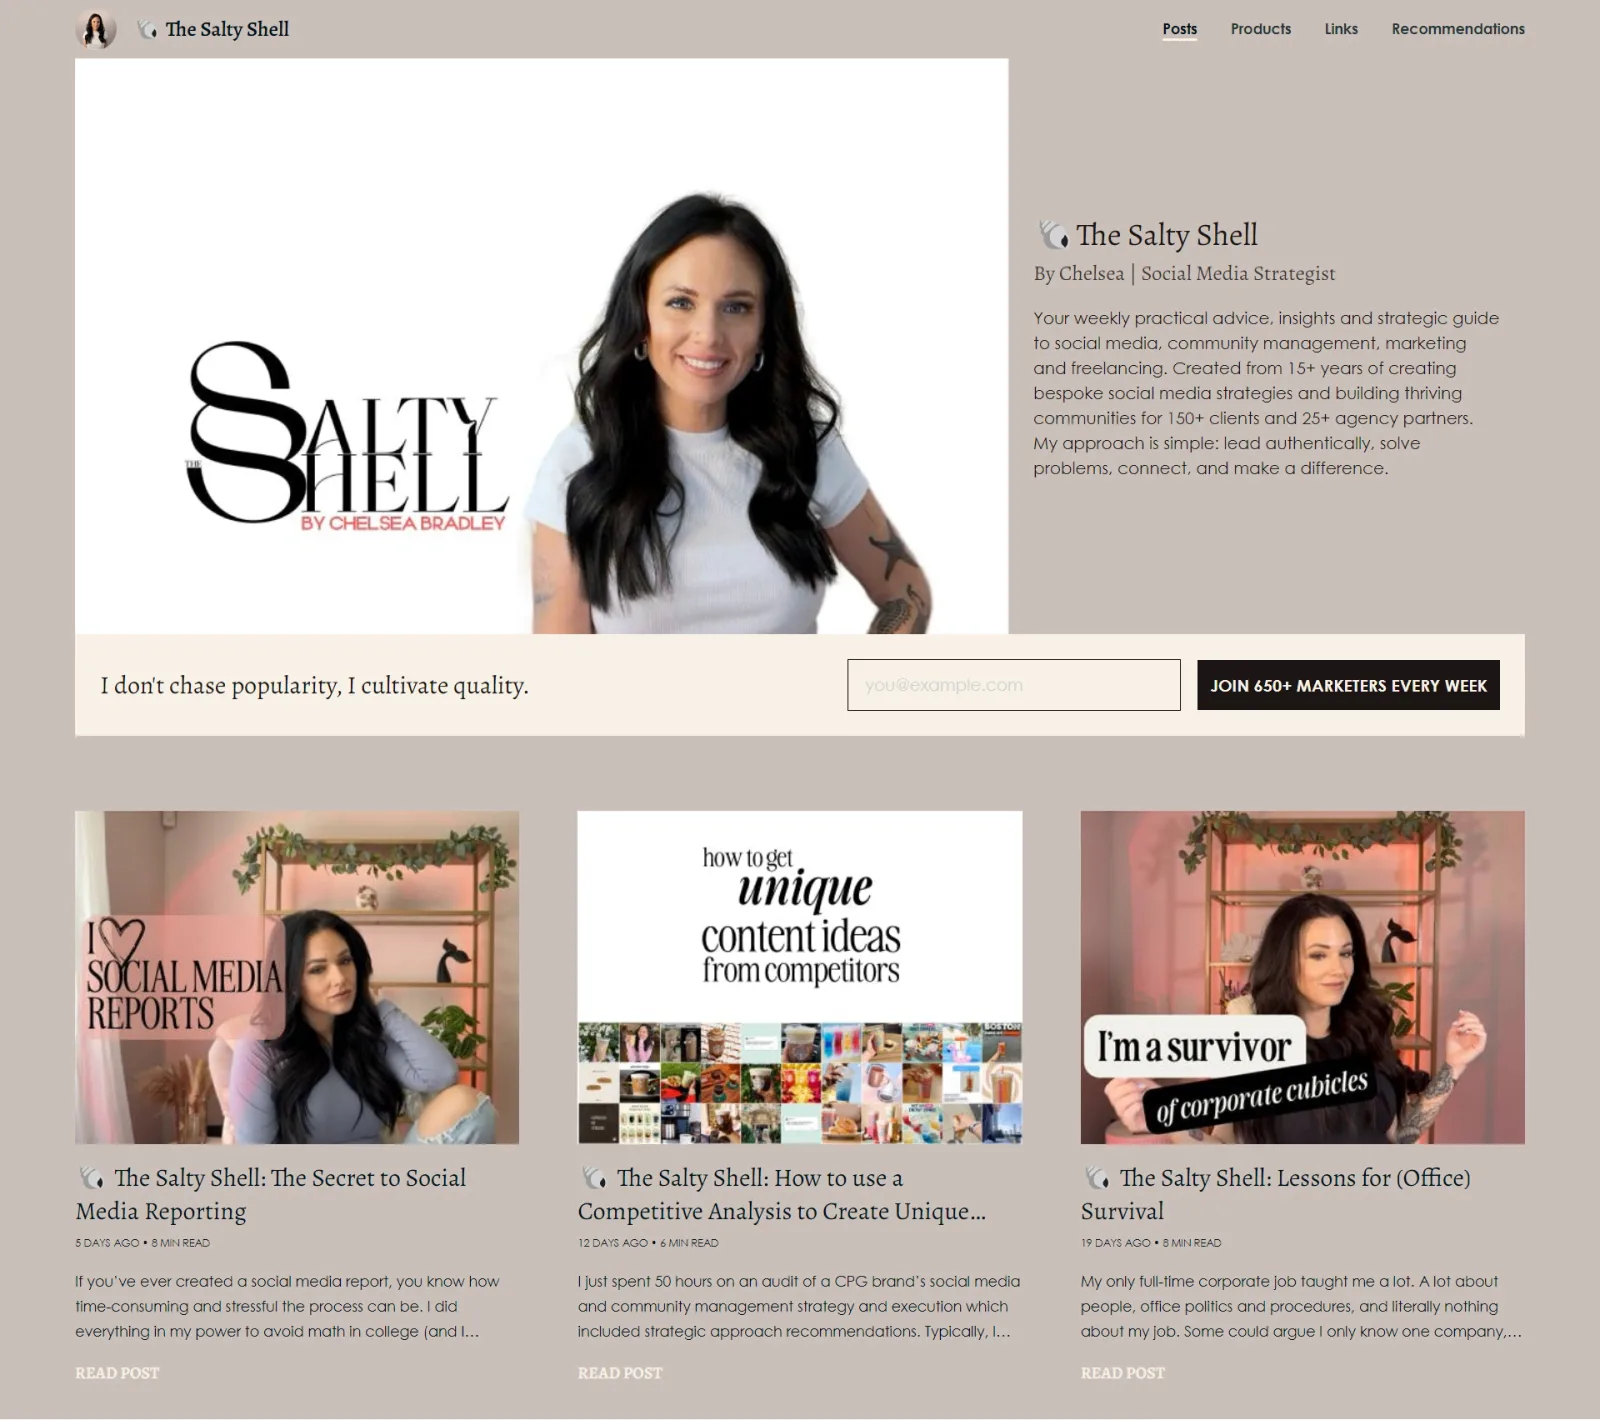
Style example by The Salty Shell
Social media strategist Chelsea with The Salty Shell didn’t miss any details when tweaking her Creator Profile to match her brand.
She used different fonts for her header and her body text, a specific color palette, and her own imagery to make her Creator Profile shine.
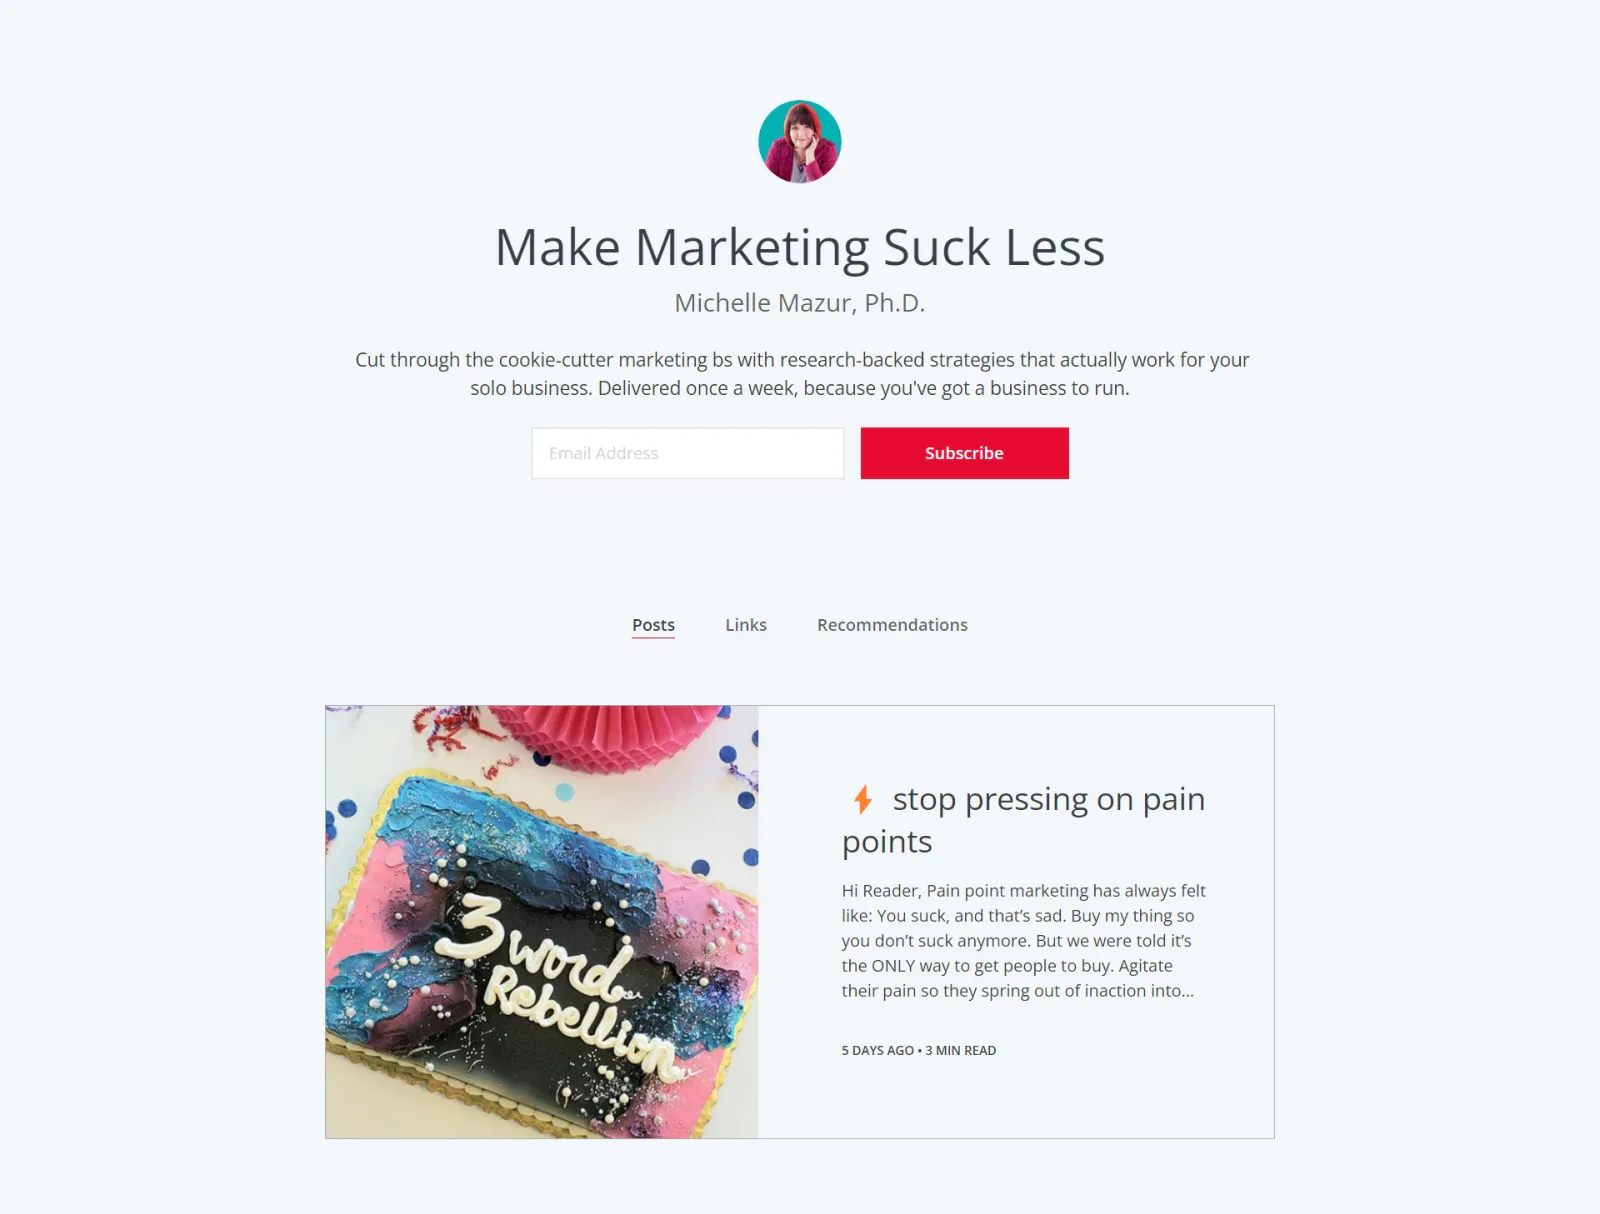
Style example by Michelle Mazur
If you want to stick with simple branding, give your Creator Profile a pop of your signature color, like marketer Michelle Mazur has done with her pop of red.
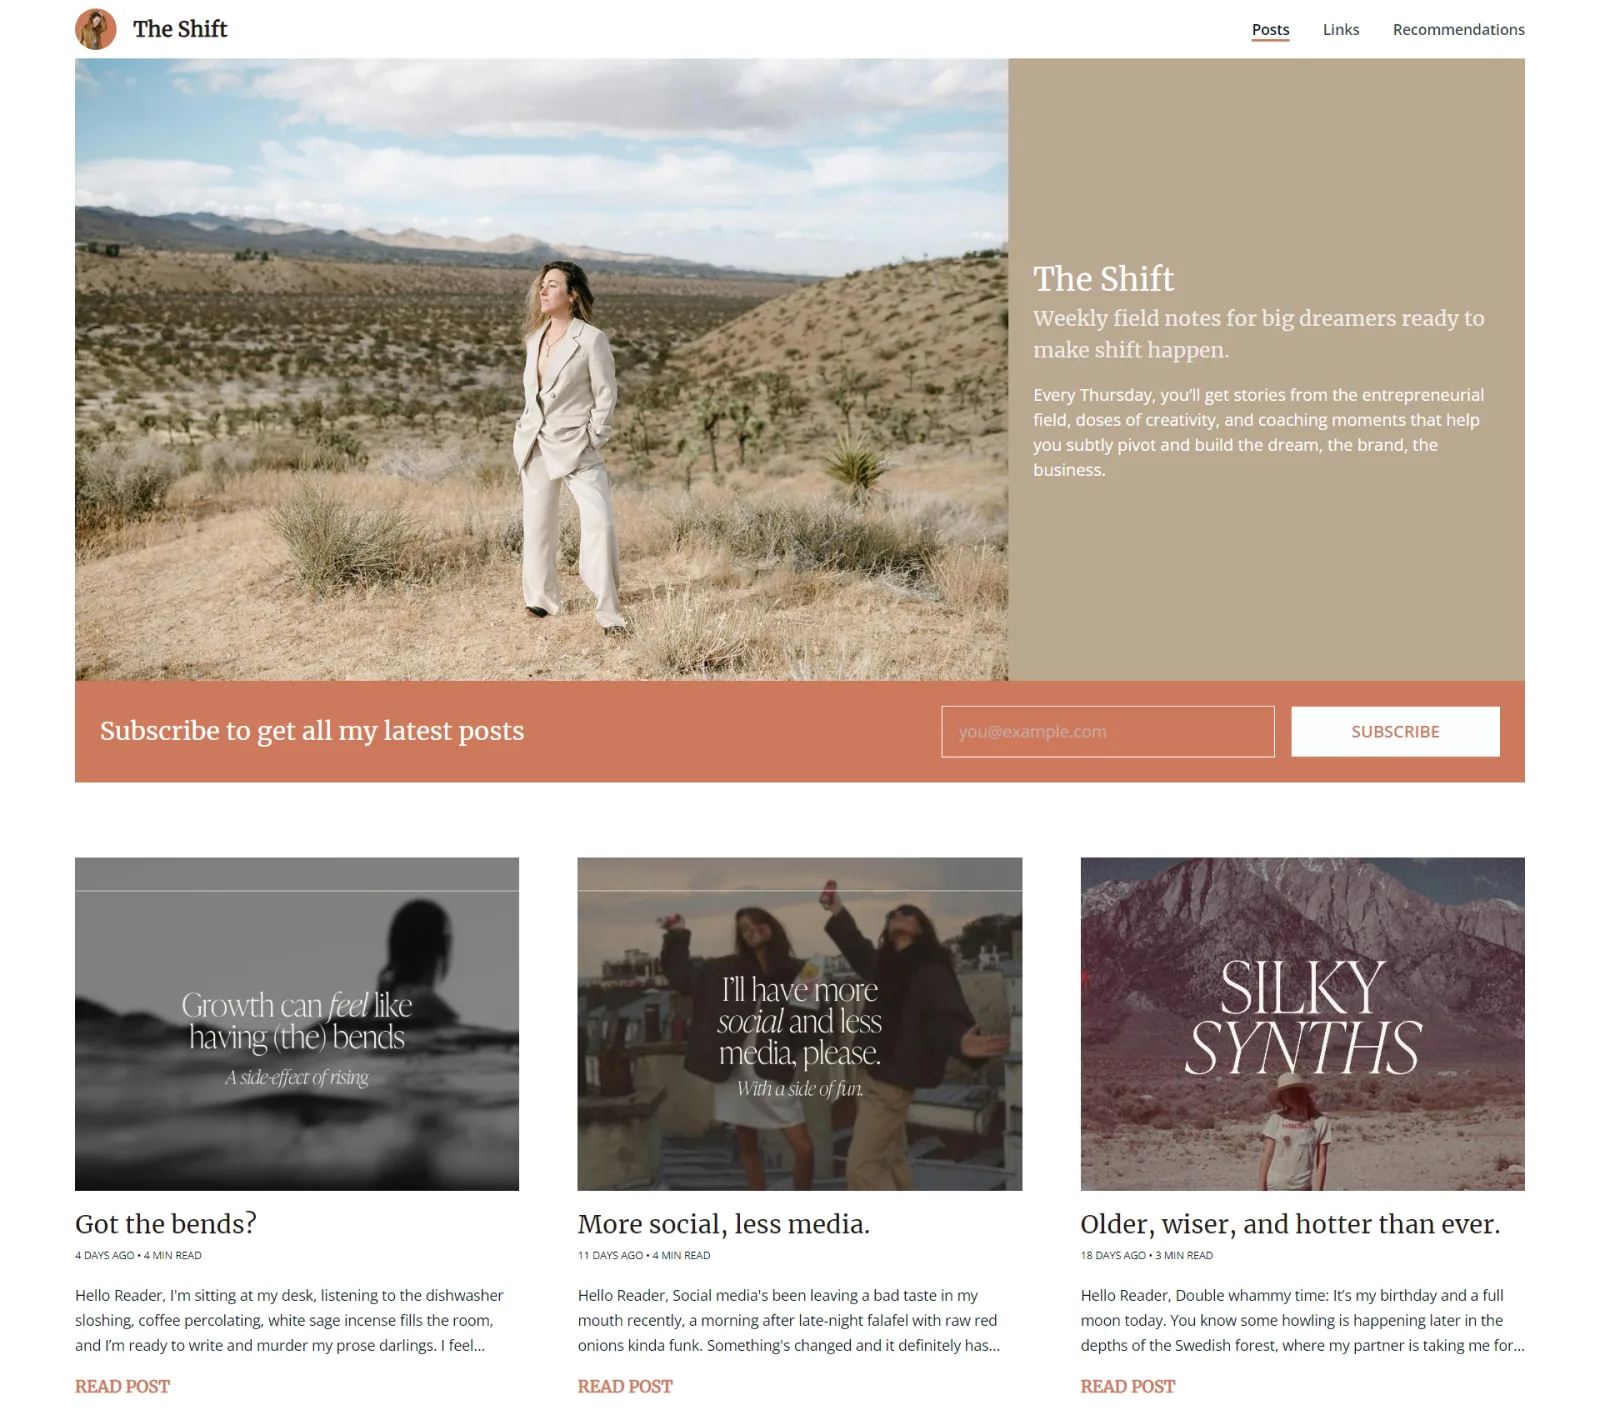
Style example by Kollektiv Studio
Pia Leichter, founder of the branding studio Kollektiv, sticks with two colors, two fonts, and on-brand imagery to make her Creator Page unique.
Step #4: Join the Creator Network and recommend other creators
Depending on your plan, you might be auto-enrolled in the Creator Network. Which is a good thing—the Creator Network opens you up to a built-in cross-collaboration tool to grow your list faster through referral marketing.
Here’s how the Creator Network works:
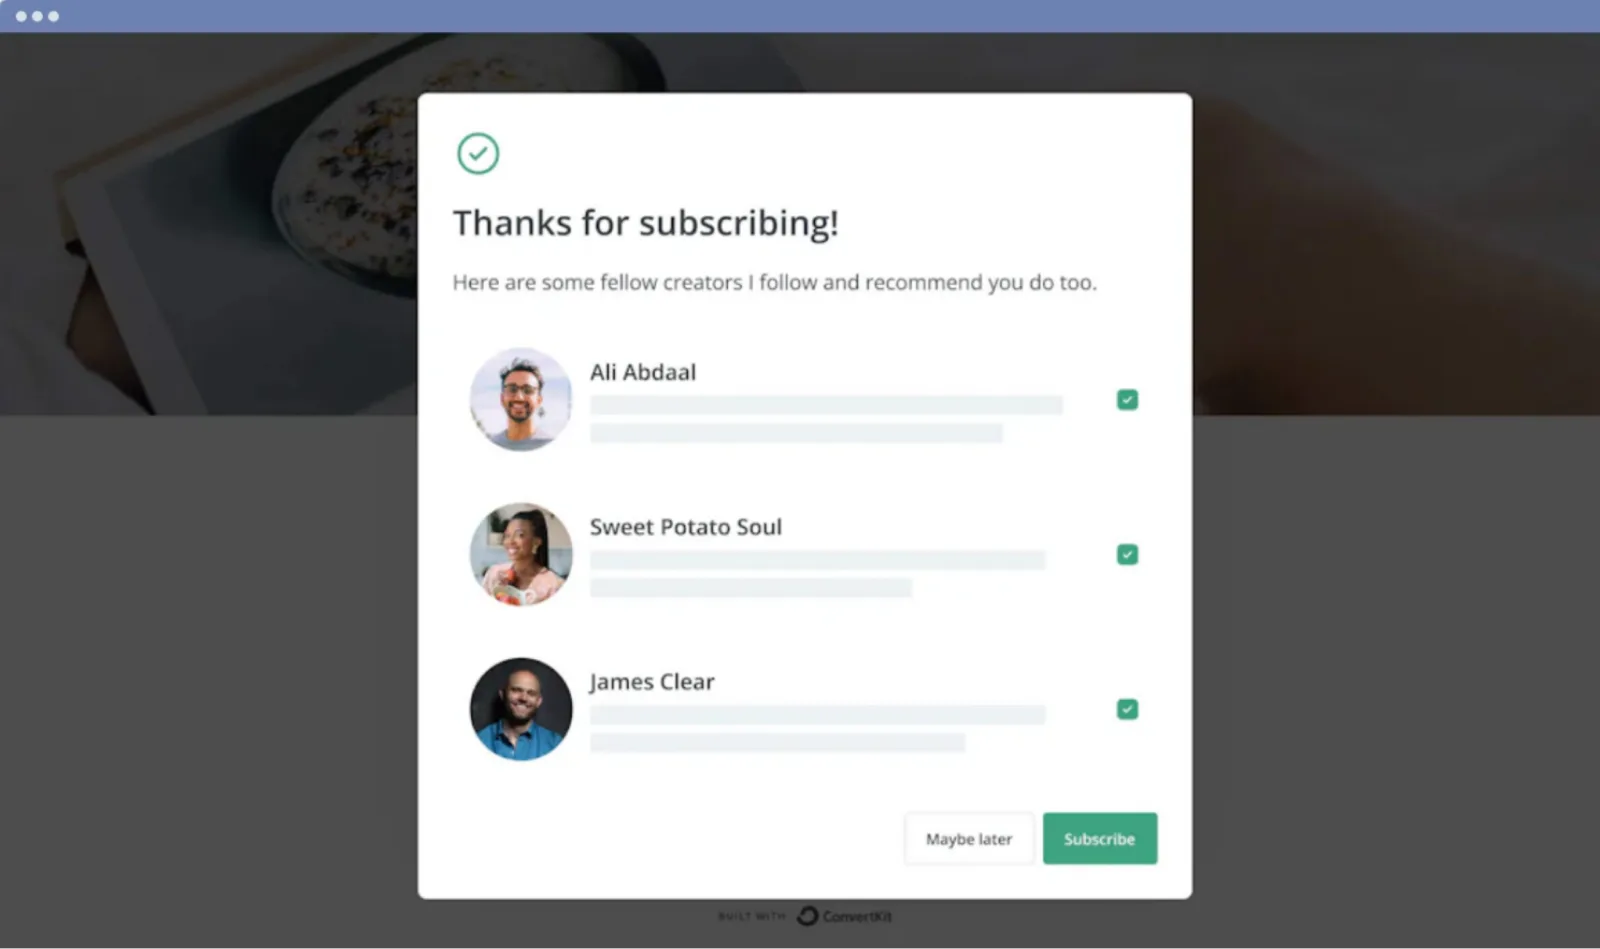
After someone subscribes to your list, they’ll see a prompt where they can also subscribe to other newsletters you recommend. And your name will appear on the modal for creators who recommend you. Like this:
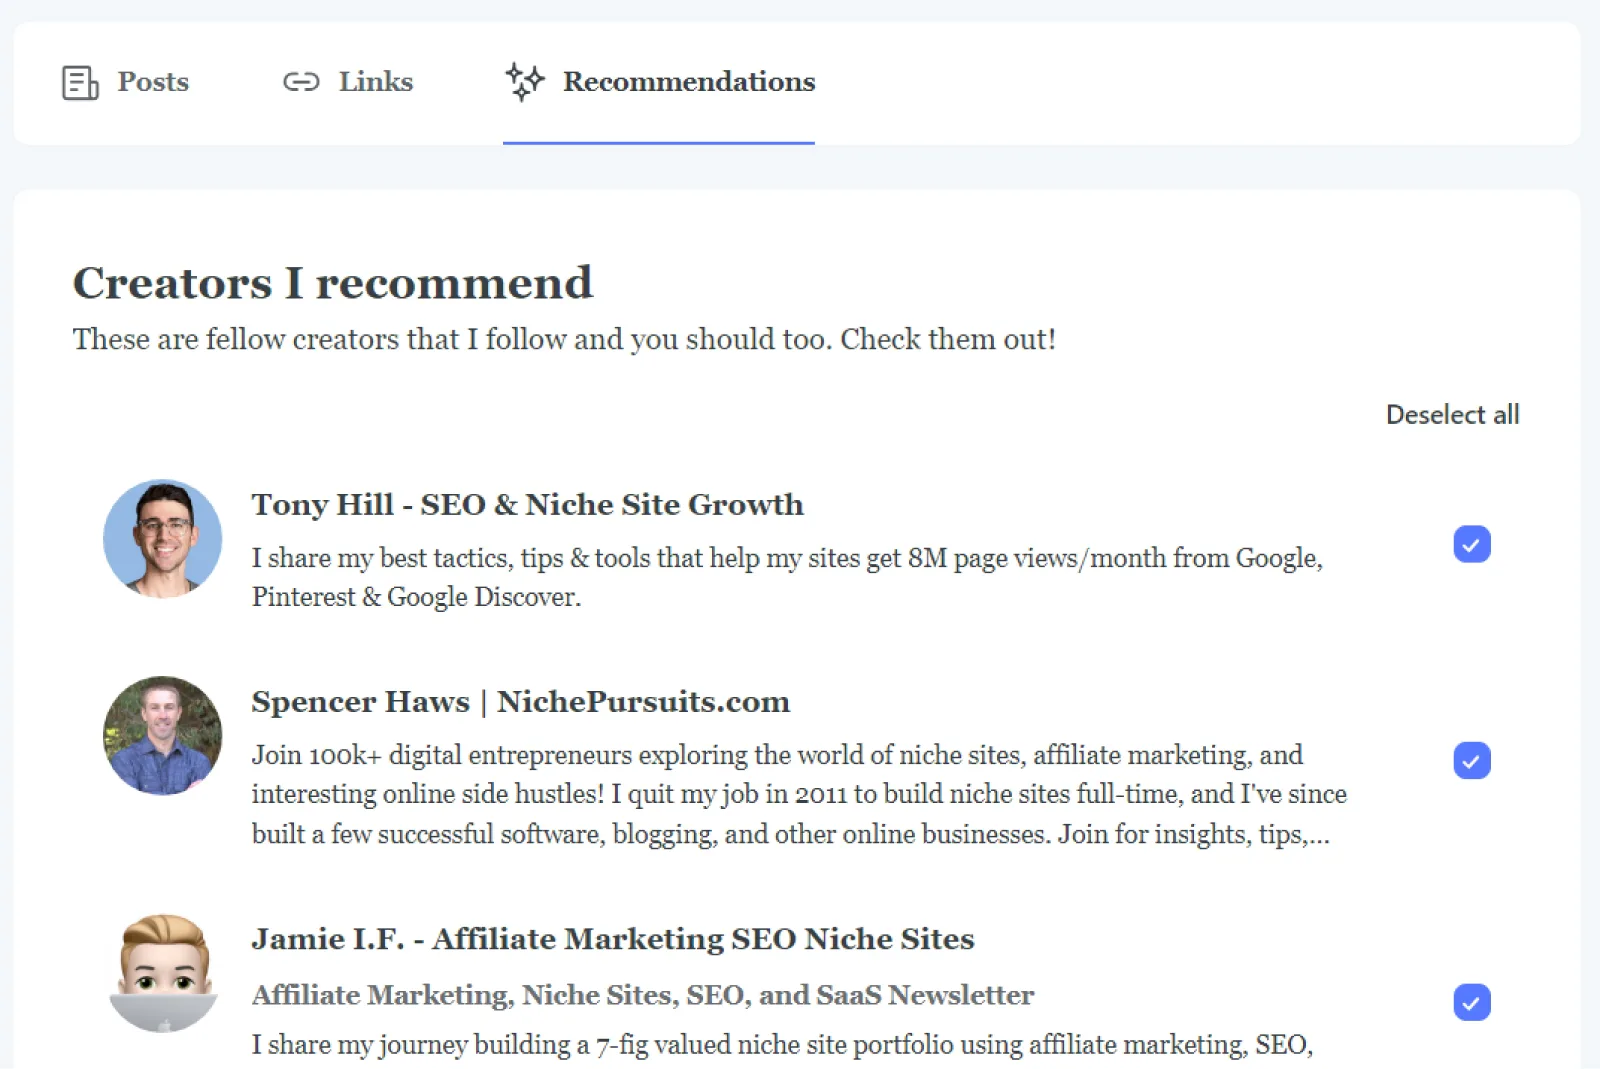
You’ll also be shown on other creators’ “Recommendation” pages. Like this:
To make sure other creators can refer you, click “Grow” > “Recommendations.”
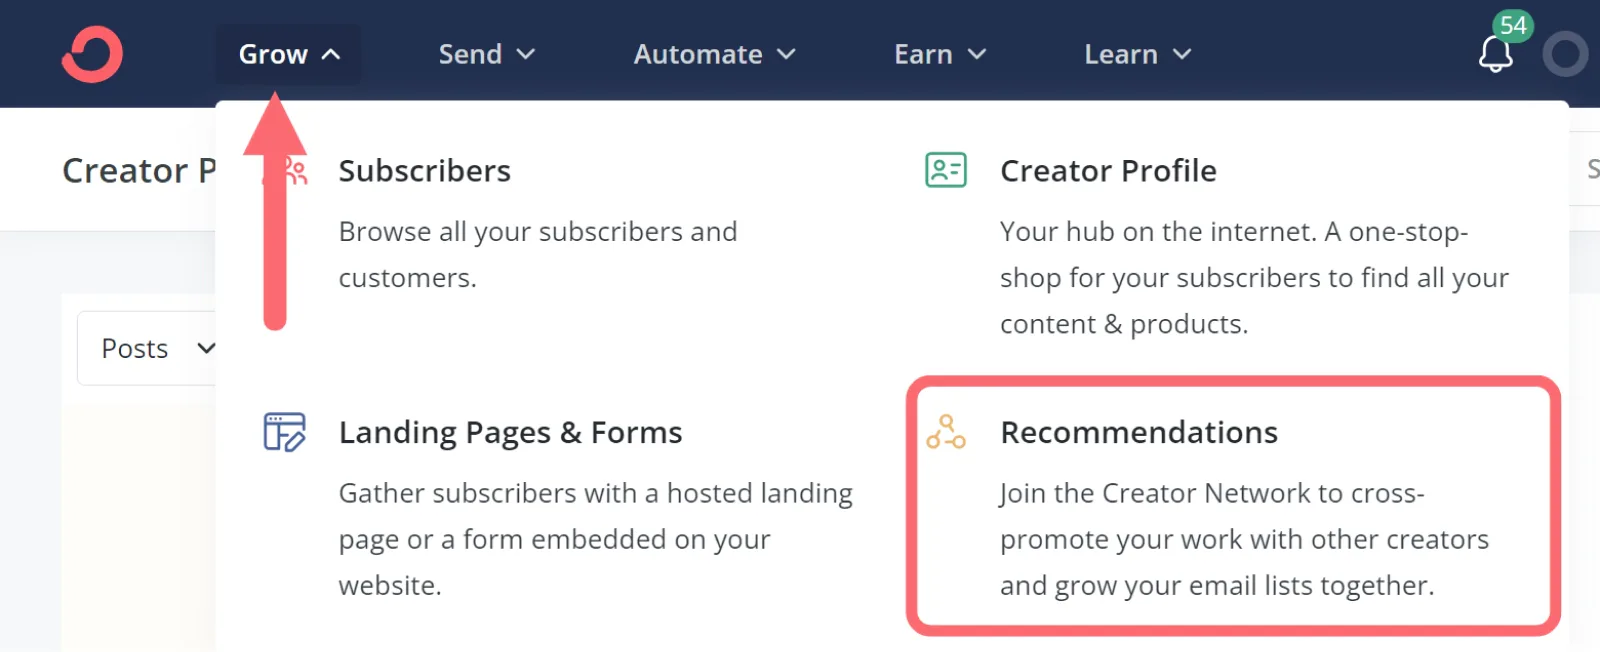
Go through the following prompts where you will:
- Confirm your creator profile
- Choose which type of creator you are (i.e., blogger, influencer, etc.)
- Select your topic
- Select where to show your recommendations
- Choose other creators to recommend
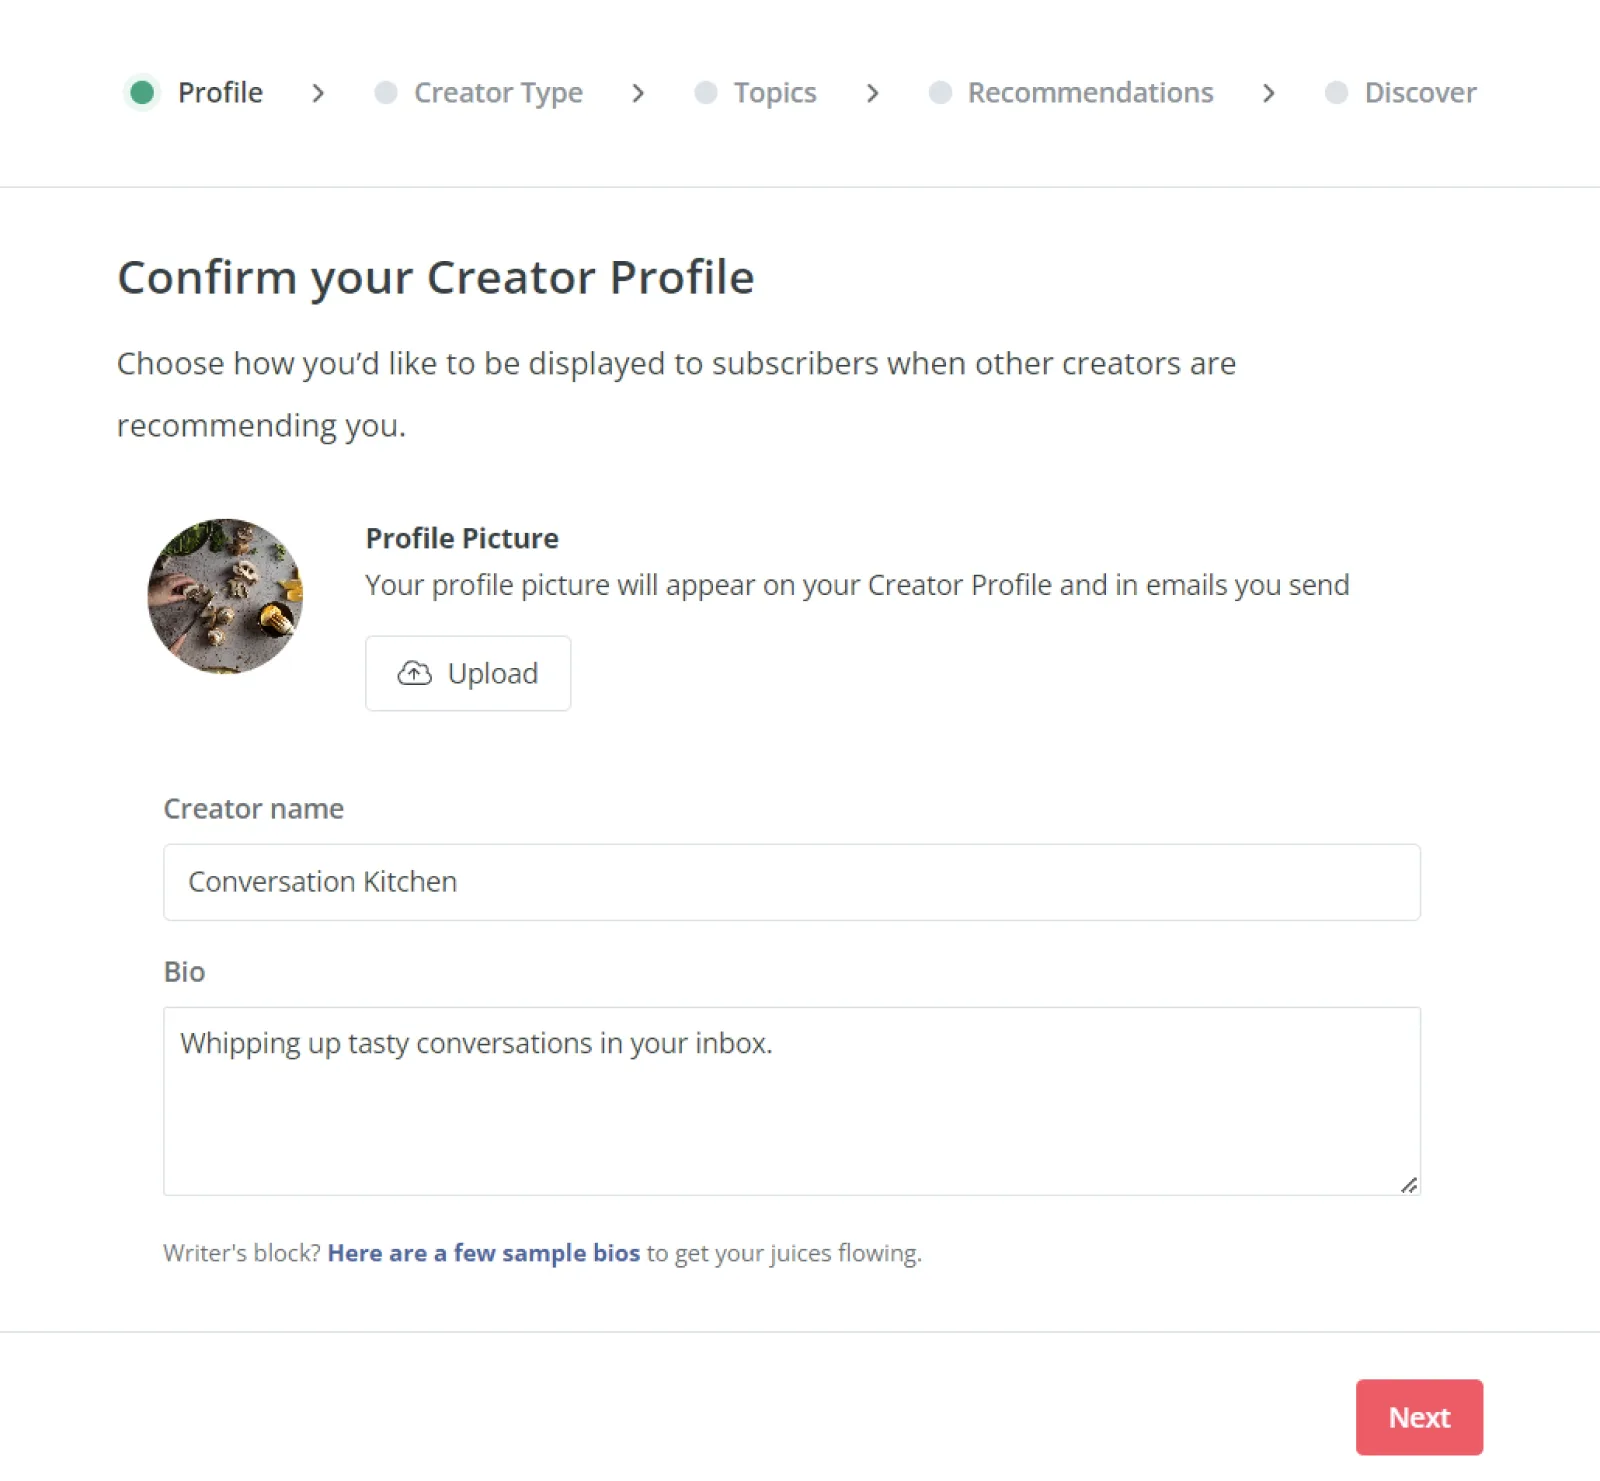
Once you’re enrolled in the Creator Network, other creators can start recommending you, too!
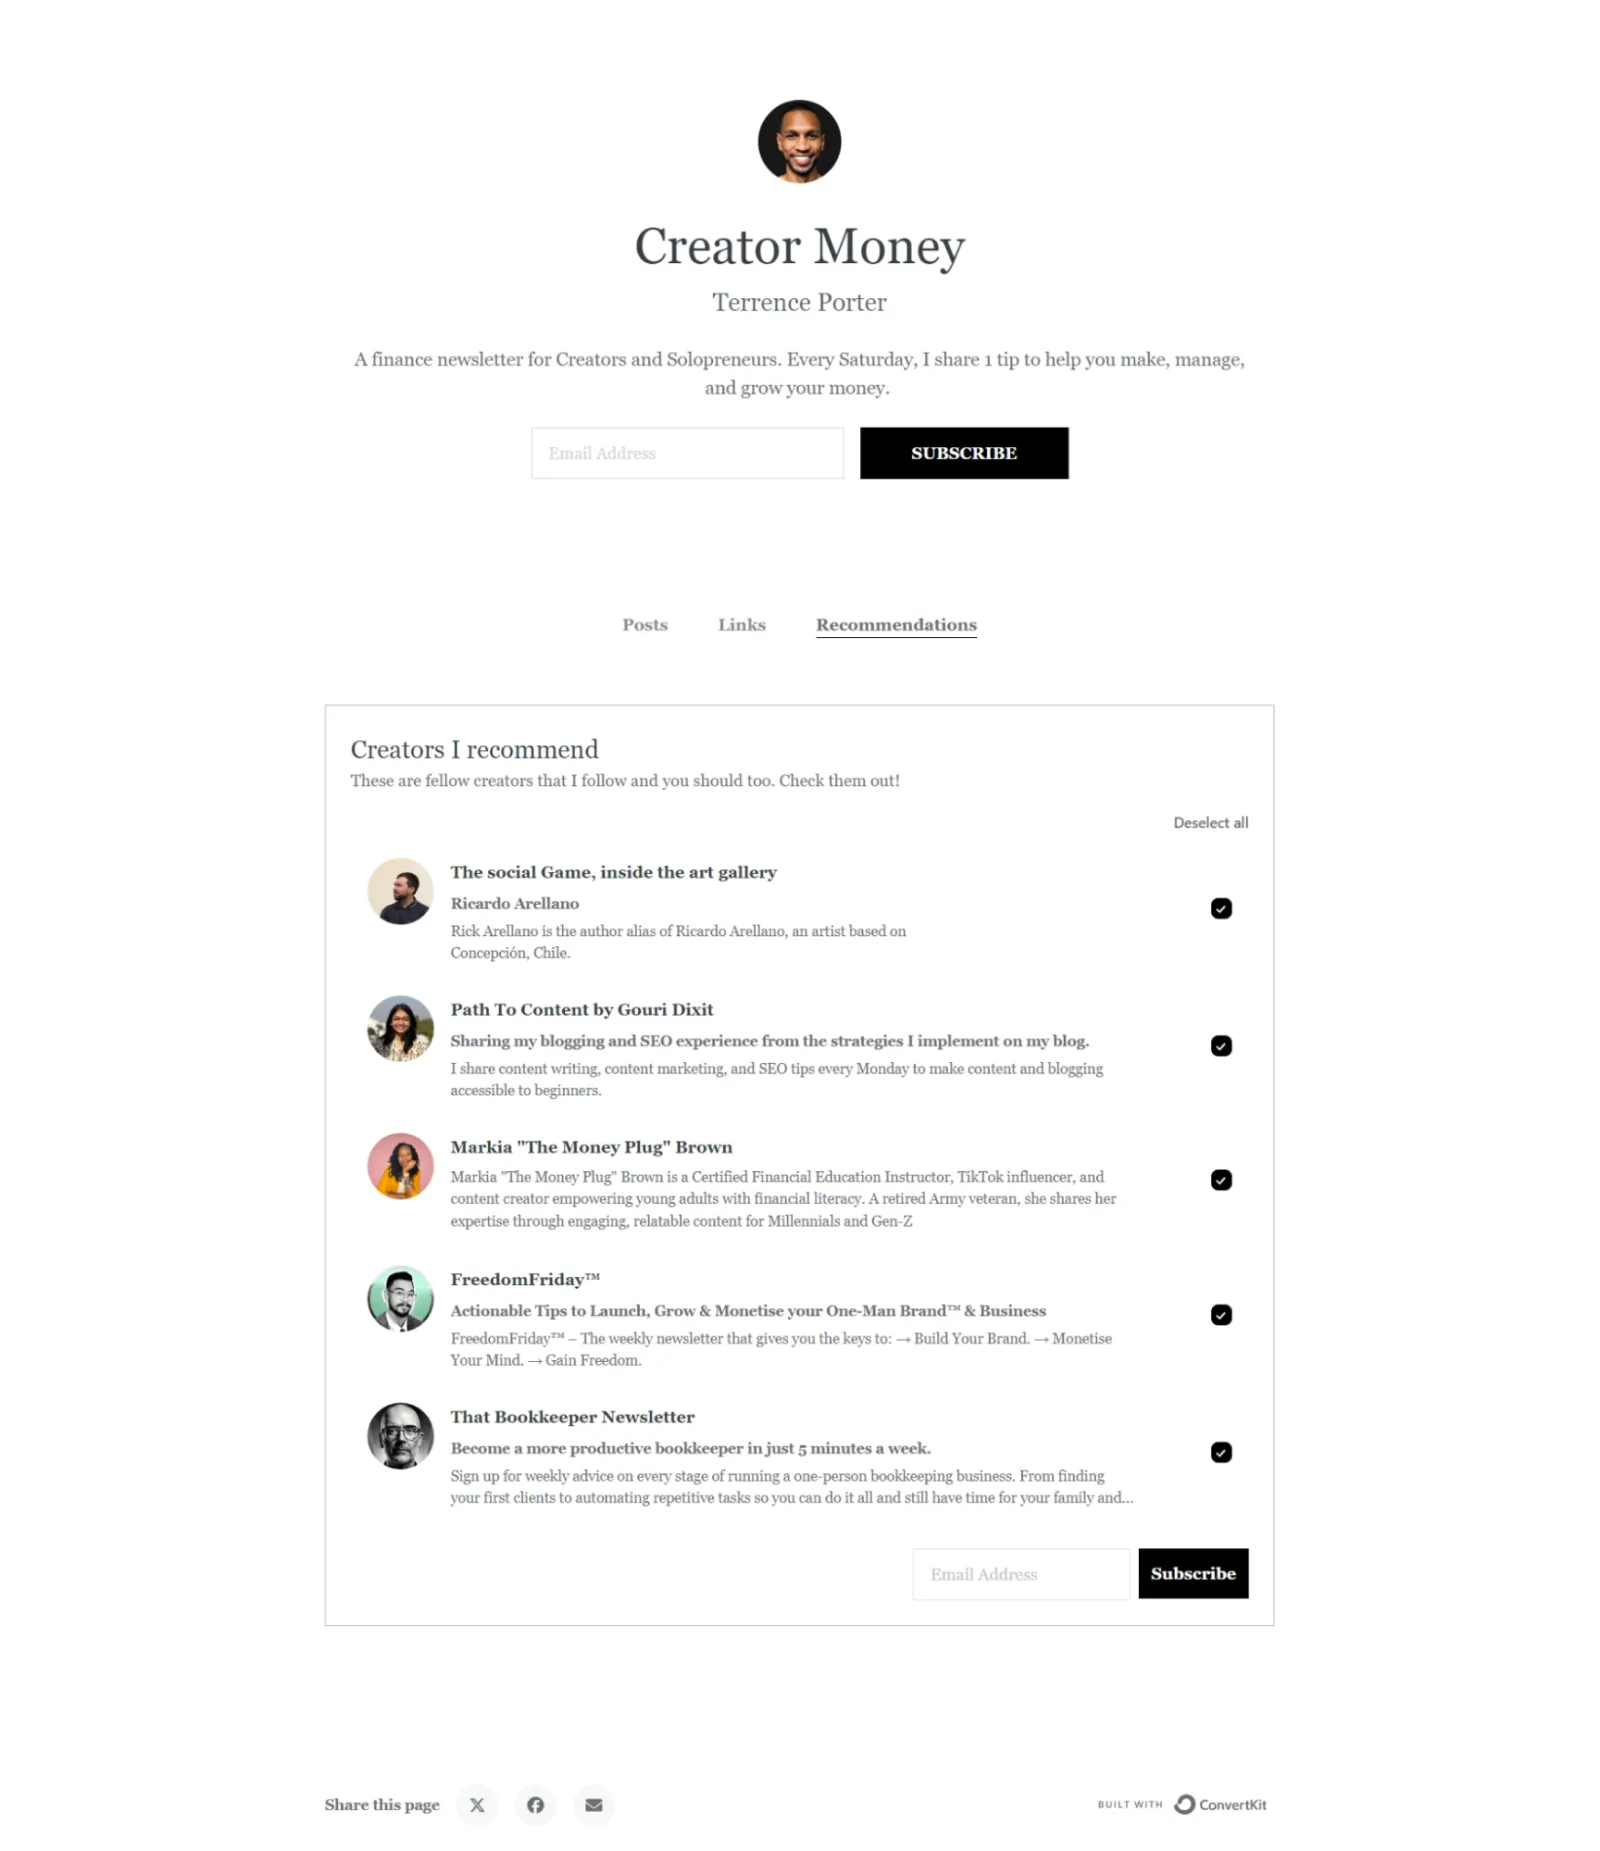
Example of Terrence Porter’s recommendations page
Terrence Porter recommends five creators related to his niche.
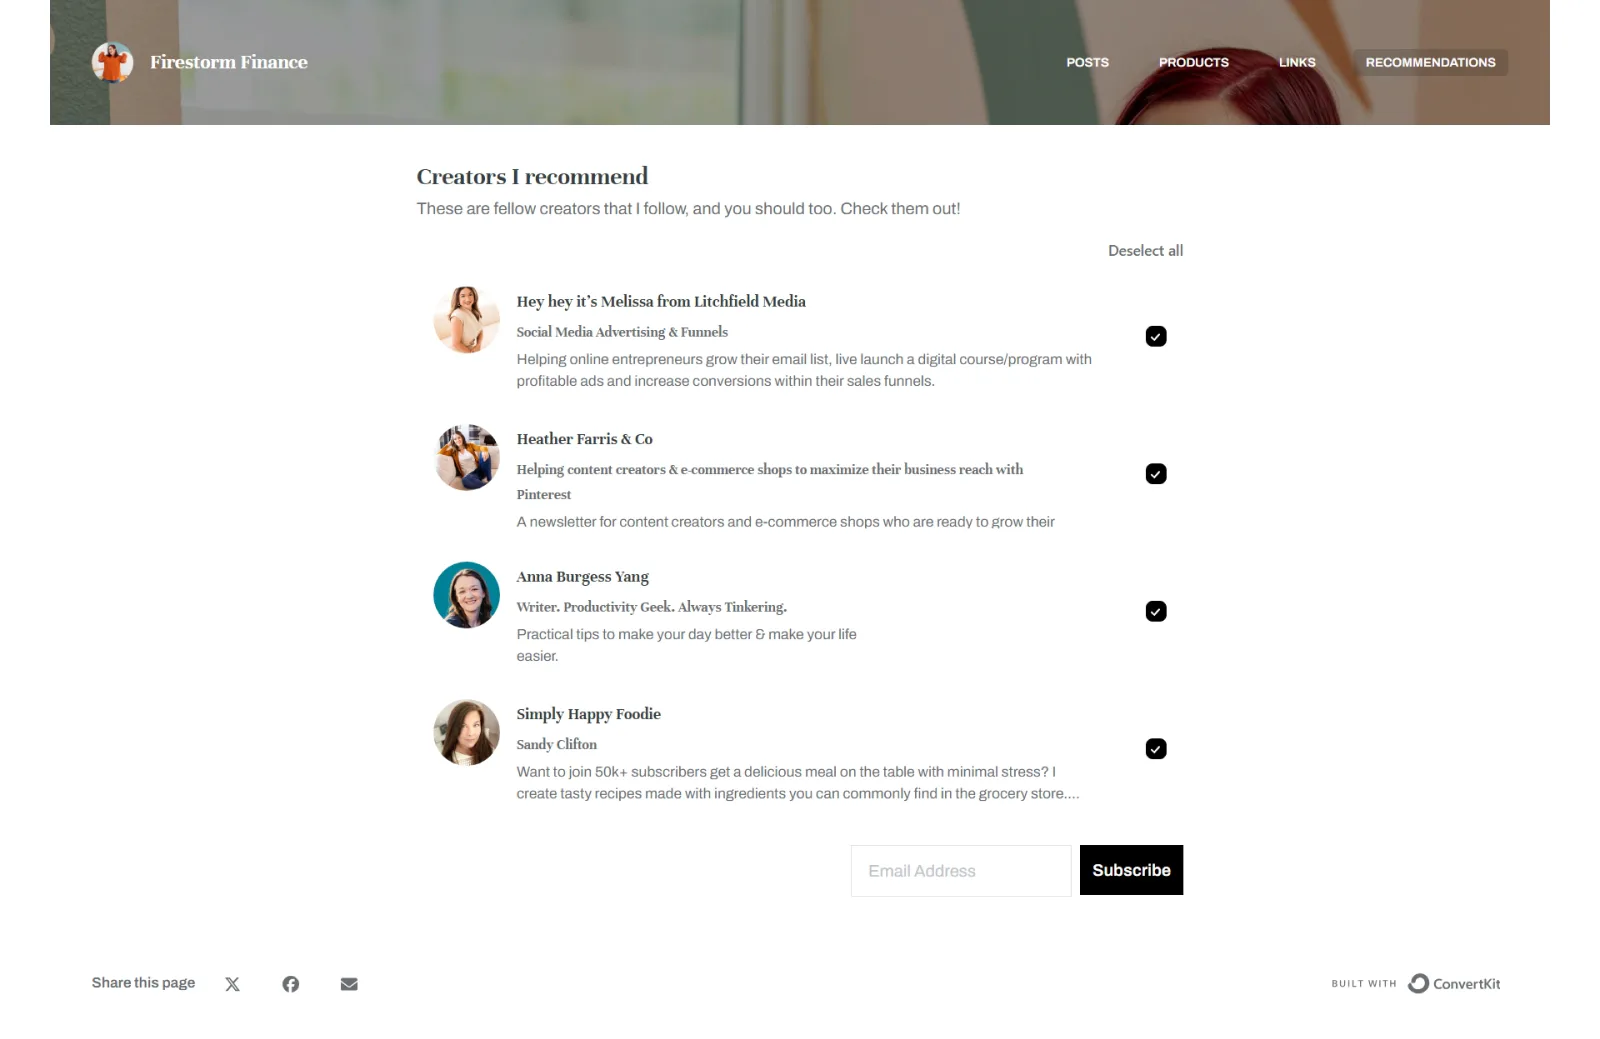
Example of Firestorm Finance’s recommendations page
Firestorm Finance recommends four other creators who also complement their niche:
Step #5: Decide where to send subscribers after they sign up
Next, decide what happens when someone subscribes to your list using the opt-in form on your Creator Profile:
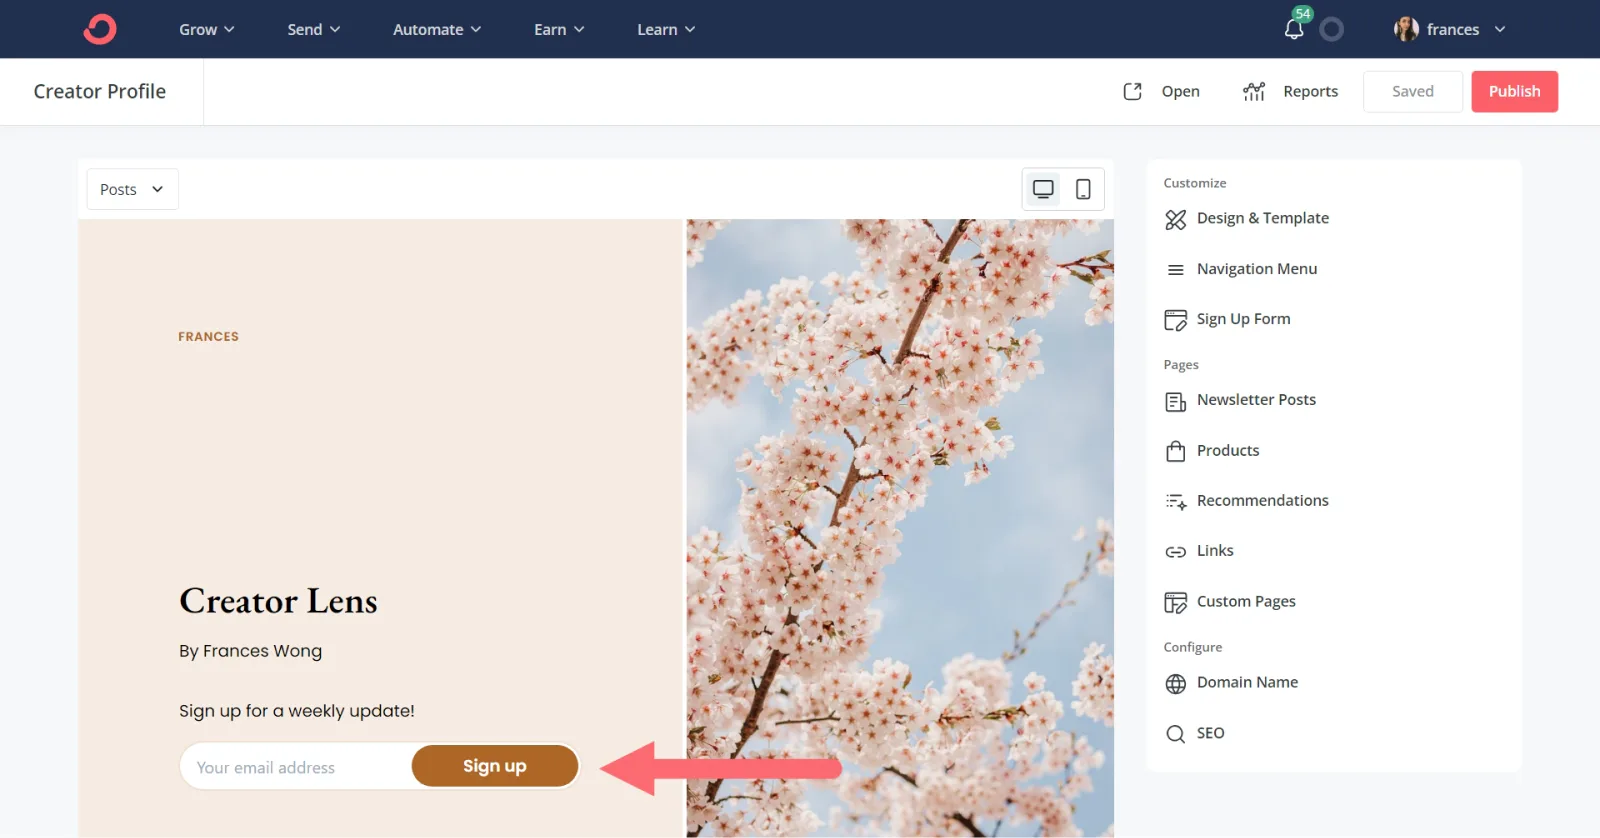
Click “Sign Up Form.”
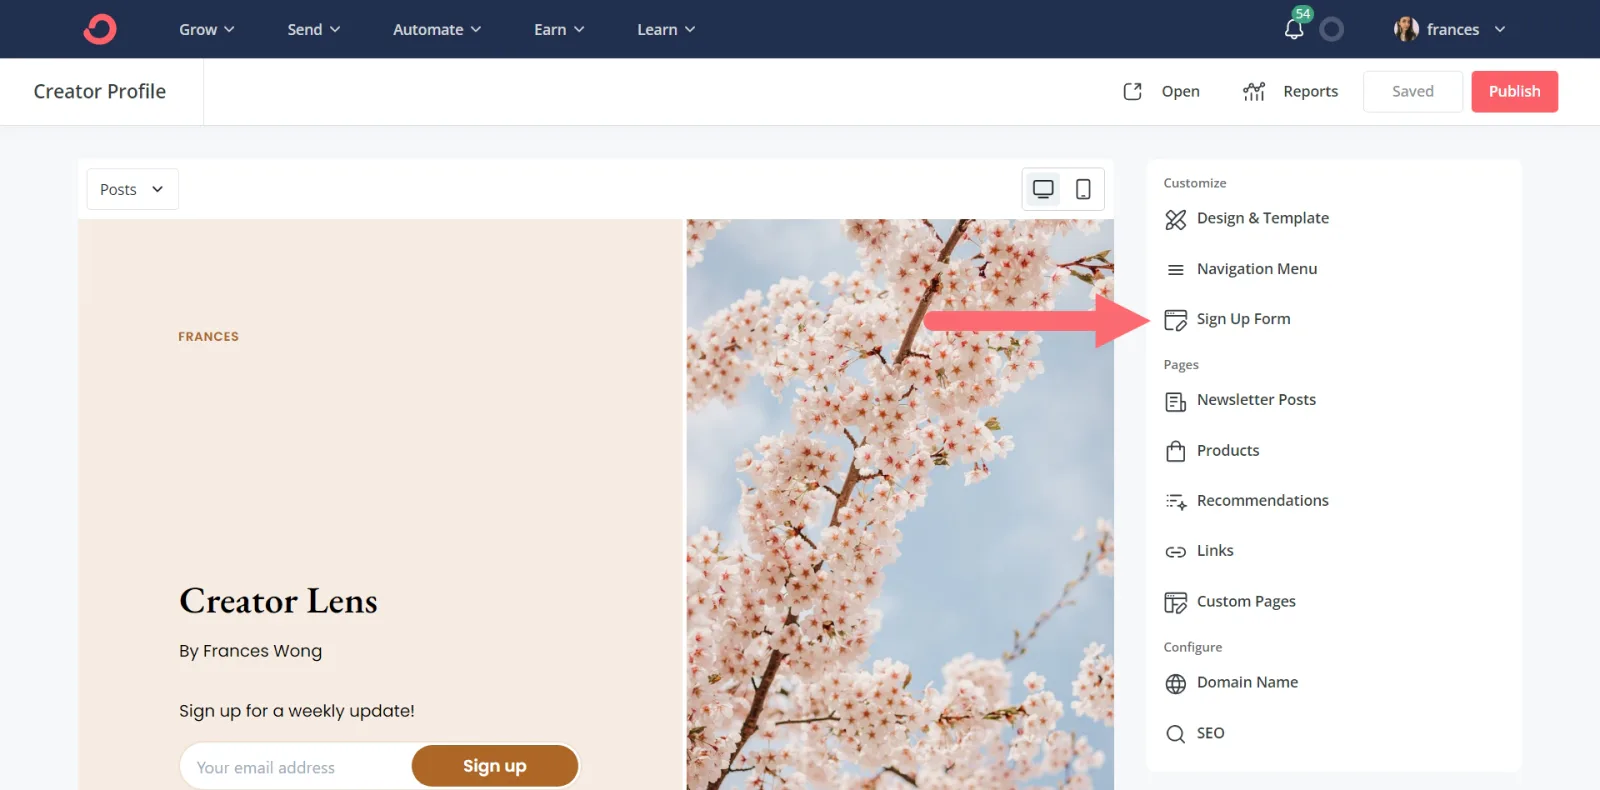
And choose if you want to send a confirmation email (sending confirmation emails ensures your list is filled with active emails).
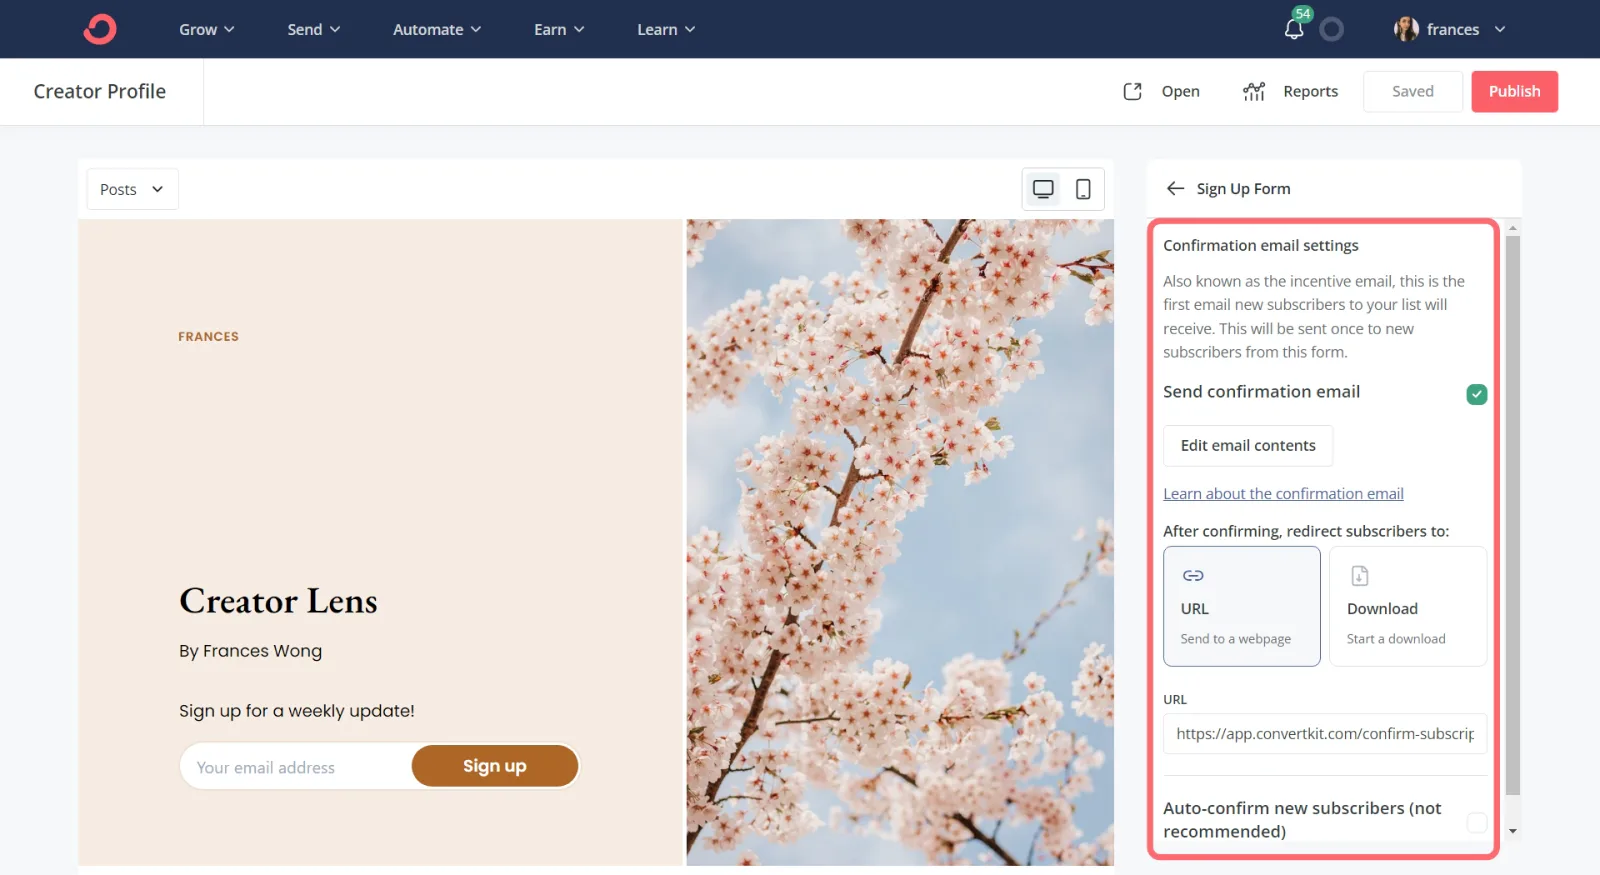
Then, decide where your Creator Profile should send people after they subscribe. You have two choices:
- URL: Send people to a URL—like a thank you page—if you don’t have a lead magnet yet.
- Download: Attach your lead magnet file—like a PDF—to download automatically after someone subscribes to your list. The lead magnet you offer should be related to your niche so your subscribers will be interested in getting it. For example, if you teach art classes, a lead magnet idea could be a free mini watercolor class.
Step #6: Add custom pages to your website
Up until now you’ve learned how to create a free website with a few different pages by way of your Creator Profile. Now, let’s turn your Creator Profile into a full-on website with custom pages.
Click the dropdown menu and “+ Add page.”

Then, add content using the editor at the bottom. And adjust the page’s technical elements with the editor to the right.
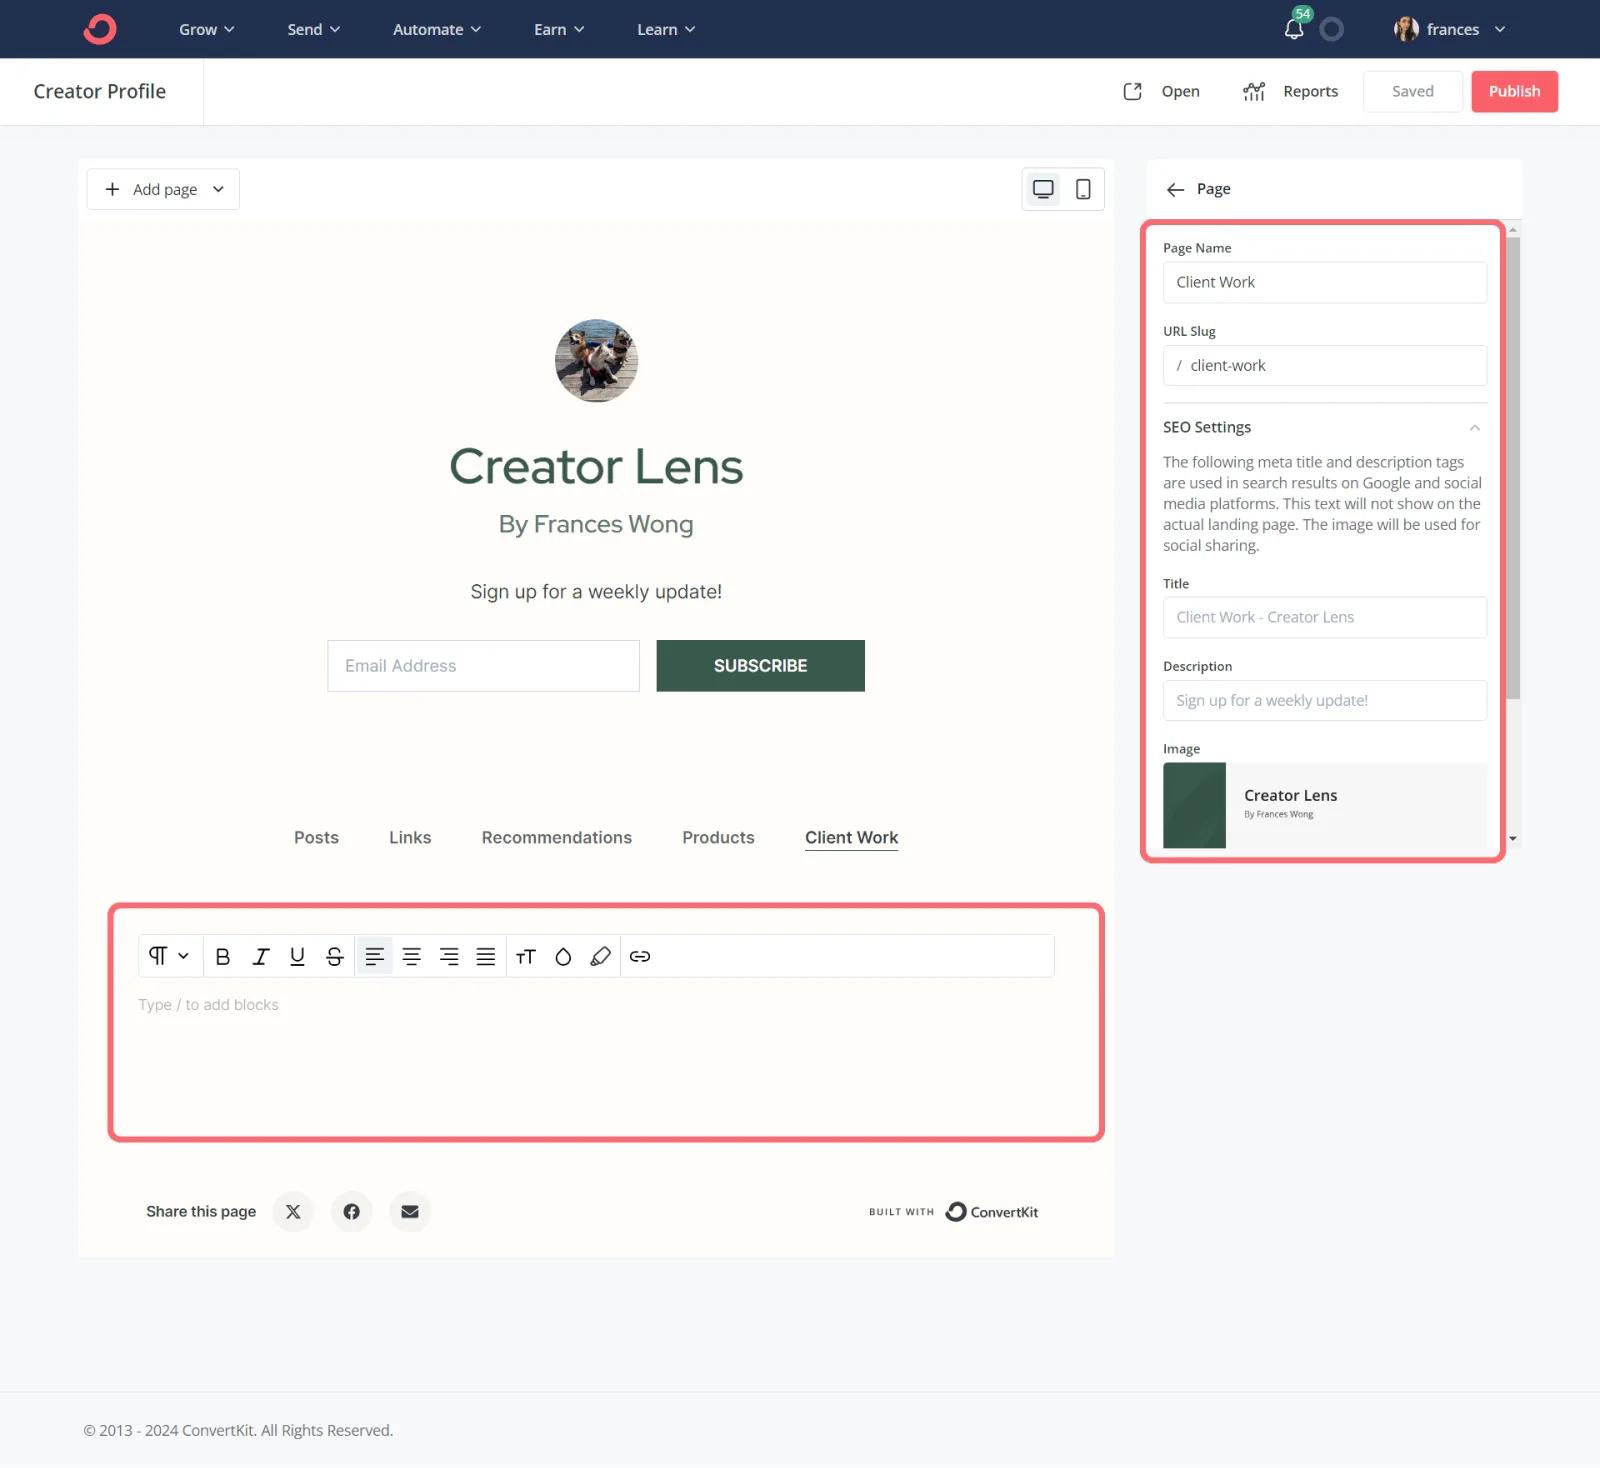
Here are some ideas for additional pages:
- About page with more detailed information about you
- Services page with a link to send you an email
- Product page with all your products to buy
- Booking page with a link to book a consultation
- Portfolio page with a sample of your work
- Posts page with your past newsletters or blog posts
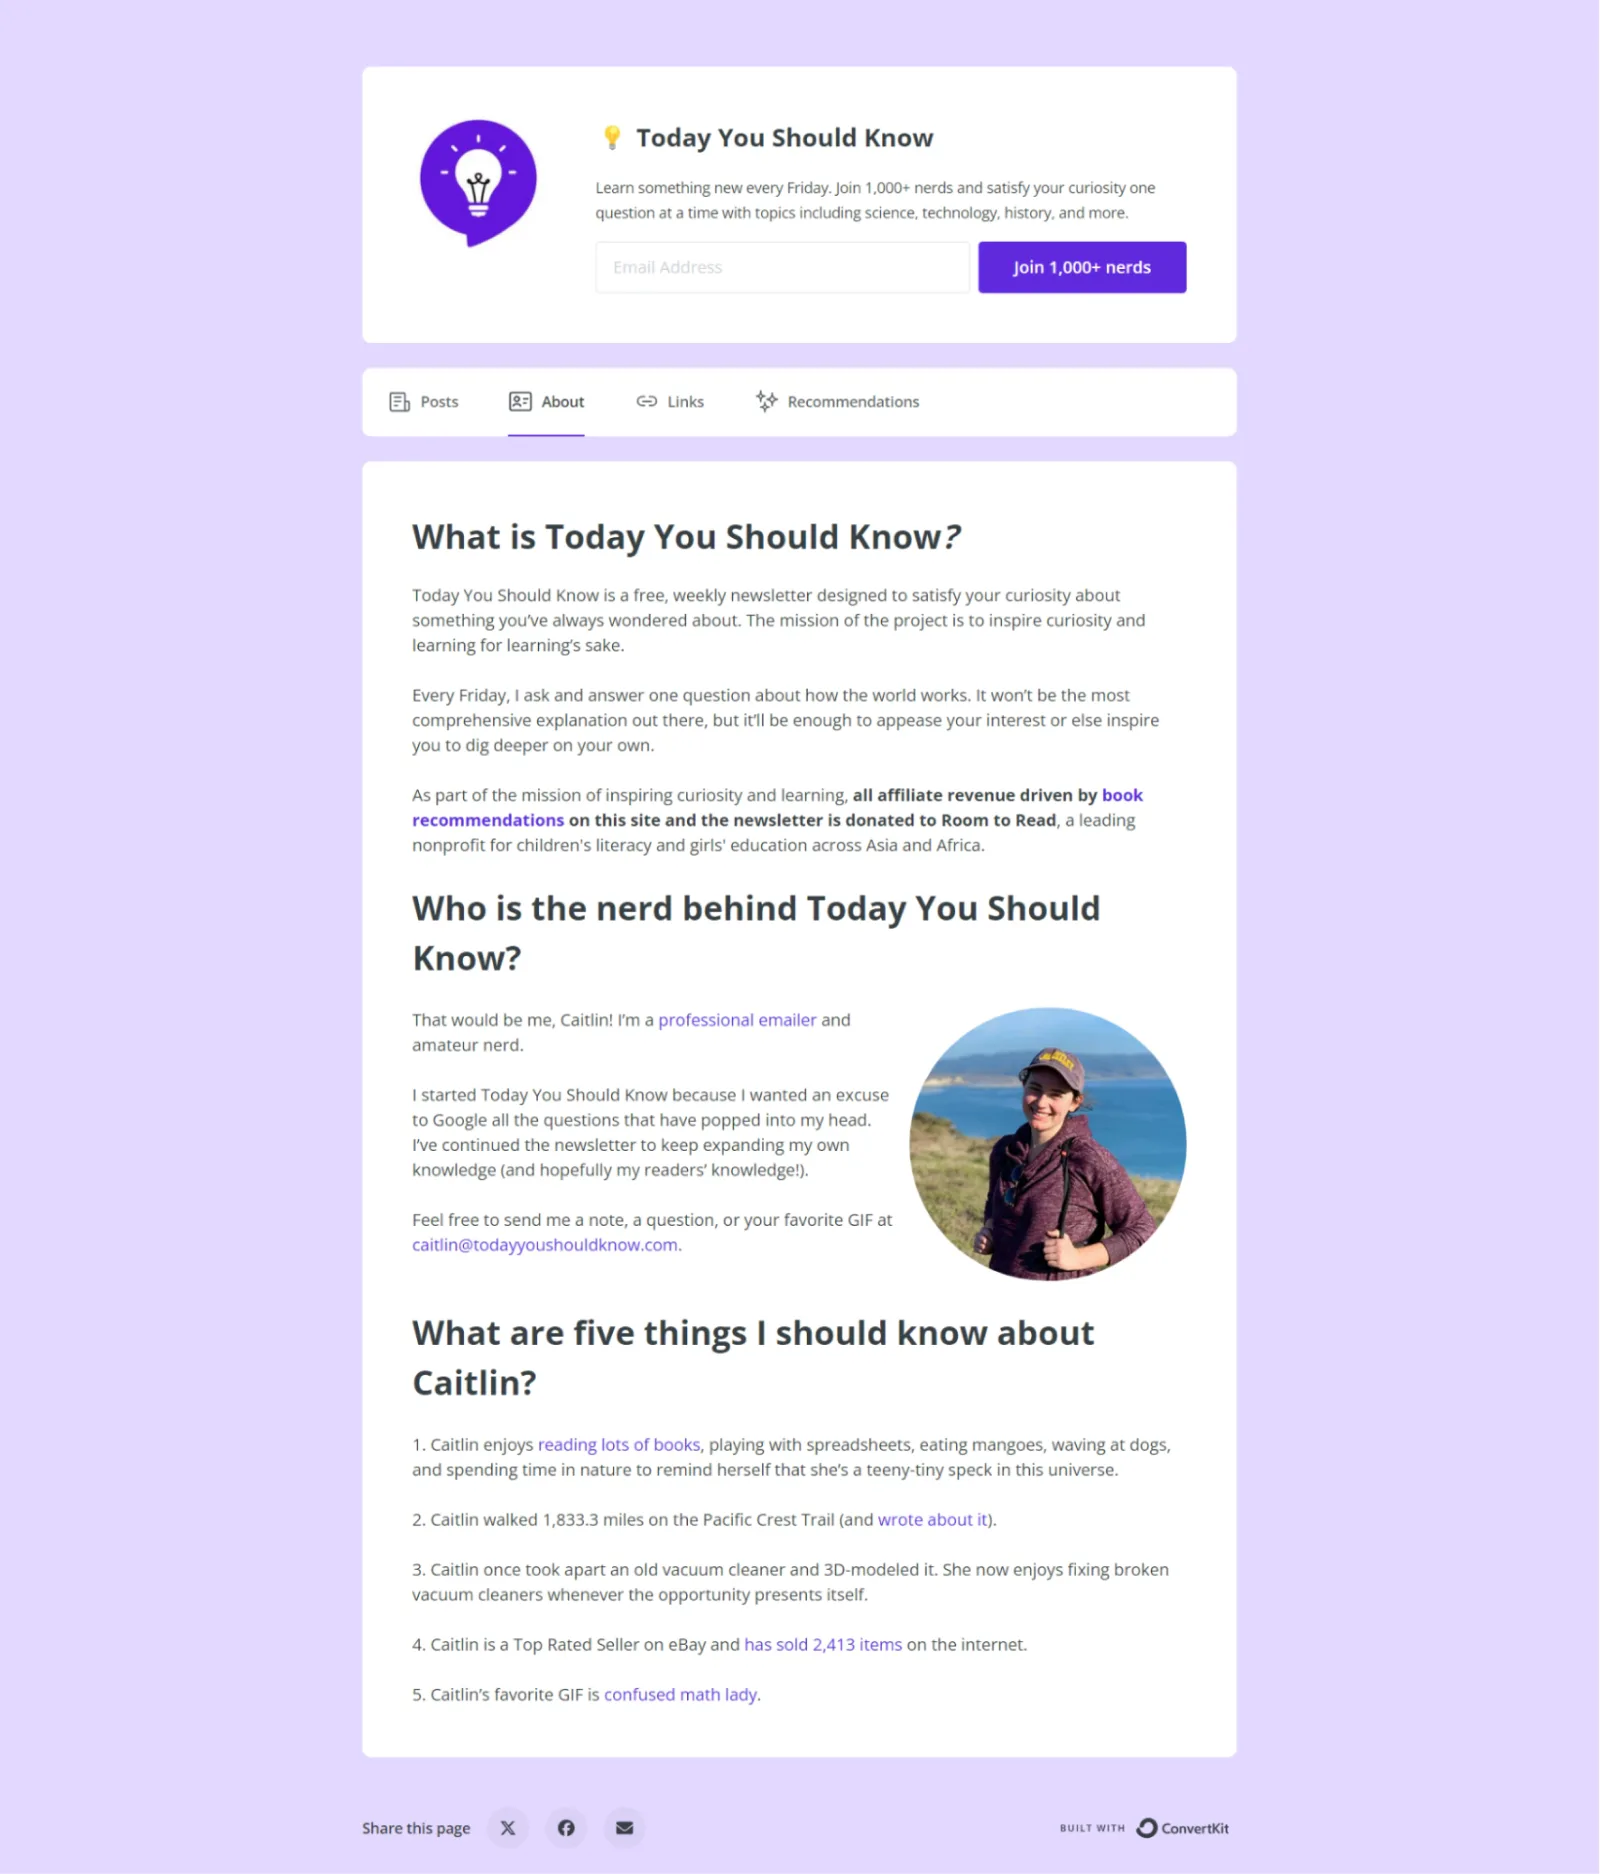
About page example by Caitlin
Creator Caitlin uses her about page to dive deeper into who she is and how her newsletter “Today You Should Know” works.
She also encourages people to send her a question (or a GIF) by hyperlinking her email.
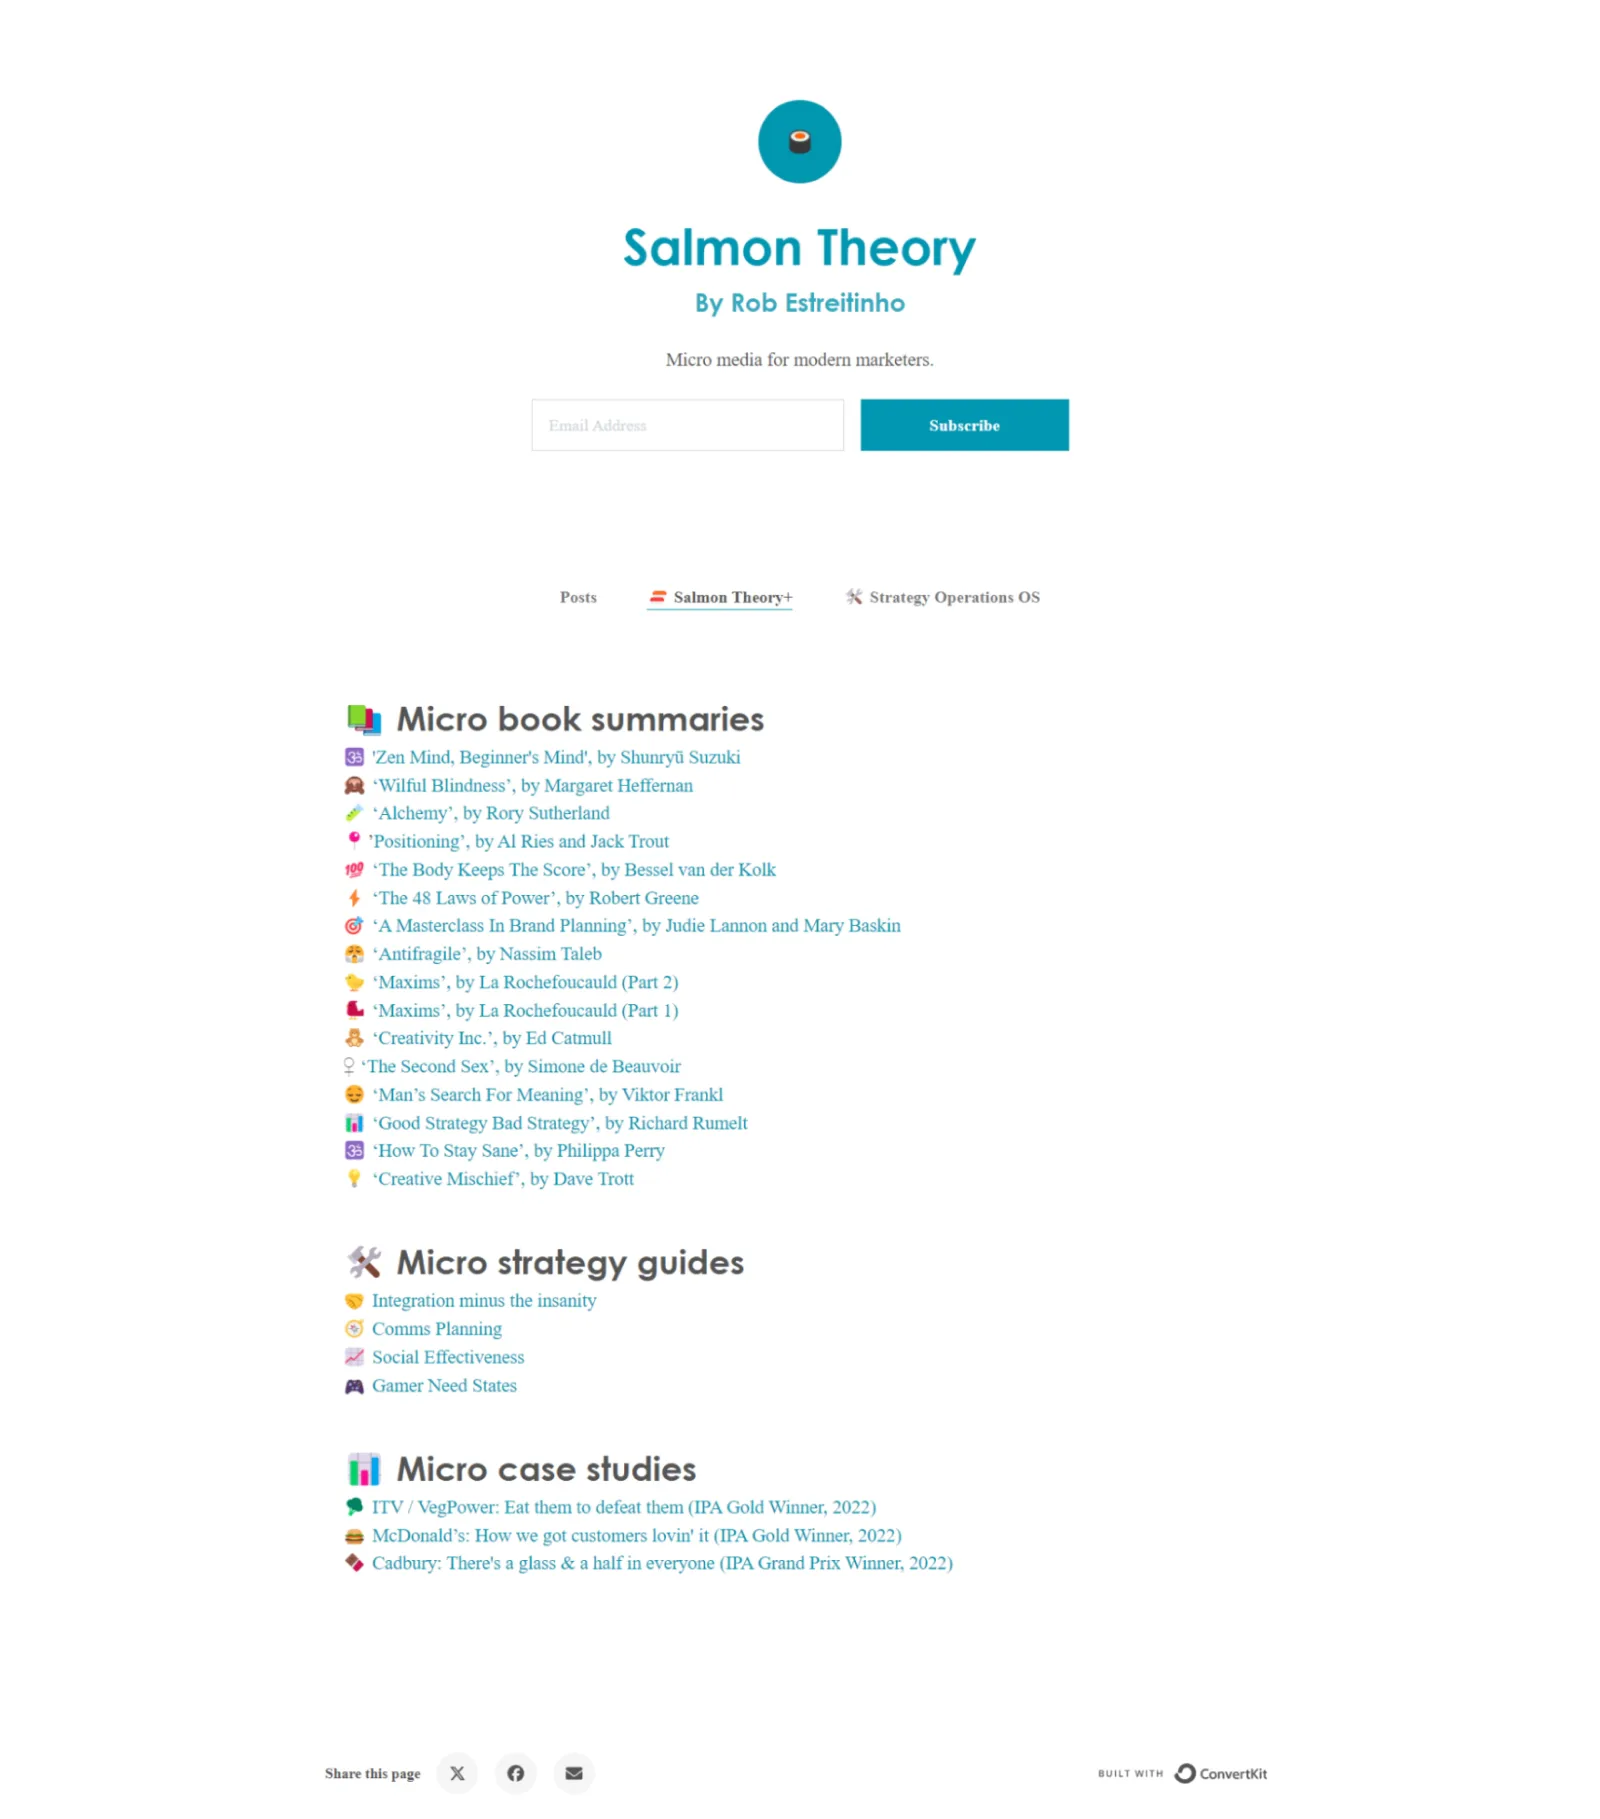
Summary page example by Rob Estreitinho
Marketer Rob Estreitinho gives viewers a list of his paid content (organized into three categories to help people find the most relevant piece).
When users click the links, they’re brought to a page where they can get a preview of Rob’s paid content, along with the option to become a paid subscriber.
Step #7: Create and connect your product pages
Want to create products and turn your website into an ecommerce shop?
Your Creator Profile integrates with Kit Commerce, making it easy to sell products and earn income.
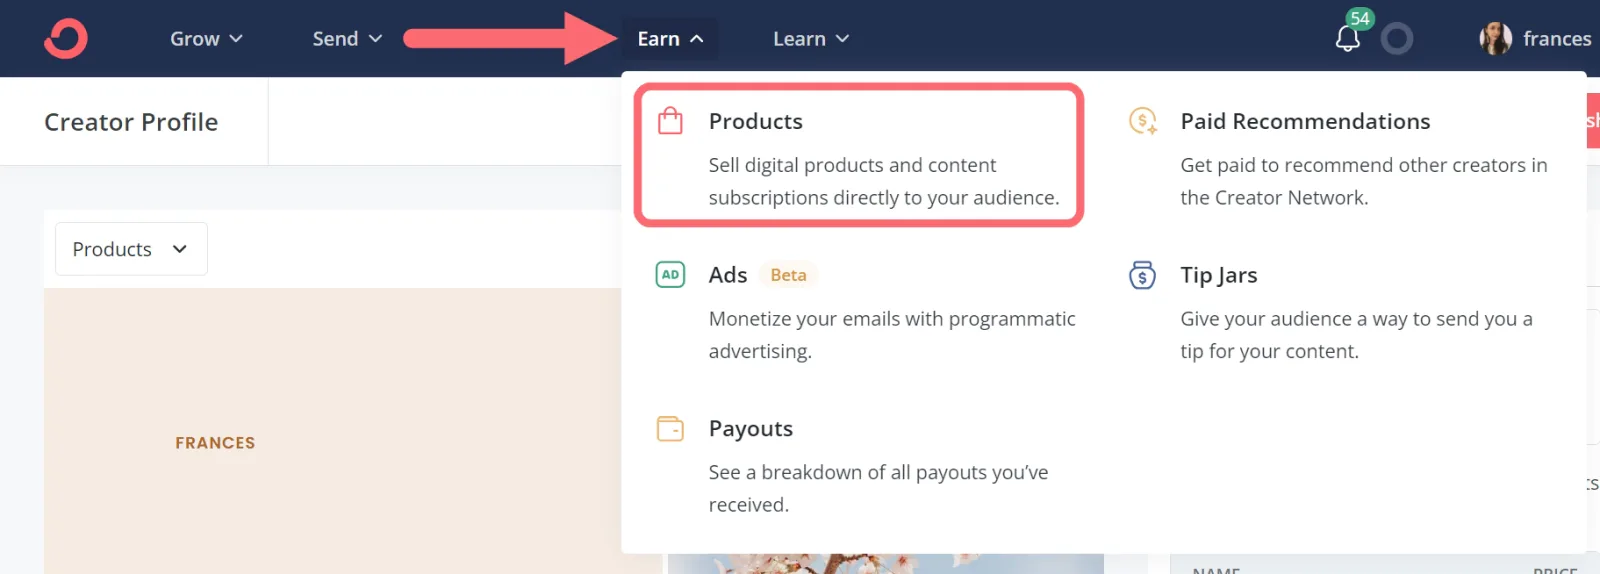
Head into “Earn” > “Products” to get your first product up and running.
Select “Set up payments” and follow the prompt to integrate your account with Stripe (needed to accept payment).
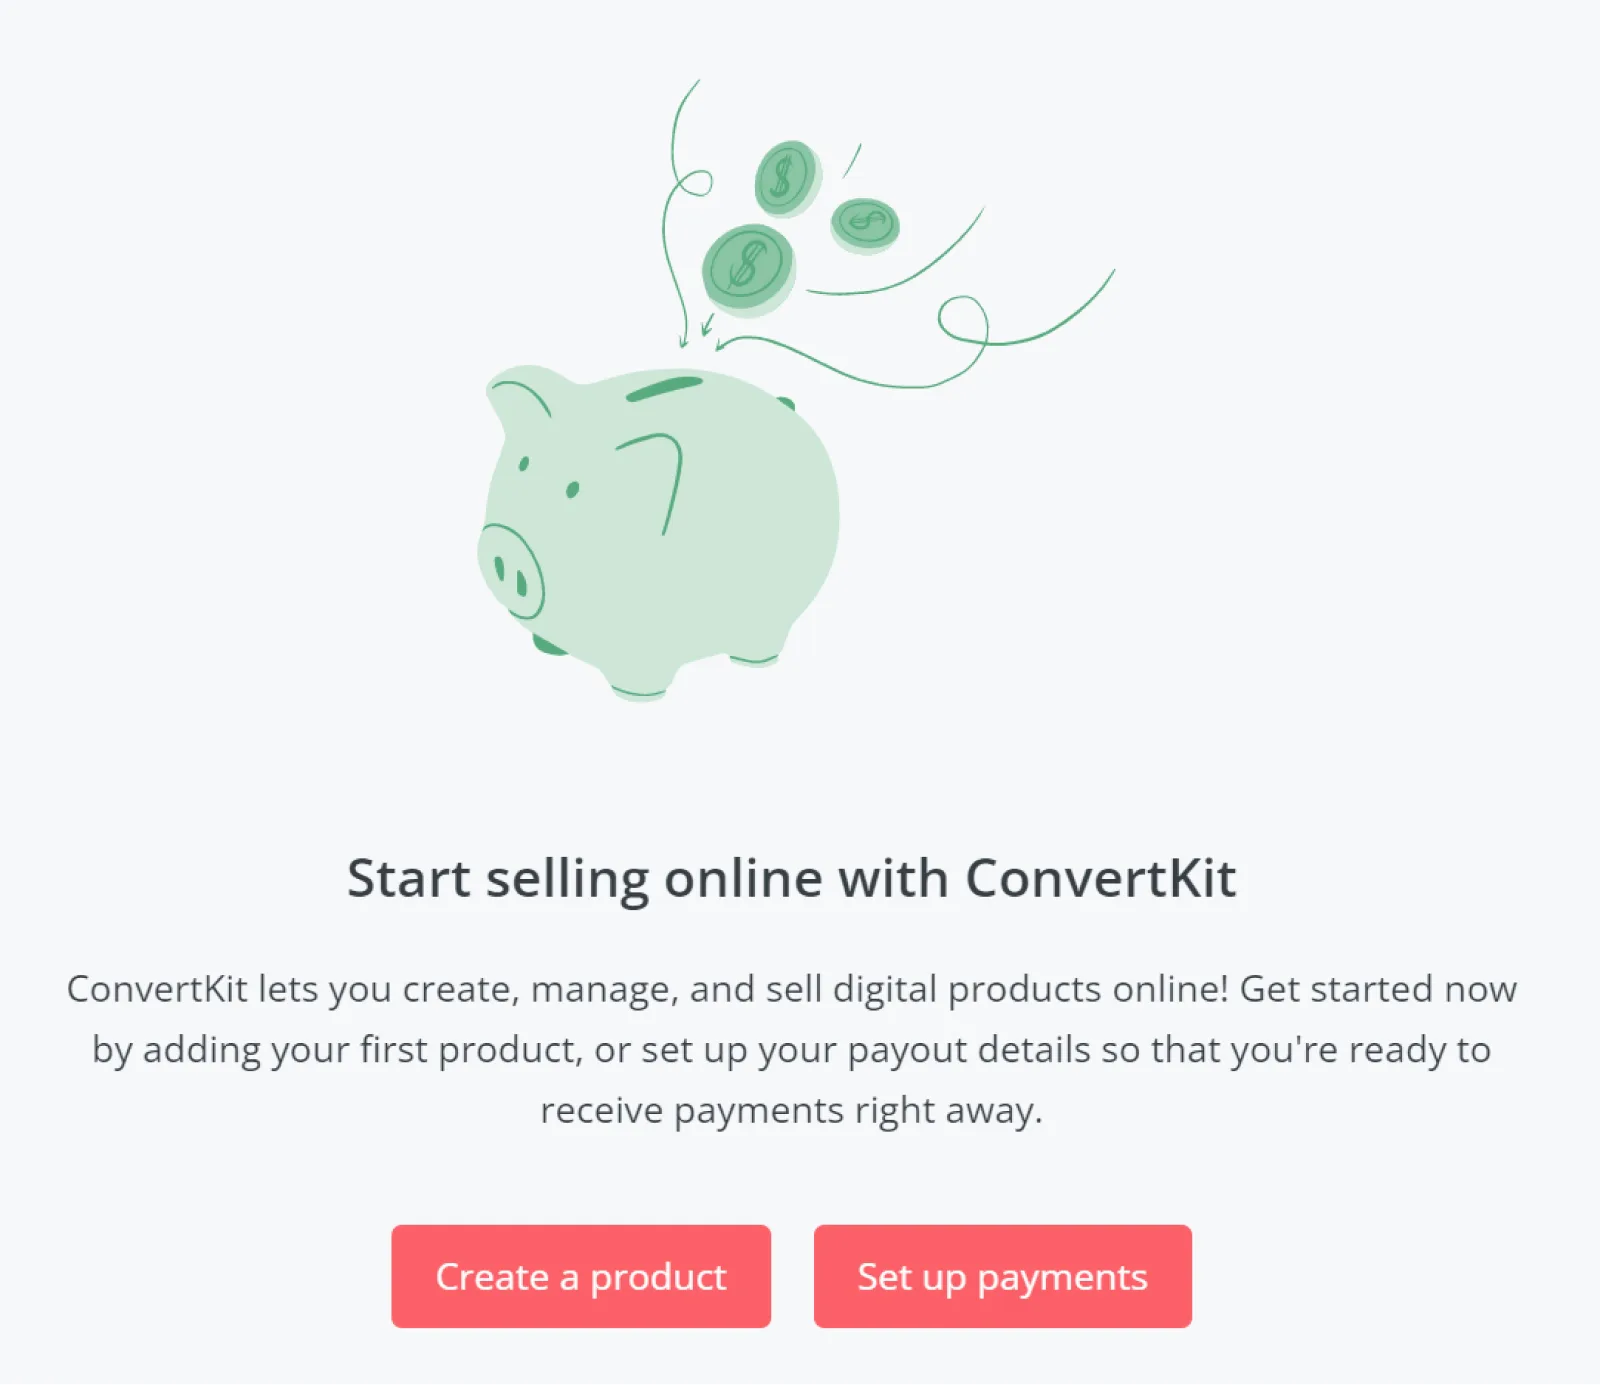
With Stripe ready to go, head back into the “Products” tab and click “Create a product.”
The next page will take you through a few different steps where you’ll get to name your product, set payment details, name your price, choose the product type, and set its URL.
You can sell different products like:
- Digital products (like file downloads)
- Coaching packages
- Professional services (either one-time or monthly retainers)
- Paid newsletters
- Physical products (like merch and books)
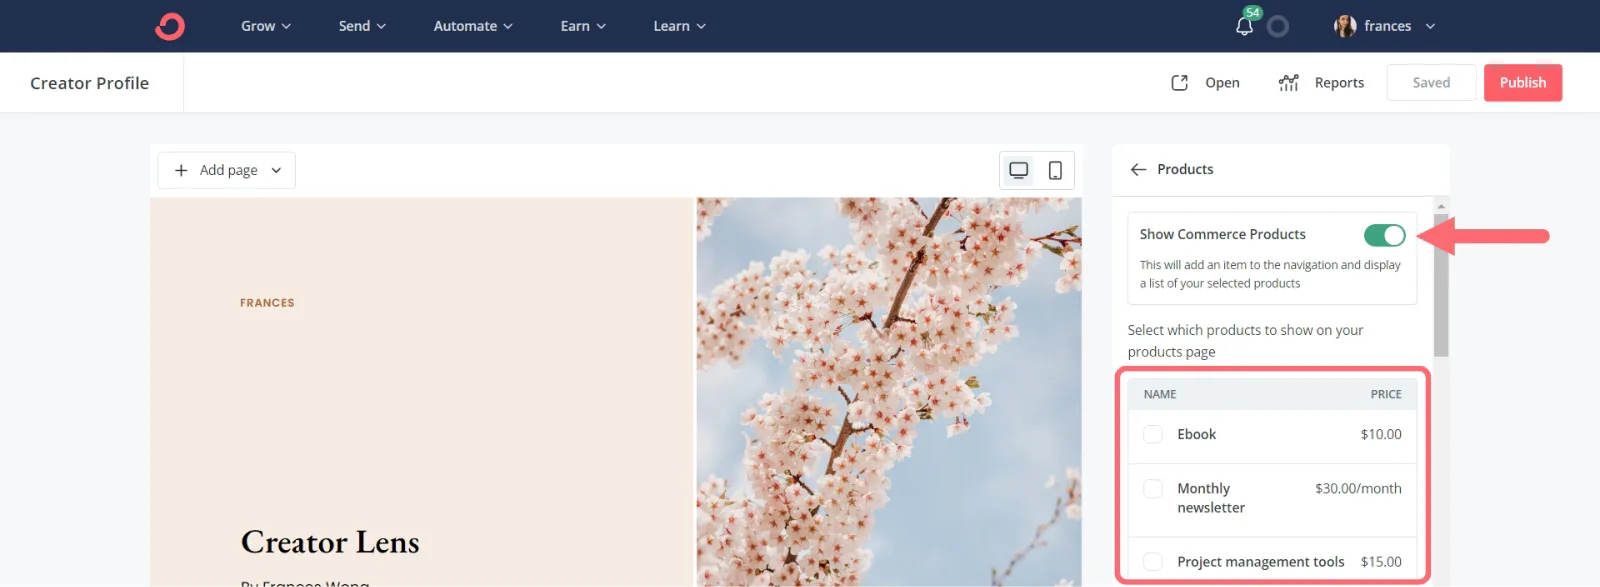
Lastly, add your products to a dedicated page on your creator profile so you can advertise and sell products to all visitors.
Head into your Creator Profile and click “Products.”
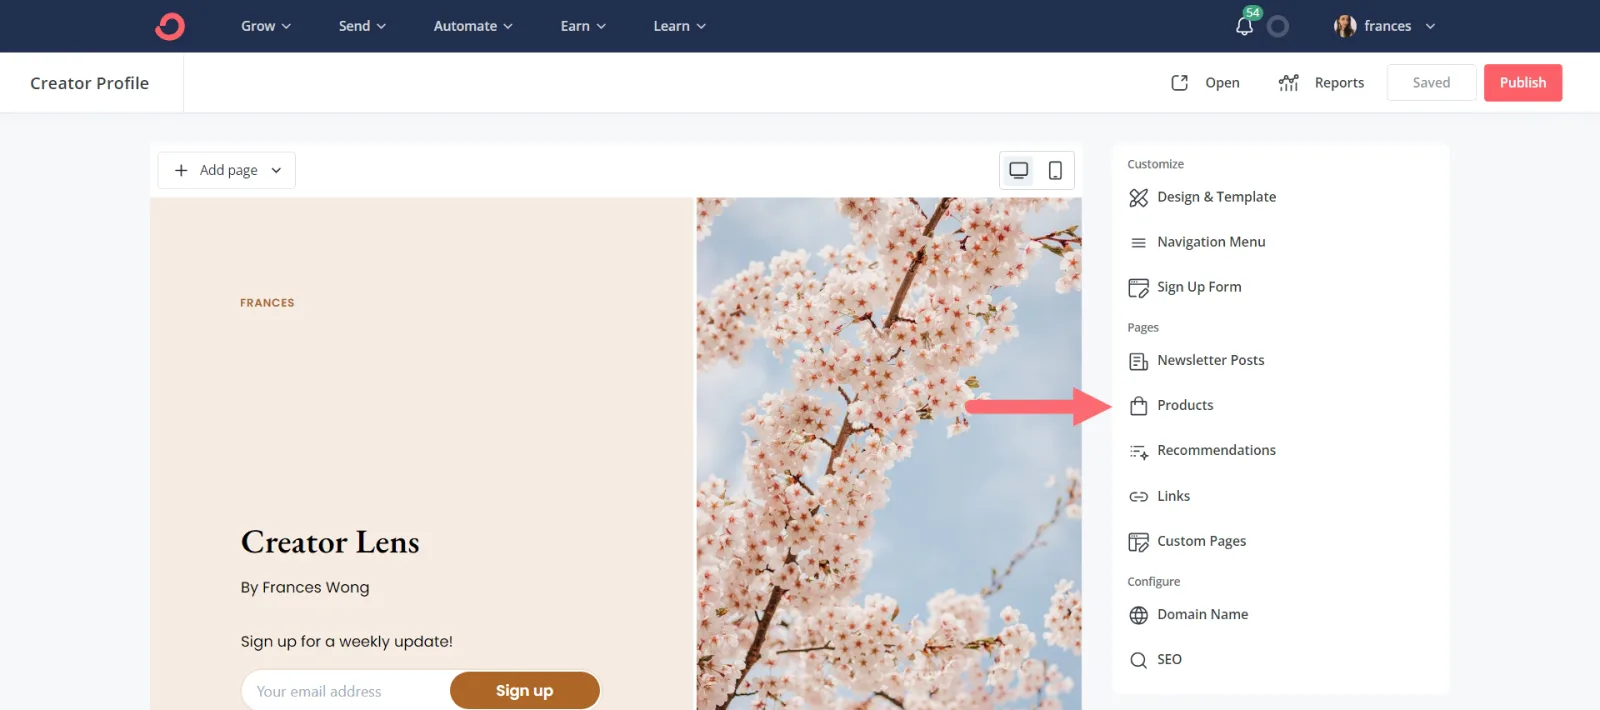
Toggle on “Show Commerce Products” and select which products you’d like to display from the list below.
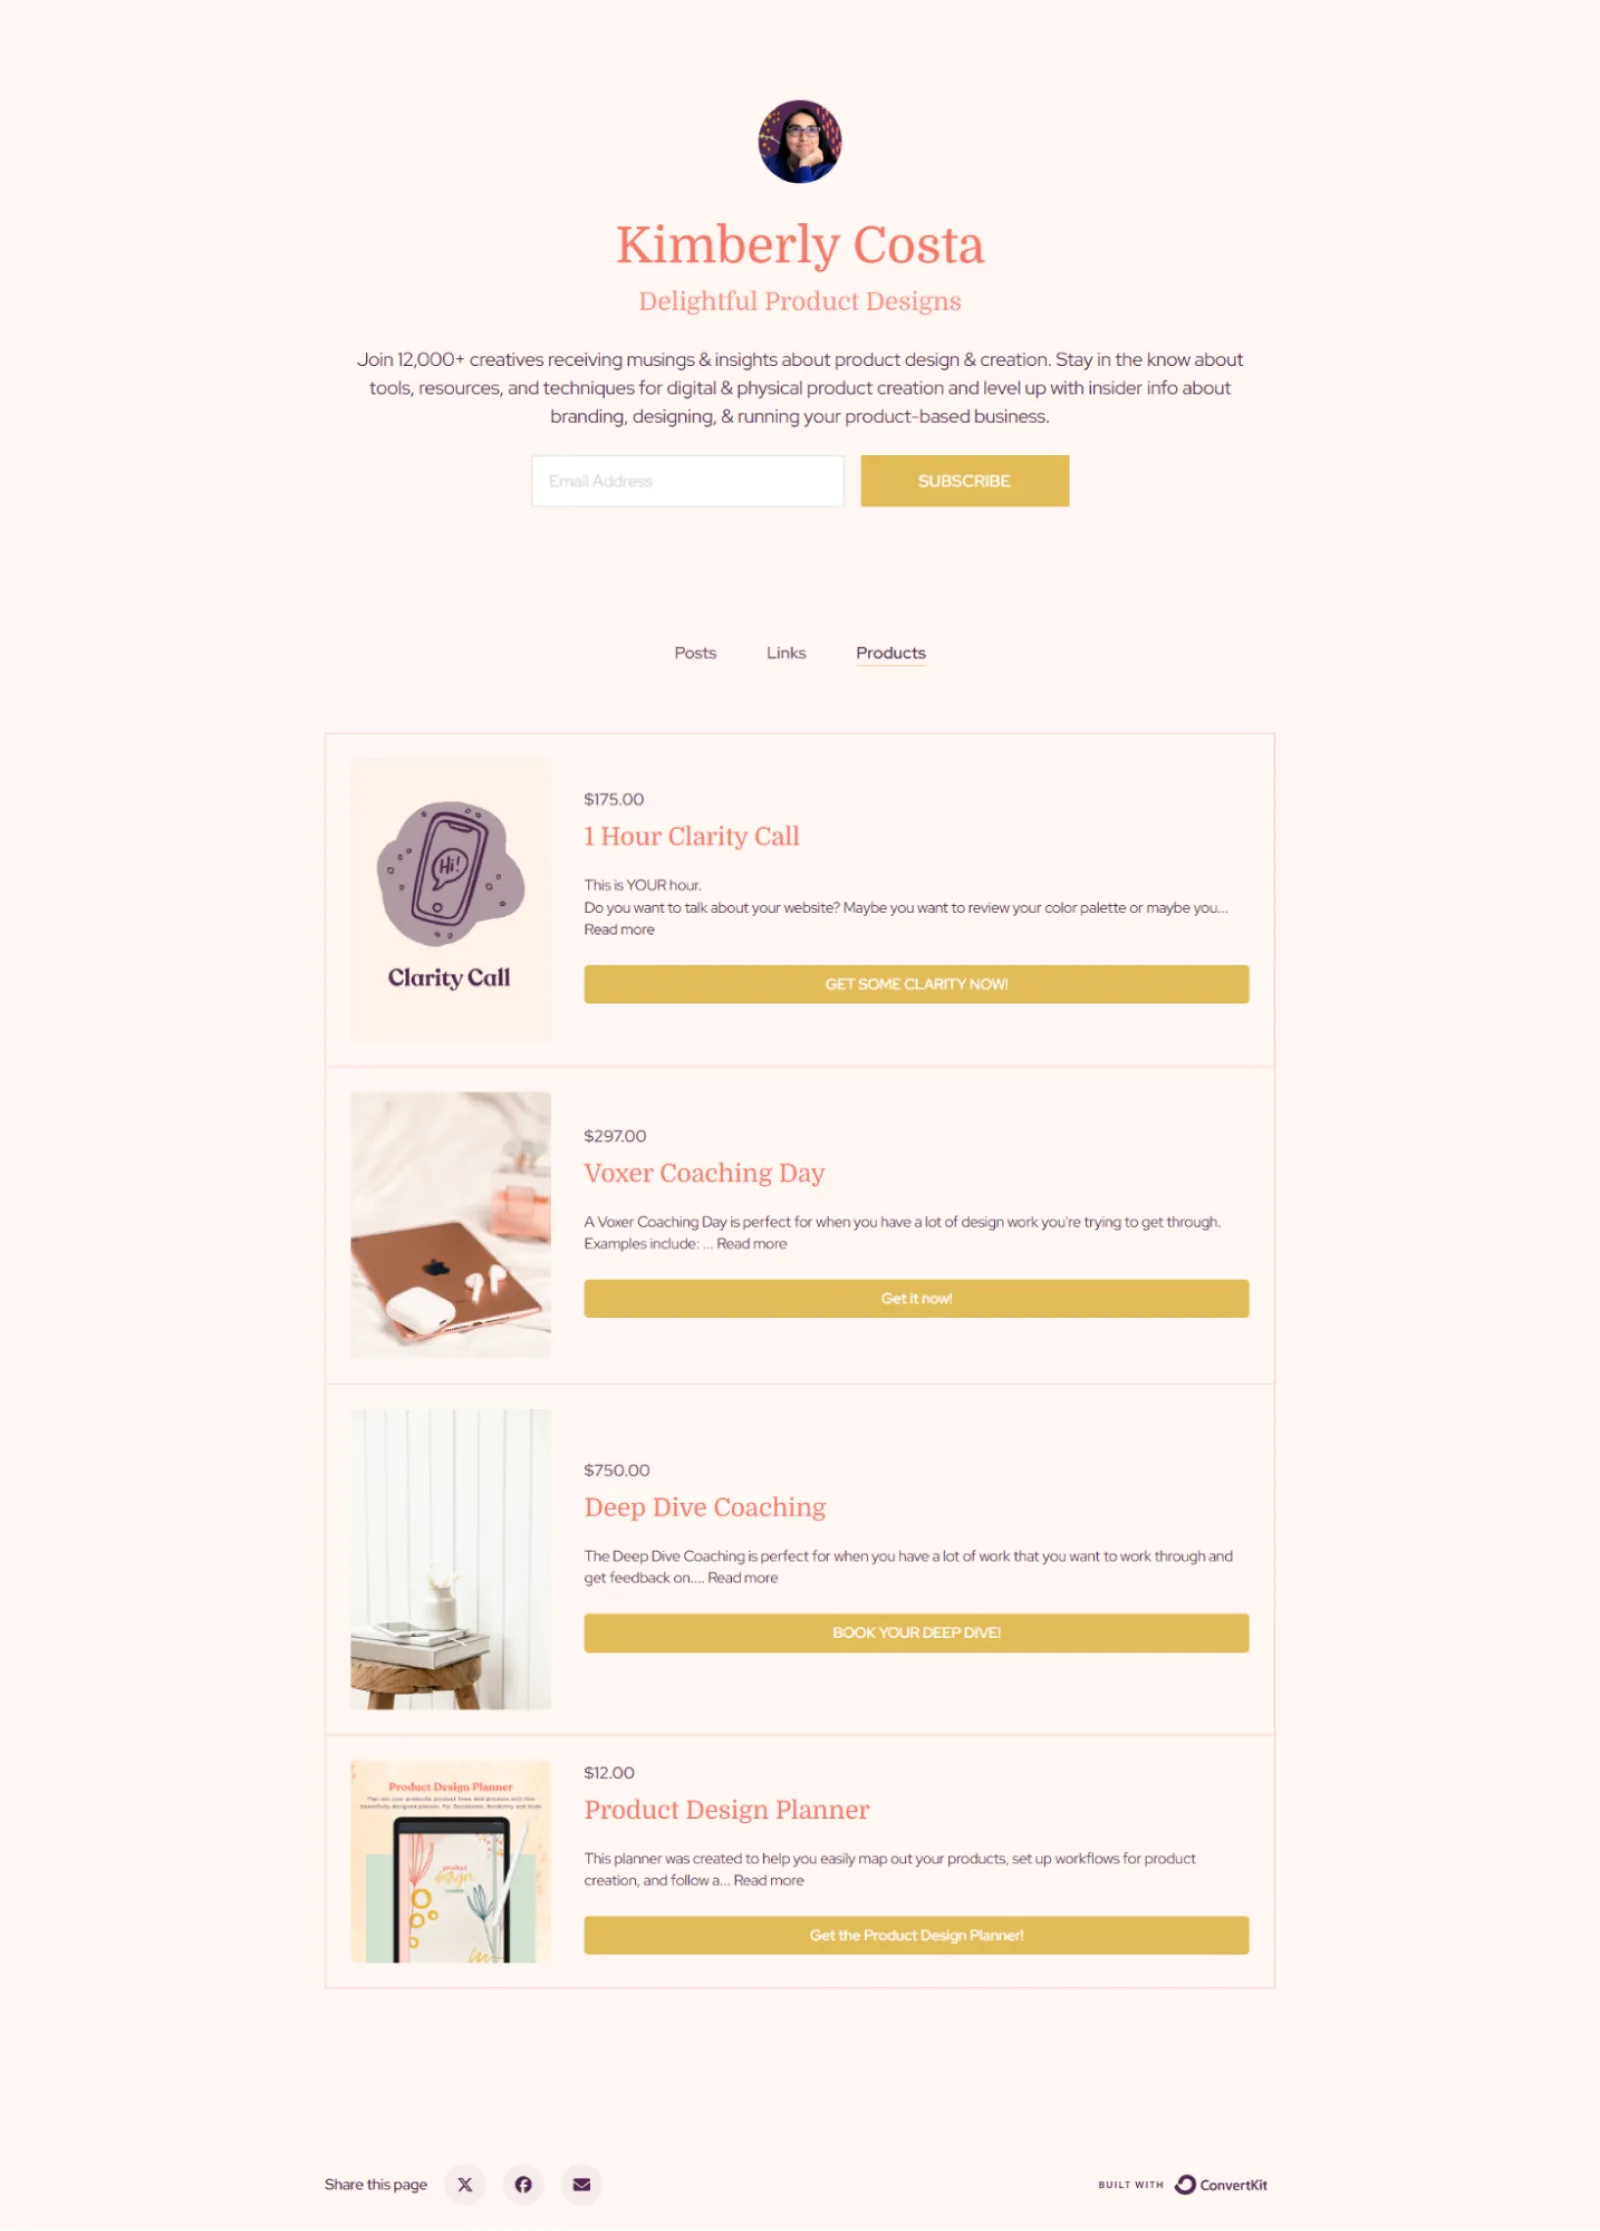
Product page example offering coaching and digital products from Kimberly Costa
Product designer Kimberly Costa features coaching calls and a digital planner on her product page.
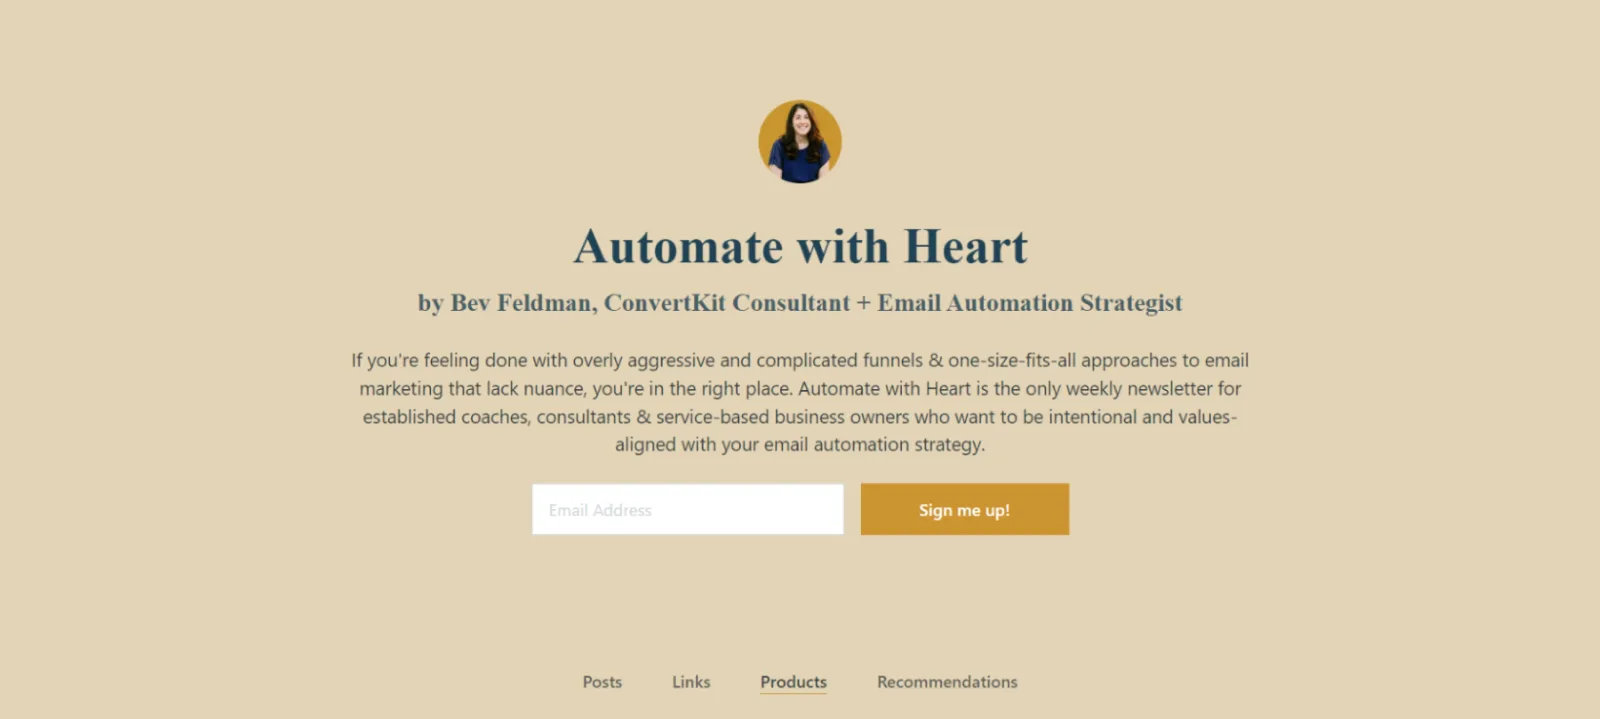
Product page example selling courses, strategy calls, and tips by Bev Feldman
Consultant Bev Feldman uses her product page to highlight a spot where people can send her a $5 tip—along with two products that include a course and a strategy call. (If you don’t have any products to sell right now, take a page from Bev and include a tip option on your site.)
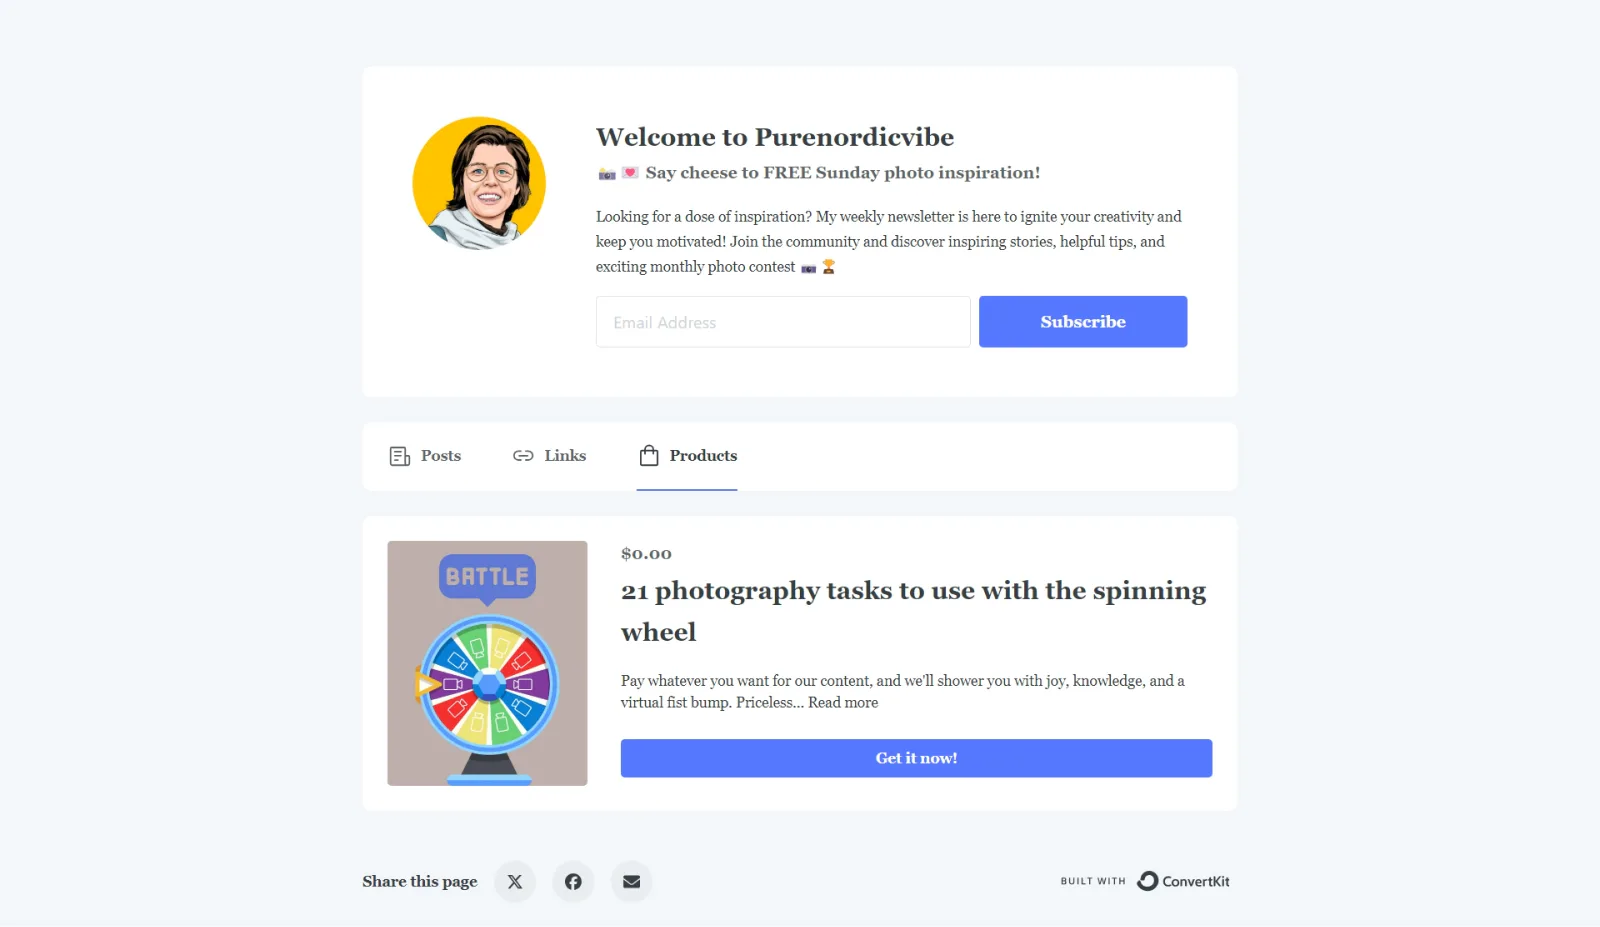
Product page example offering a PWYW option by Marianne
Photographer Marianne highlights one pay-what-you-want digital product (where visitors get to name their price).
Step #8: Publish posts to your site
Most sites nowadays have active blog rolls to share information with visitors, build rapport, and encourage people to subscribe.
Your Creator Profile has blogging capabilities where you can publicly publish certain newsletters and put other newsletters behind a paywall.
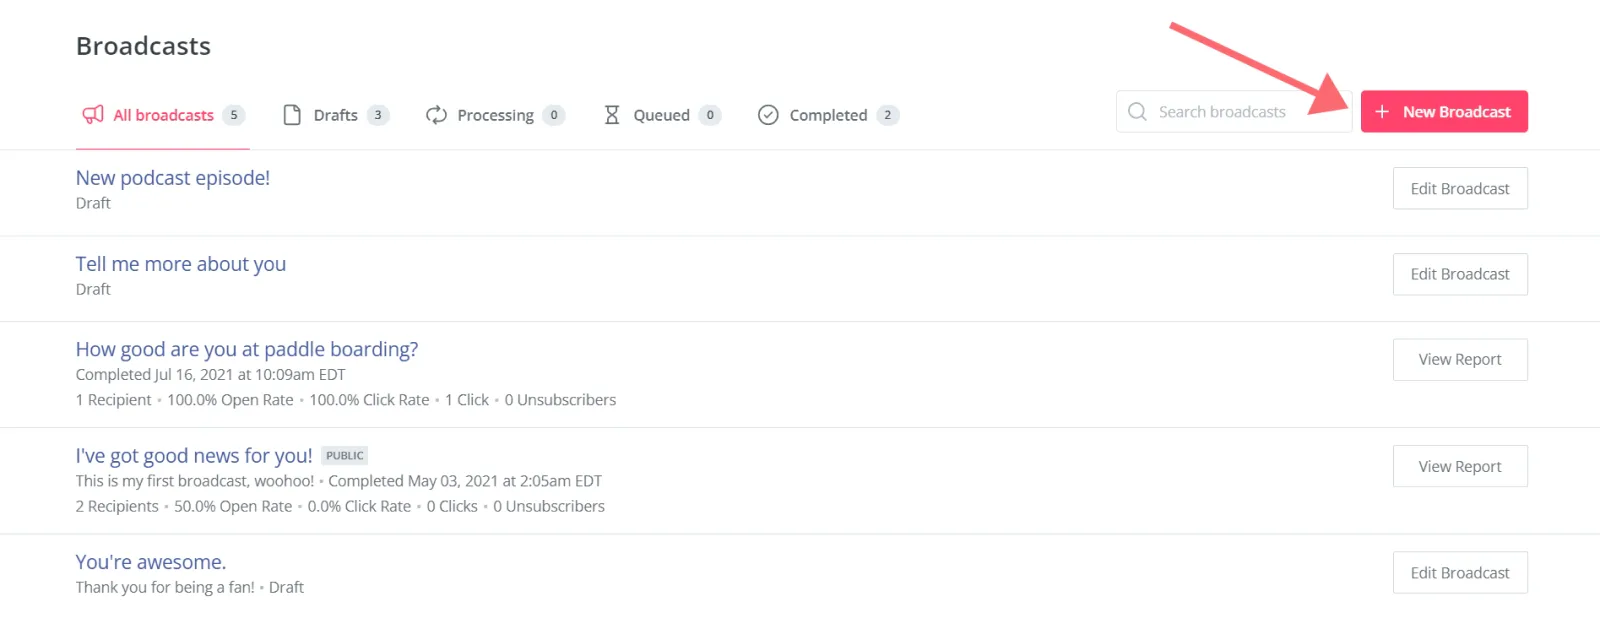
To get started, click “Send” > “Broadcasts.”
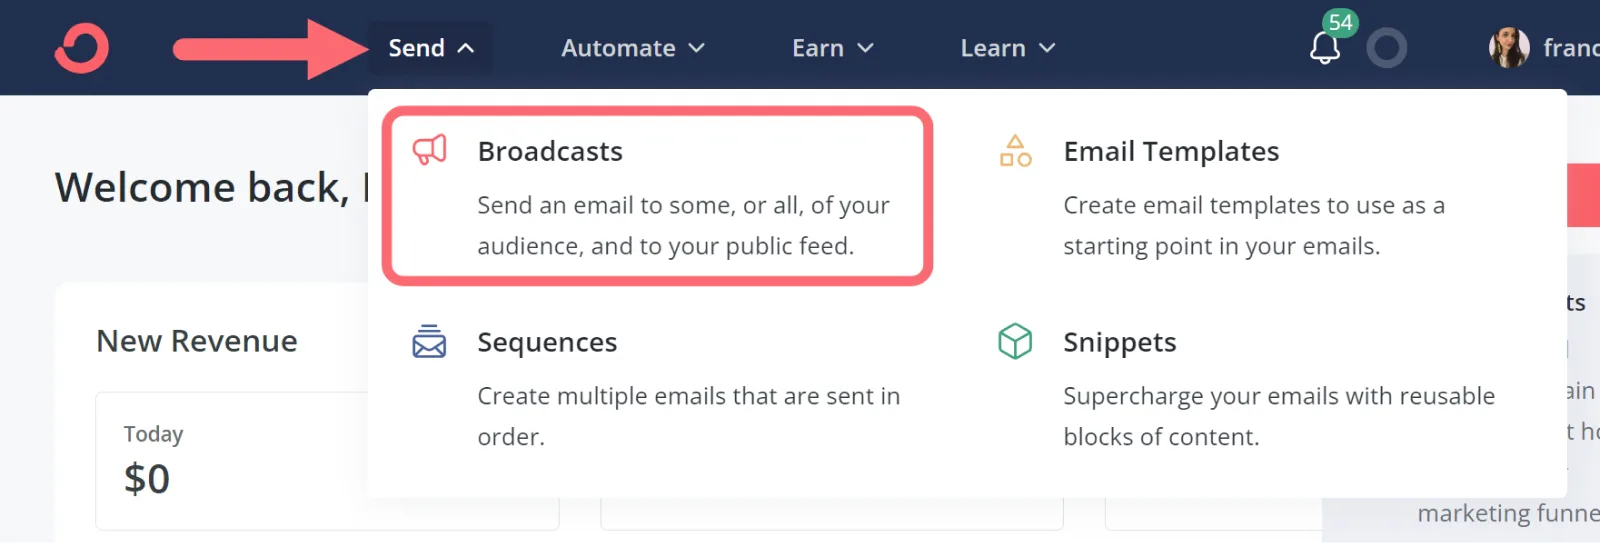
Then “+ New Broadcast.”

Write your post in the editor, and when you’re done, click “Continue.” Select to send your broadcast to your list, publish to the web, or both.
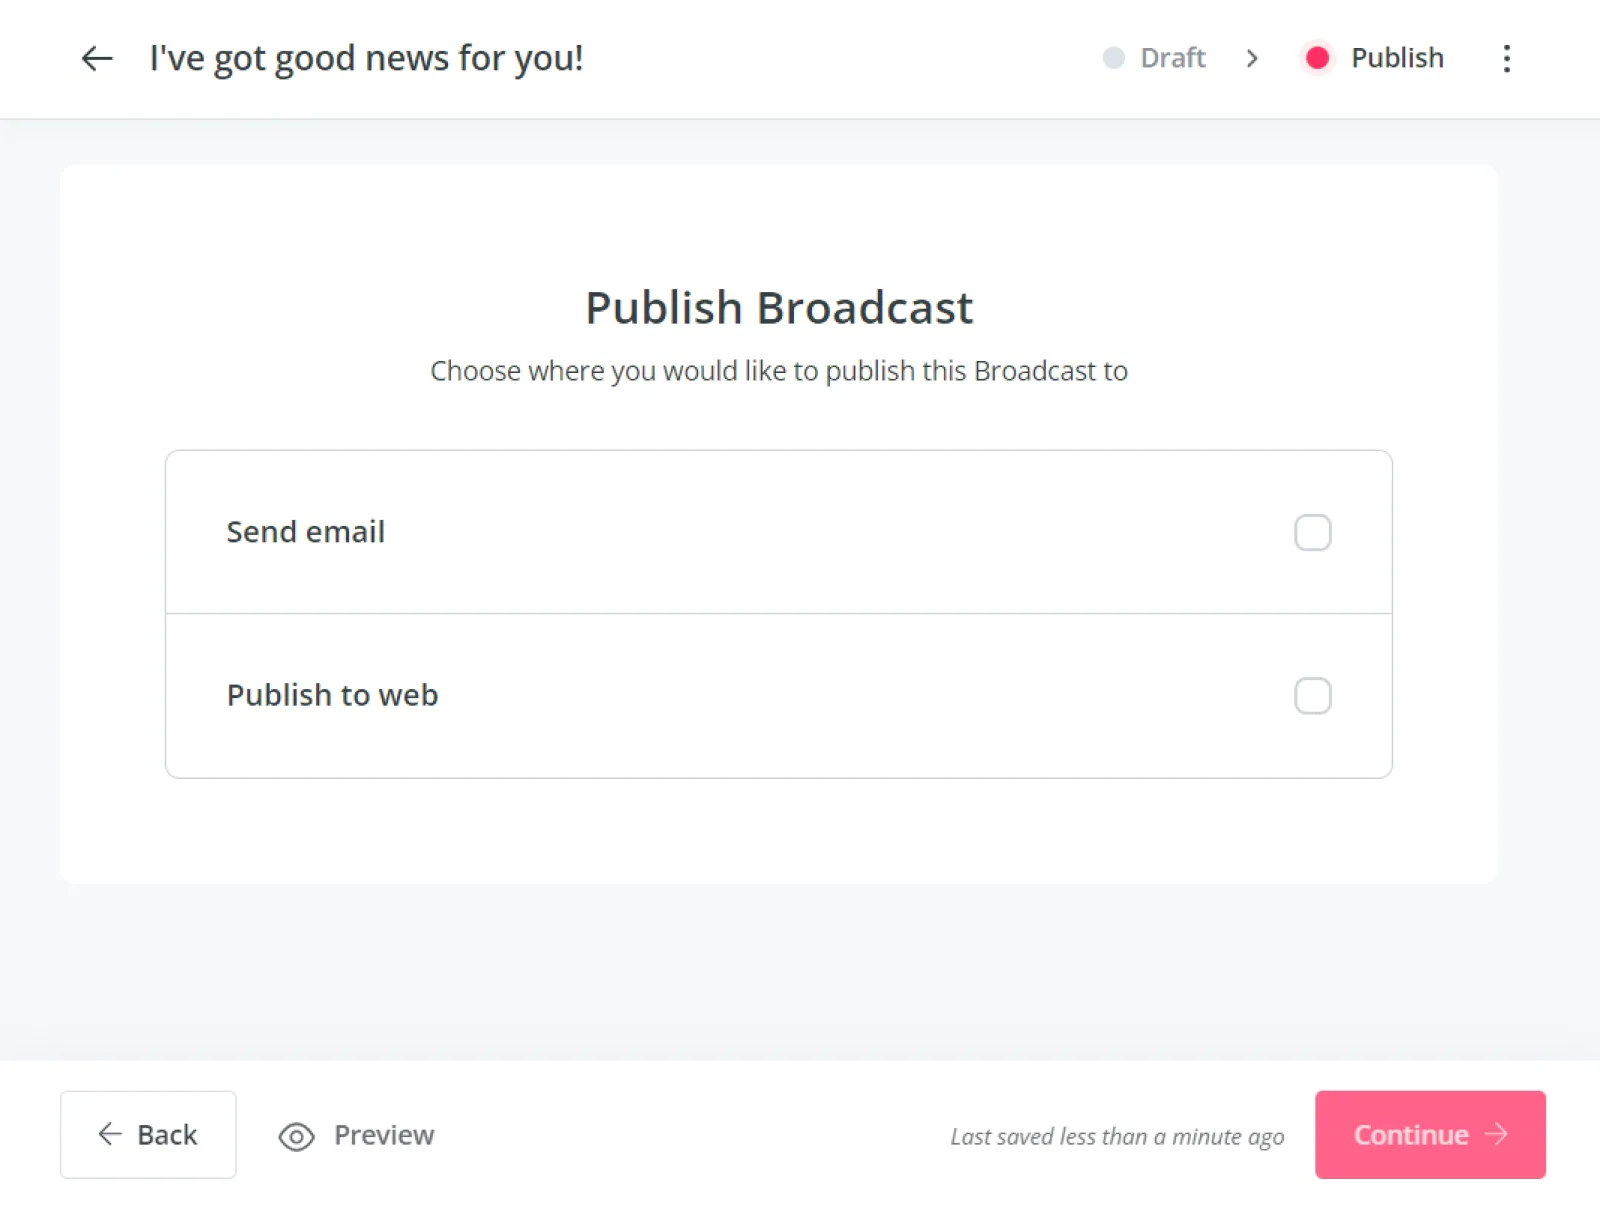
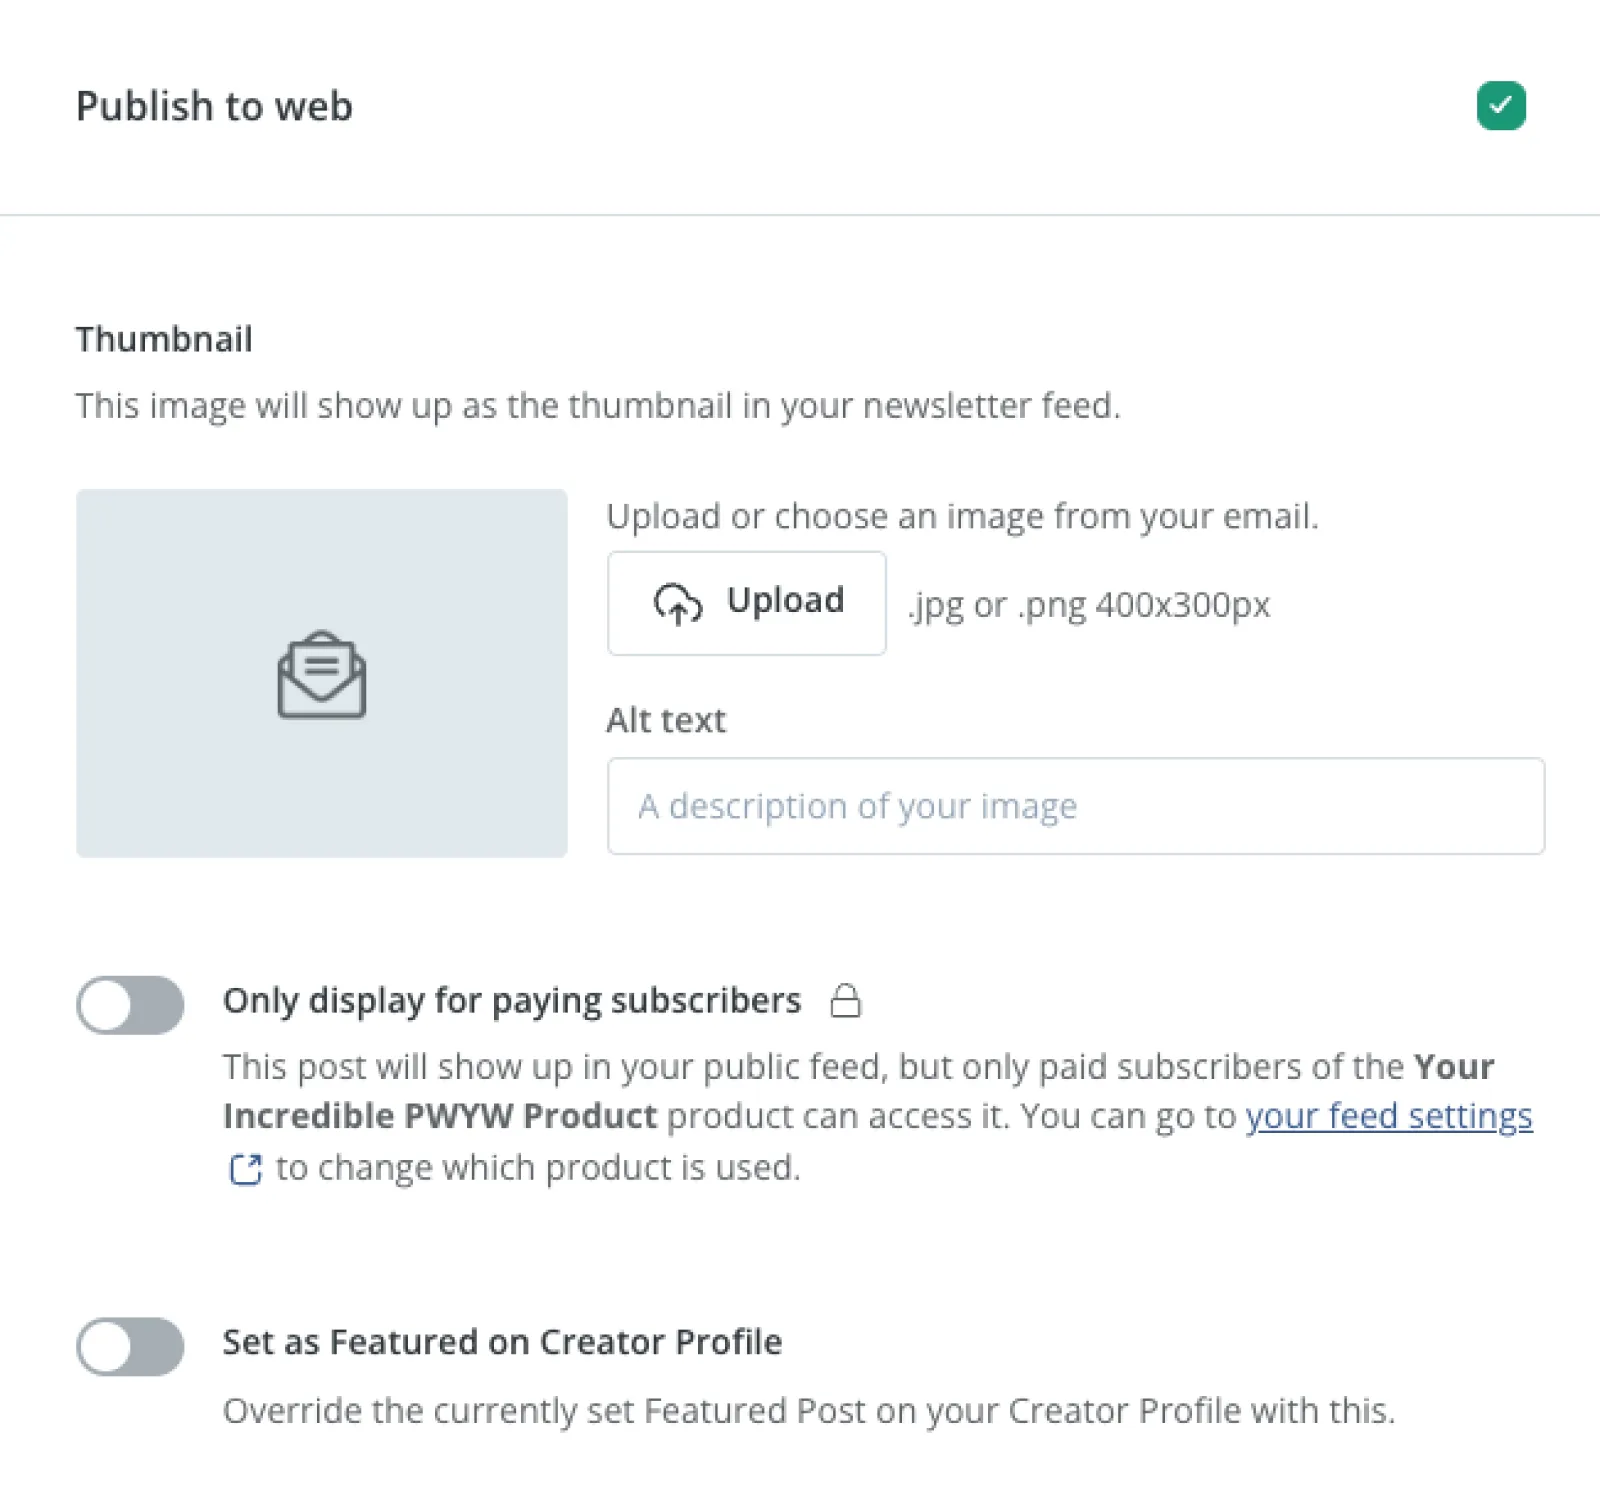
If you choose to publish your post to the web, it will automatically appear on your Posts feed. You can set a thumbnail and choose to only display the post to paying subscribers.
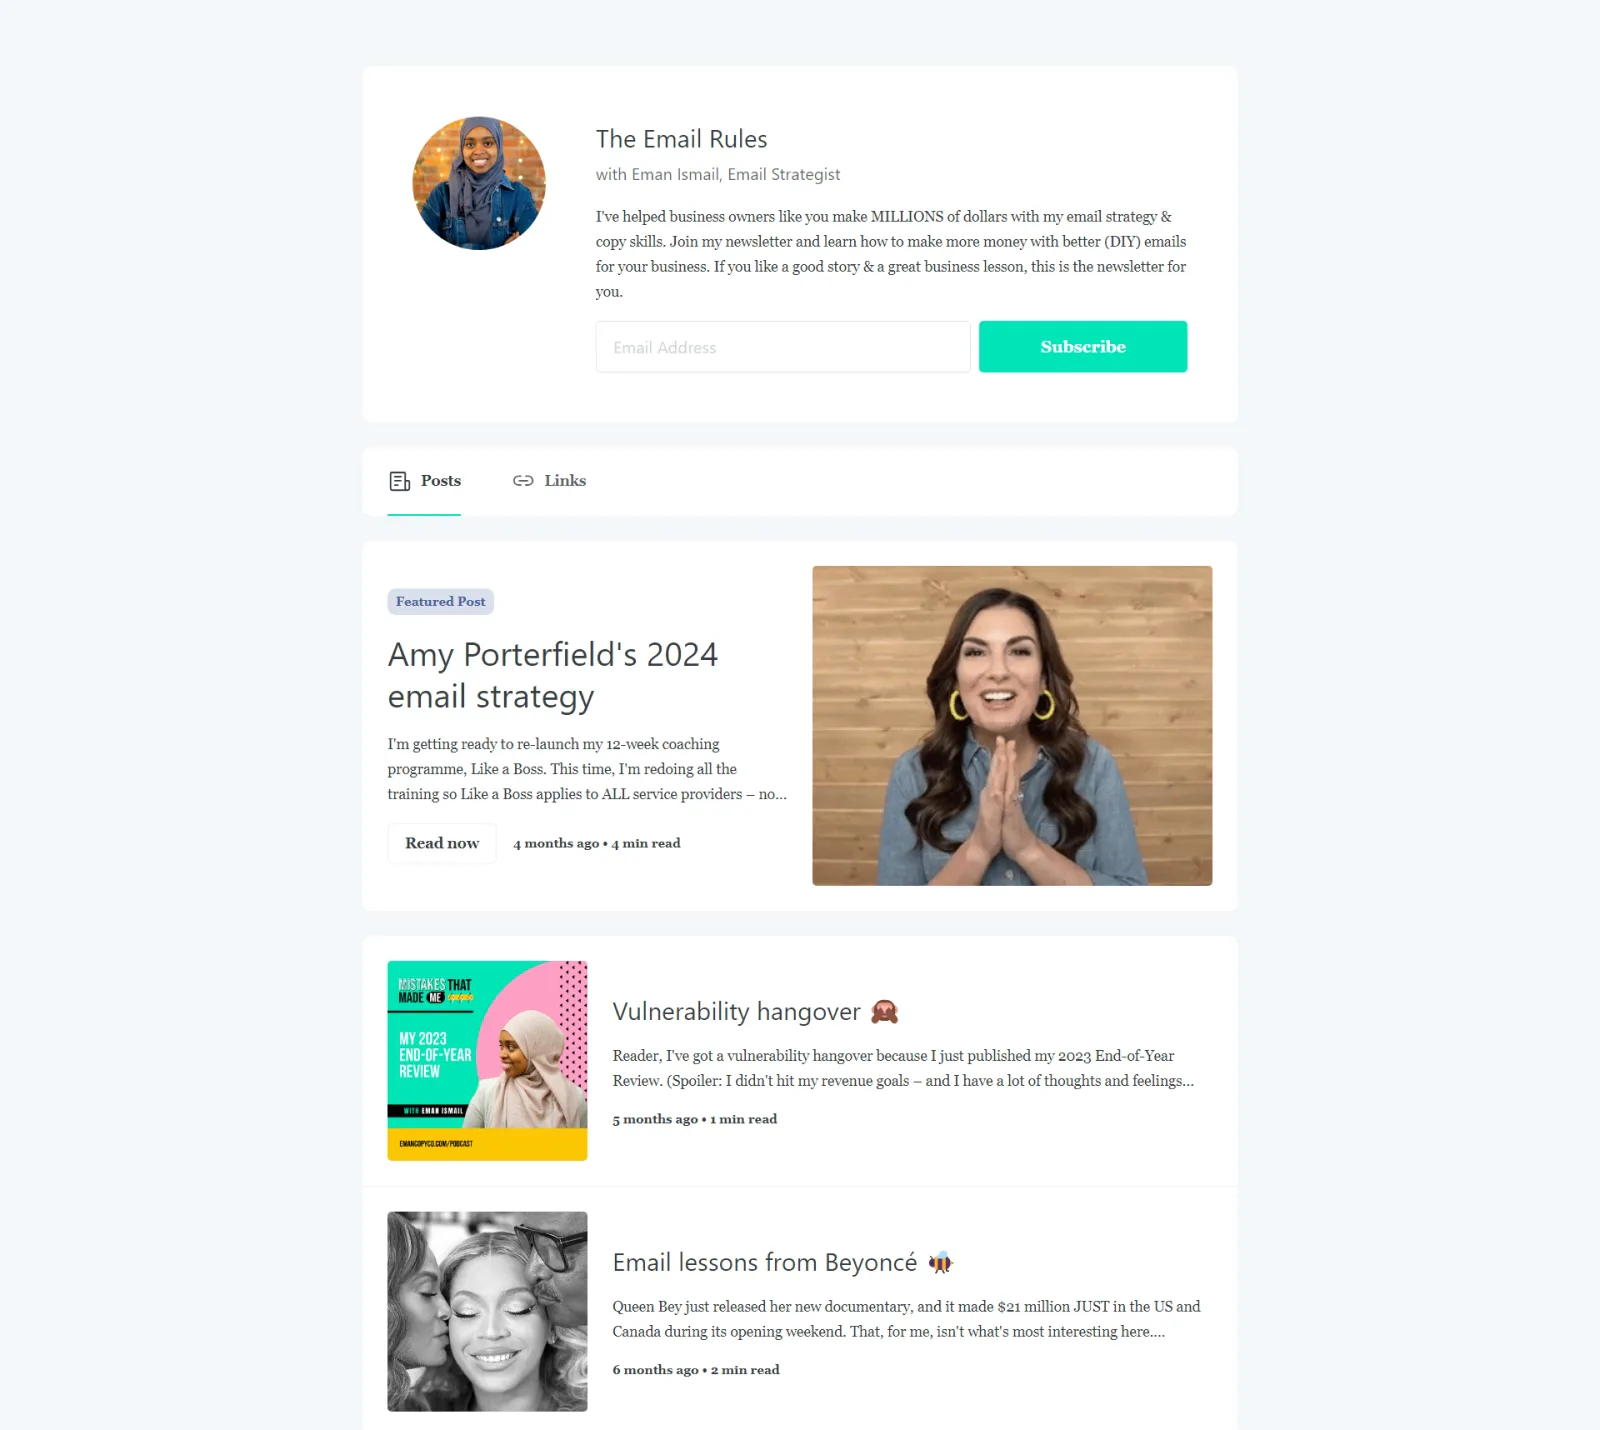
Example of public posts by Eman Ismail
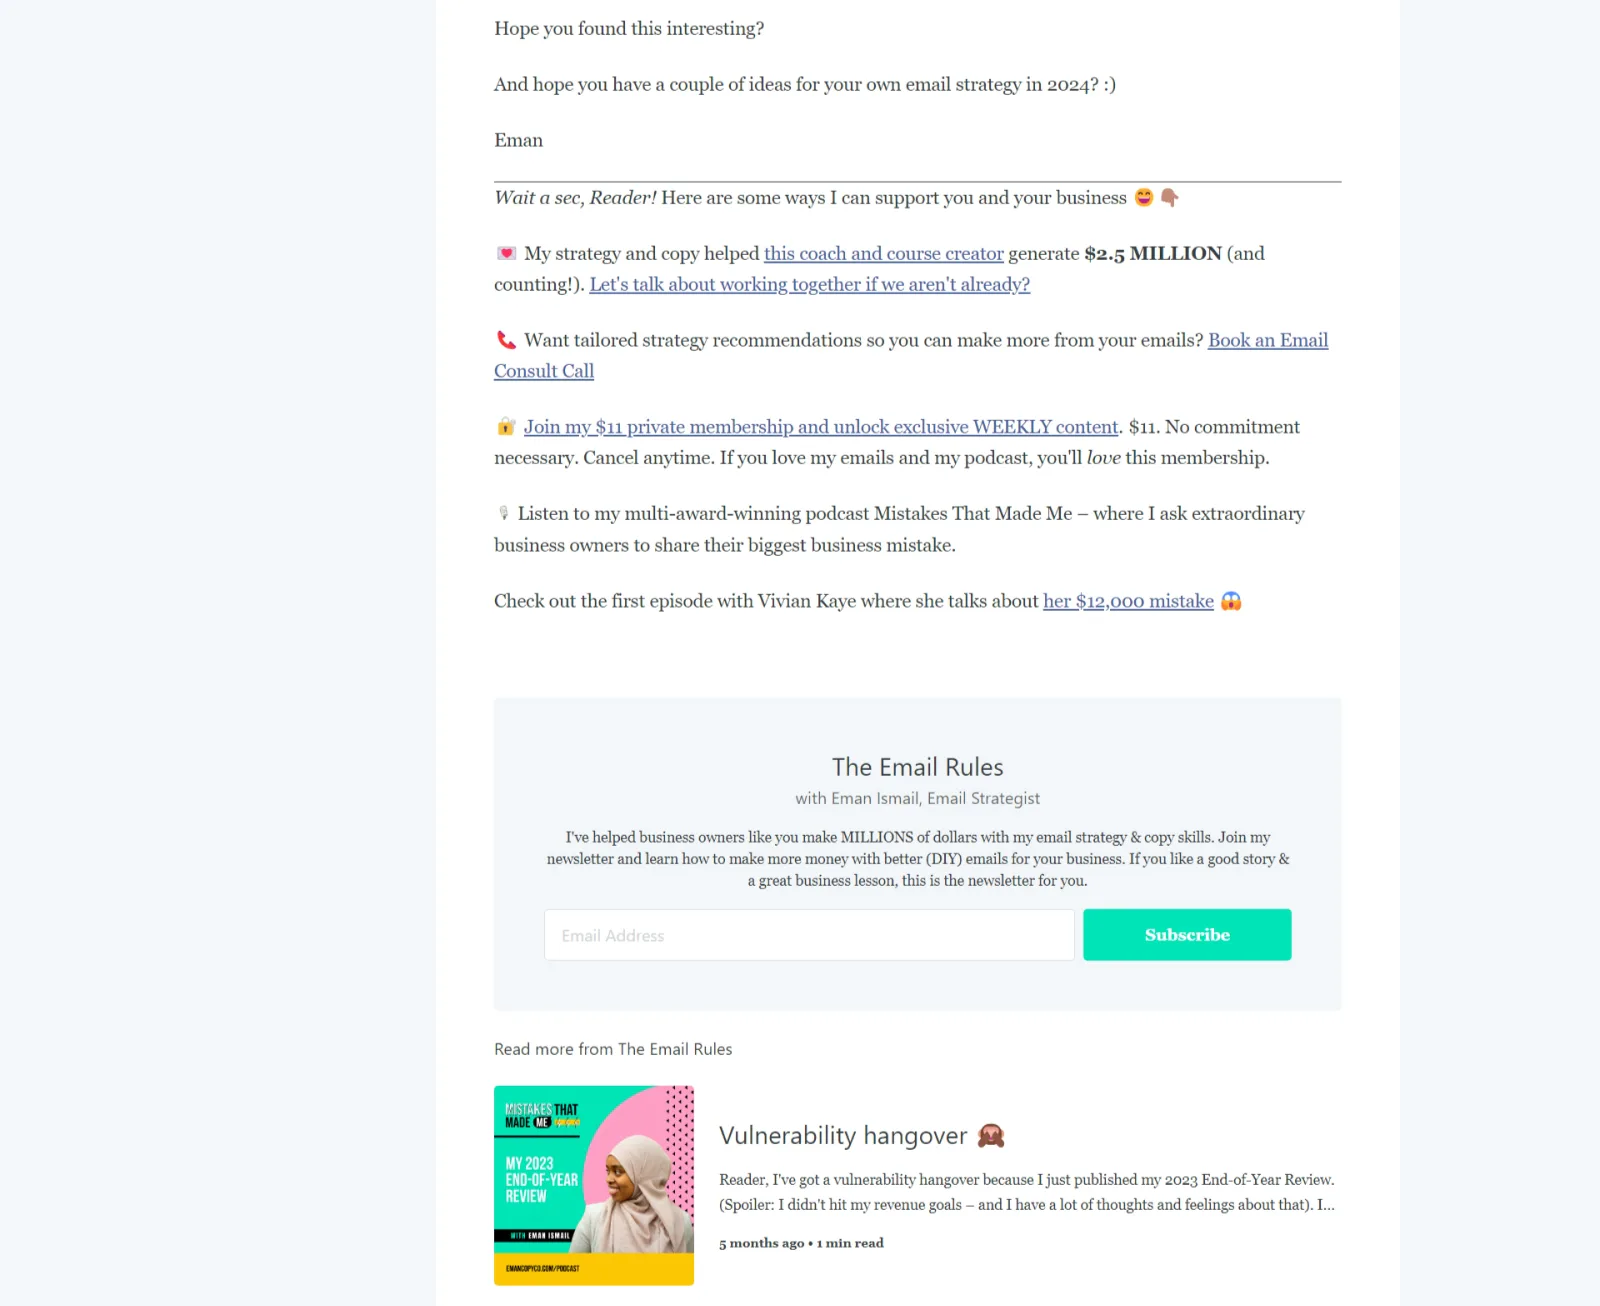
Email copywriter Eman Ismail shares her posts publicly with her audience.
Readers can click on a post and read it entirely. Plus, the opt-in form at the bottom of the post encourages people to subscribe to get their own copy.
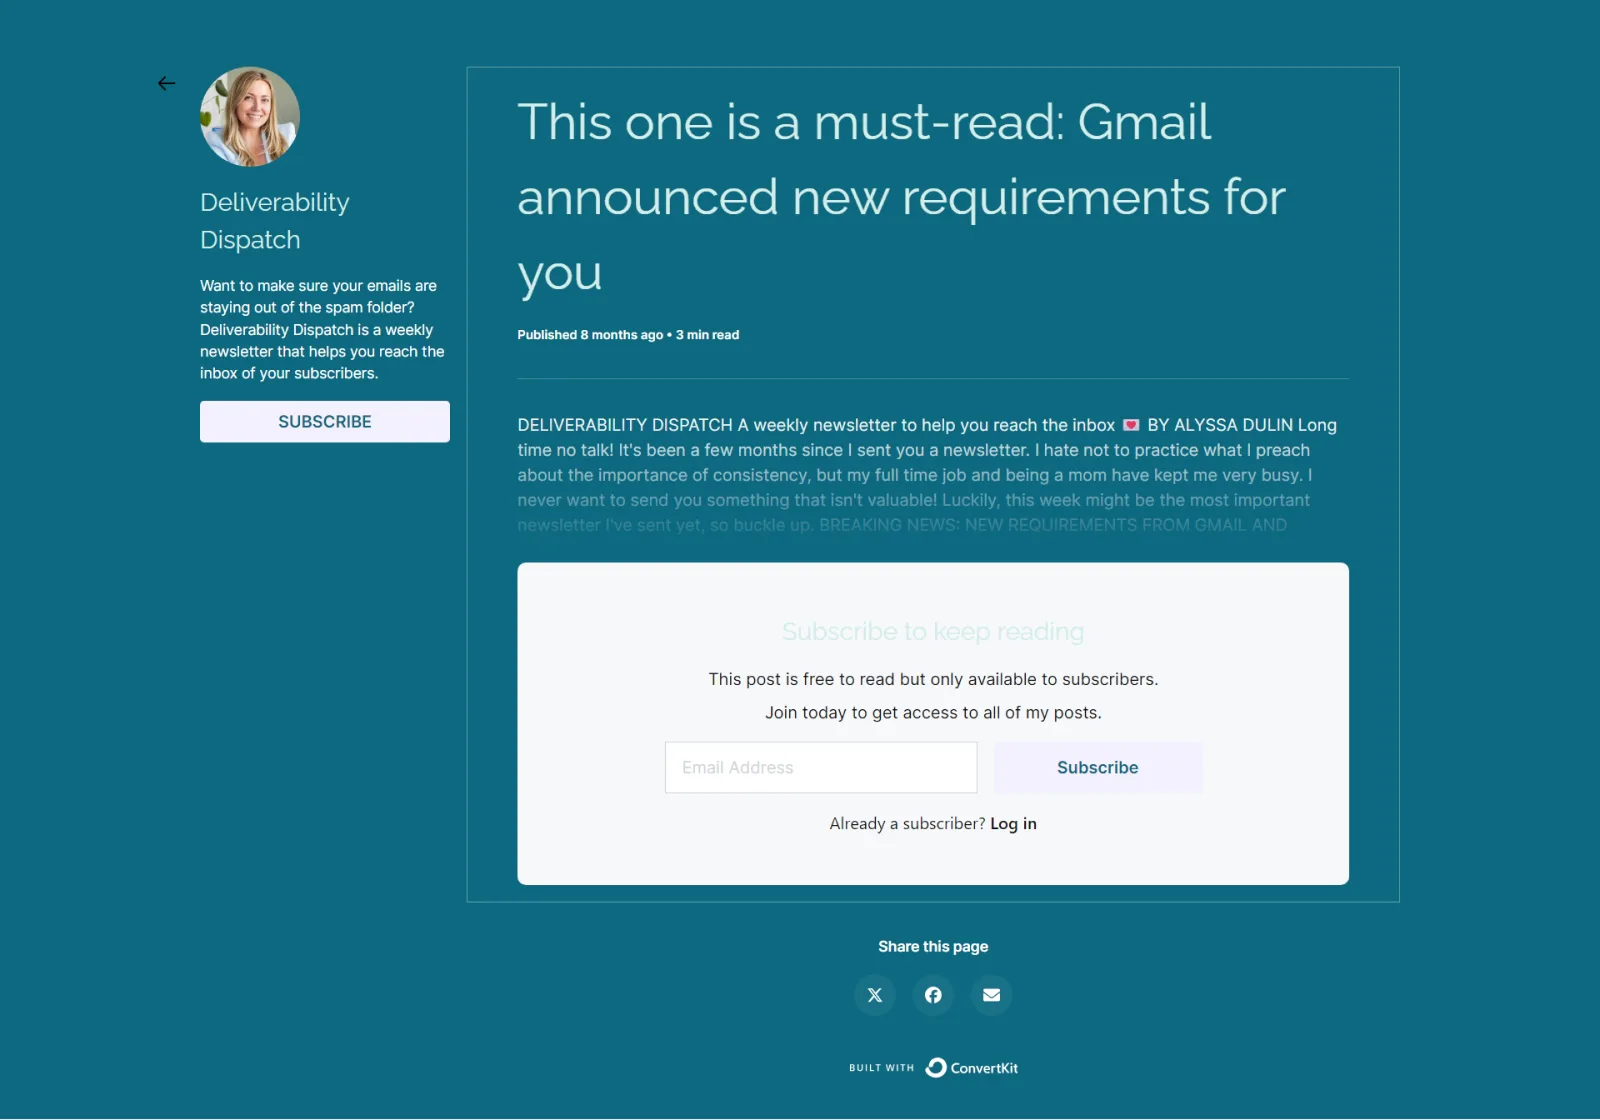
Example of posts page by Alyssa Dulin
Email specialist Alyssa Dulin takes another approach and places her posts behind a subscription.
When viewers click one of the posts in her feed, they’ll see a short snippet of the post and a form to sign-up (for free) to read the entire post.
Step #9: Send traffic to your new site
Now you know how to create a website from scratch (for free!).
But a website doesn’t do you any favors unless it drives traffic. We’ve got some ideas:
- Get active on social media: Pick one to two platforms where your audience spends time and interact with them. Add your Creator Profile link to your social bio so people can click on it whenever they want to learn more about you.
- Share in online forums: Share links to relevant posts on forums where people ask questions (like Reddit or Quora). Just be sure you add value; otherwise, people might feel like you’re spamming.
- Connect with others on the Creator Network: Reach out to other creators in Kit’s Creator Network and cross-promote one another’s newsletters.
- Be a guest on a podcast: Share your expertise on a podcast and promote your new website.
- Optimize your pages for SEO: Drive organic (free) traffic to your site through search engine optimization. Here’s how:
Head to your Creator Profile and click “SEO.”
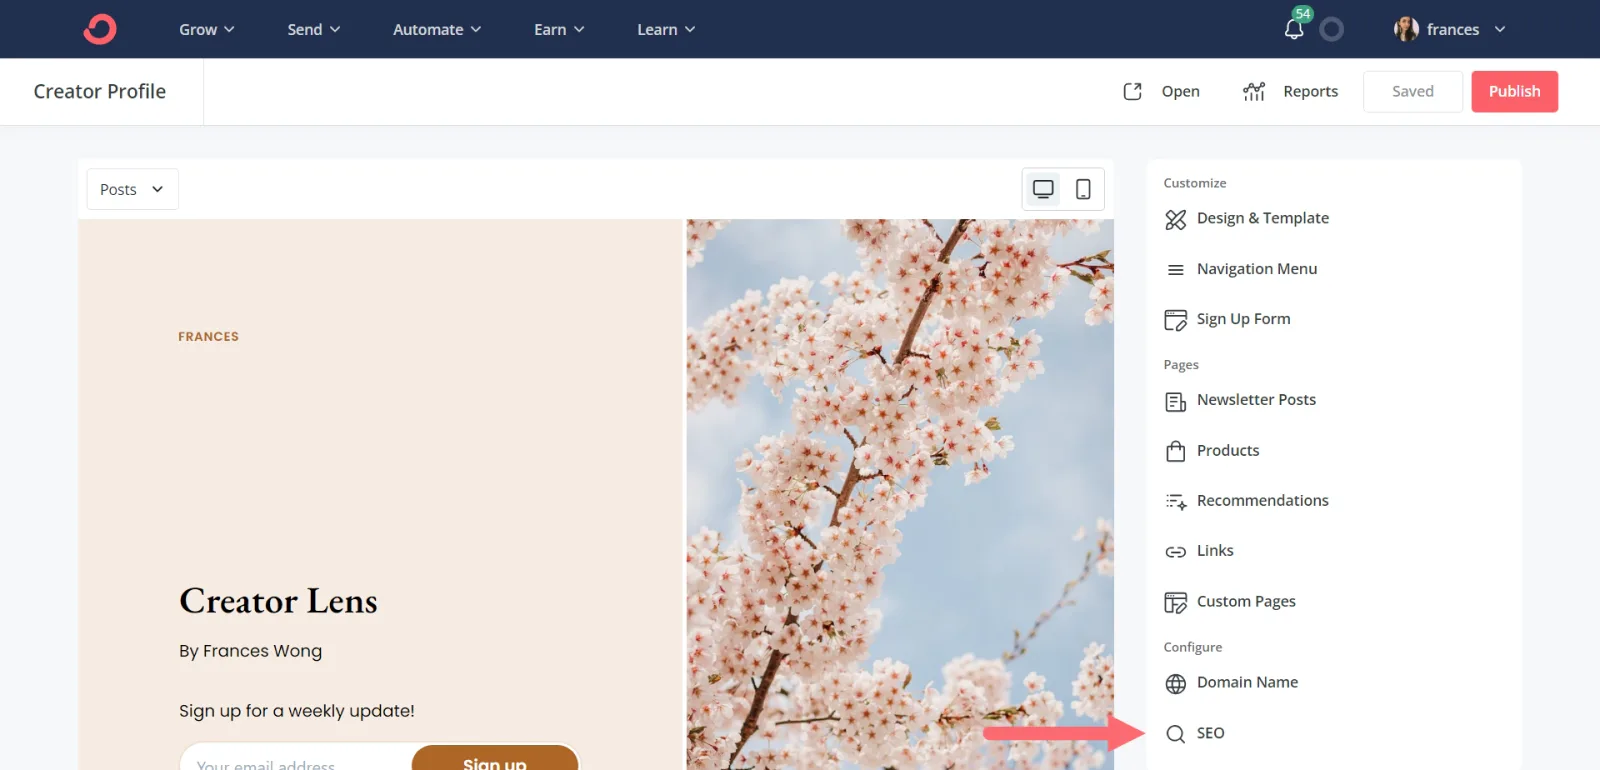
Use the toolbar to the right and:
- Give your page a title and description (the text that displays in the search results)
- Add a social share image (the image that displays when someone shares your website link on social media)
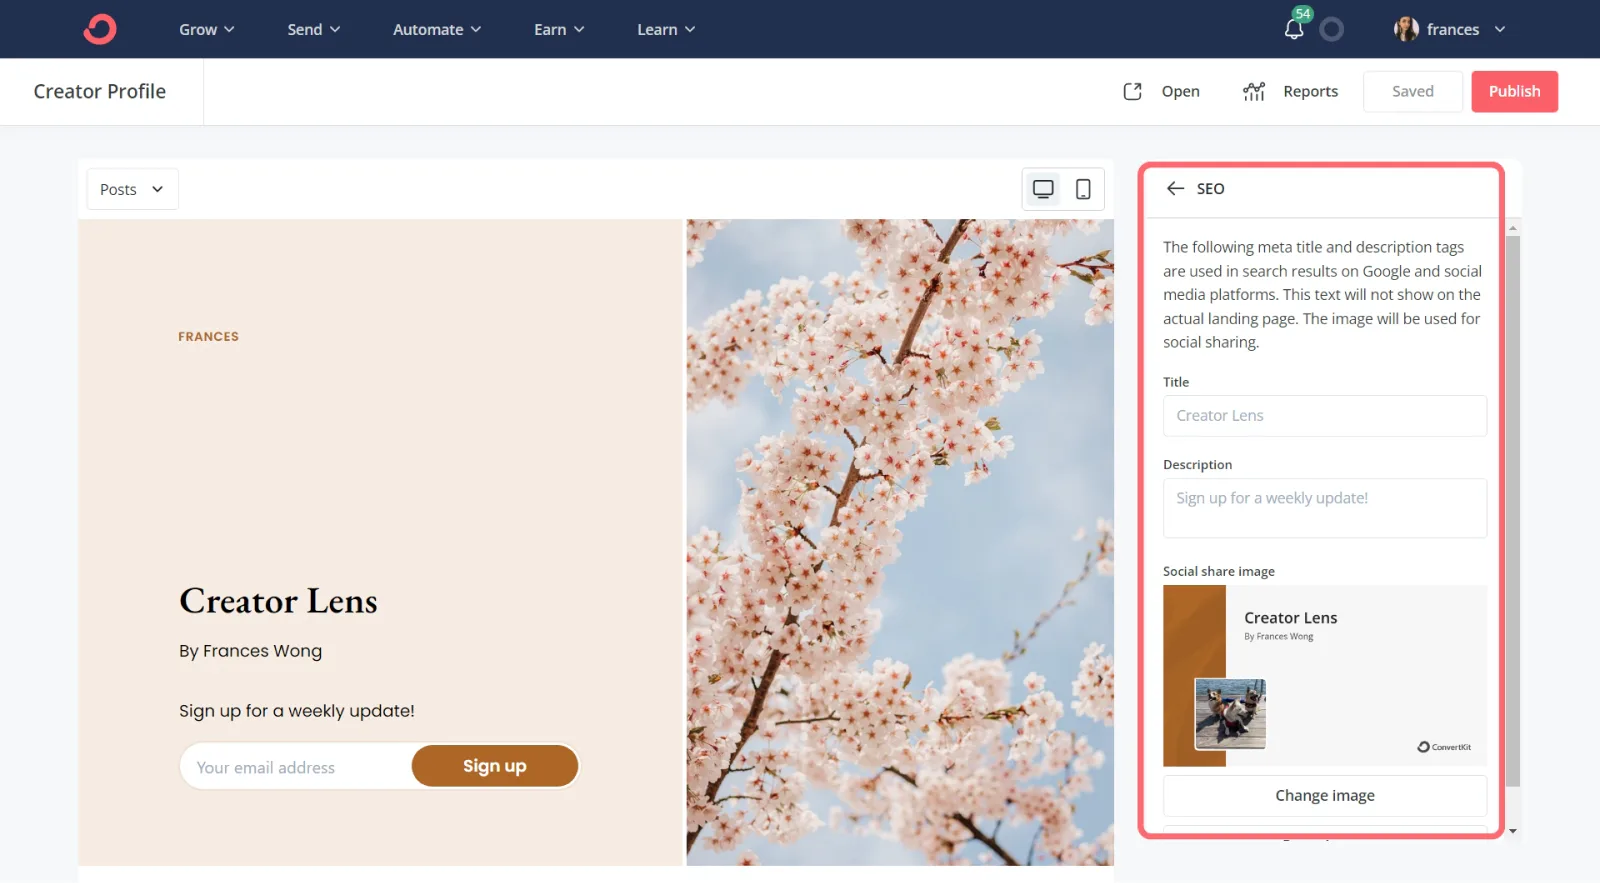
Don’t forget to adjust the SEO for any custom pages you add, too.
And that’s all! Follow the above steps, and you can make a website for free in under an hour. Ready to try it for yourself?


