The secret to growing a list that’s eager to buy your products? Content upgrades.
Even better: You can create one in under an hour.
Today, we’ll show you how—plus share different content upgrade examples to inspire your own.
What are content upgrades?
Content upgrades are relevant opt-ins—like ebooks, templates, or checklists—that complement your free content (blog posts, podcasts, YouTube videos, etc.). They encourage users to join your email list by offering related content in exchange for their email addresses.
For example, if you’re reading a blog post about writing social media captions, a downloadable guide with hook templates would be a perfect content upgrade, offering extra value on the same topic.
They also tend to be more enticing to visitors because they’re tied directly to specific topics. This helps you attract more people to your list and segment them in one go so your audience is primed to buy your related products down the road.
Content upgrades are similar to lead magnets. However, lead magnets are more general and don’t necessarily relate to specific pieces of content.
How to implement content upgrades in 10 steps
Creating content upgrades is easy if you follow these steps:
- Identify your top 3-5 blog posts
- Decide on how to add value to your existing posts
- Create the content upgrade(s)
- Set up a Kit Form (and connect the upgrade to it)
- Add the opt-in form to your blog posts
- Update and optimize the blog post (if needed)
- Promote your improved blog post
- Watch your email list grow
- Continue to engage the subscribers on that specific topic
- Upsell a related product
Repeat these steps as many times as you need for each content upgrade you create.
1. Identify your top 3-5 blog posts
Identify blog posts with the most traffic to prioritize which pieces to create content upgrades for.
Tools that tell you your most visited pages include:
- Google Analytics: A free analytics tool
- Matomo: A premium web analytics tool
- Burst Statistics: A freemium WordPress plugin (the free version highlights your top pages, as seen in the image below):
Whichever tool you choose, remember to only look at traffic for blog posts. Ignore general pages like your home or about page, as content upgrades aren’t relevant to these pages.
2. Decide on how to add value to your existing posts
Reread your post and identify what additional value you could provide to compel readers into taking action.
You might think you have already poured everything you know into a post, but there are always creative ways to provide more value. Here are some ideas:
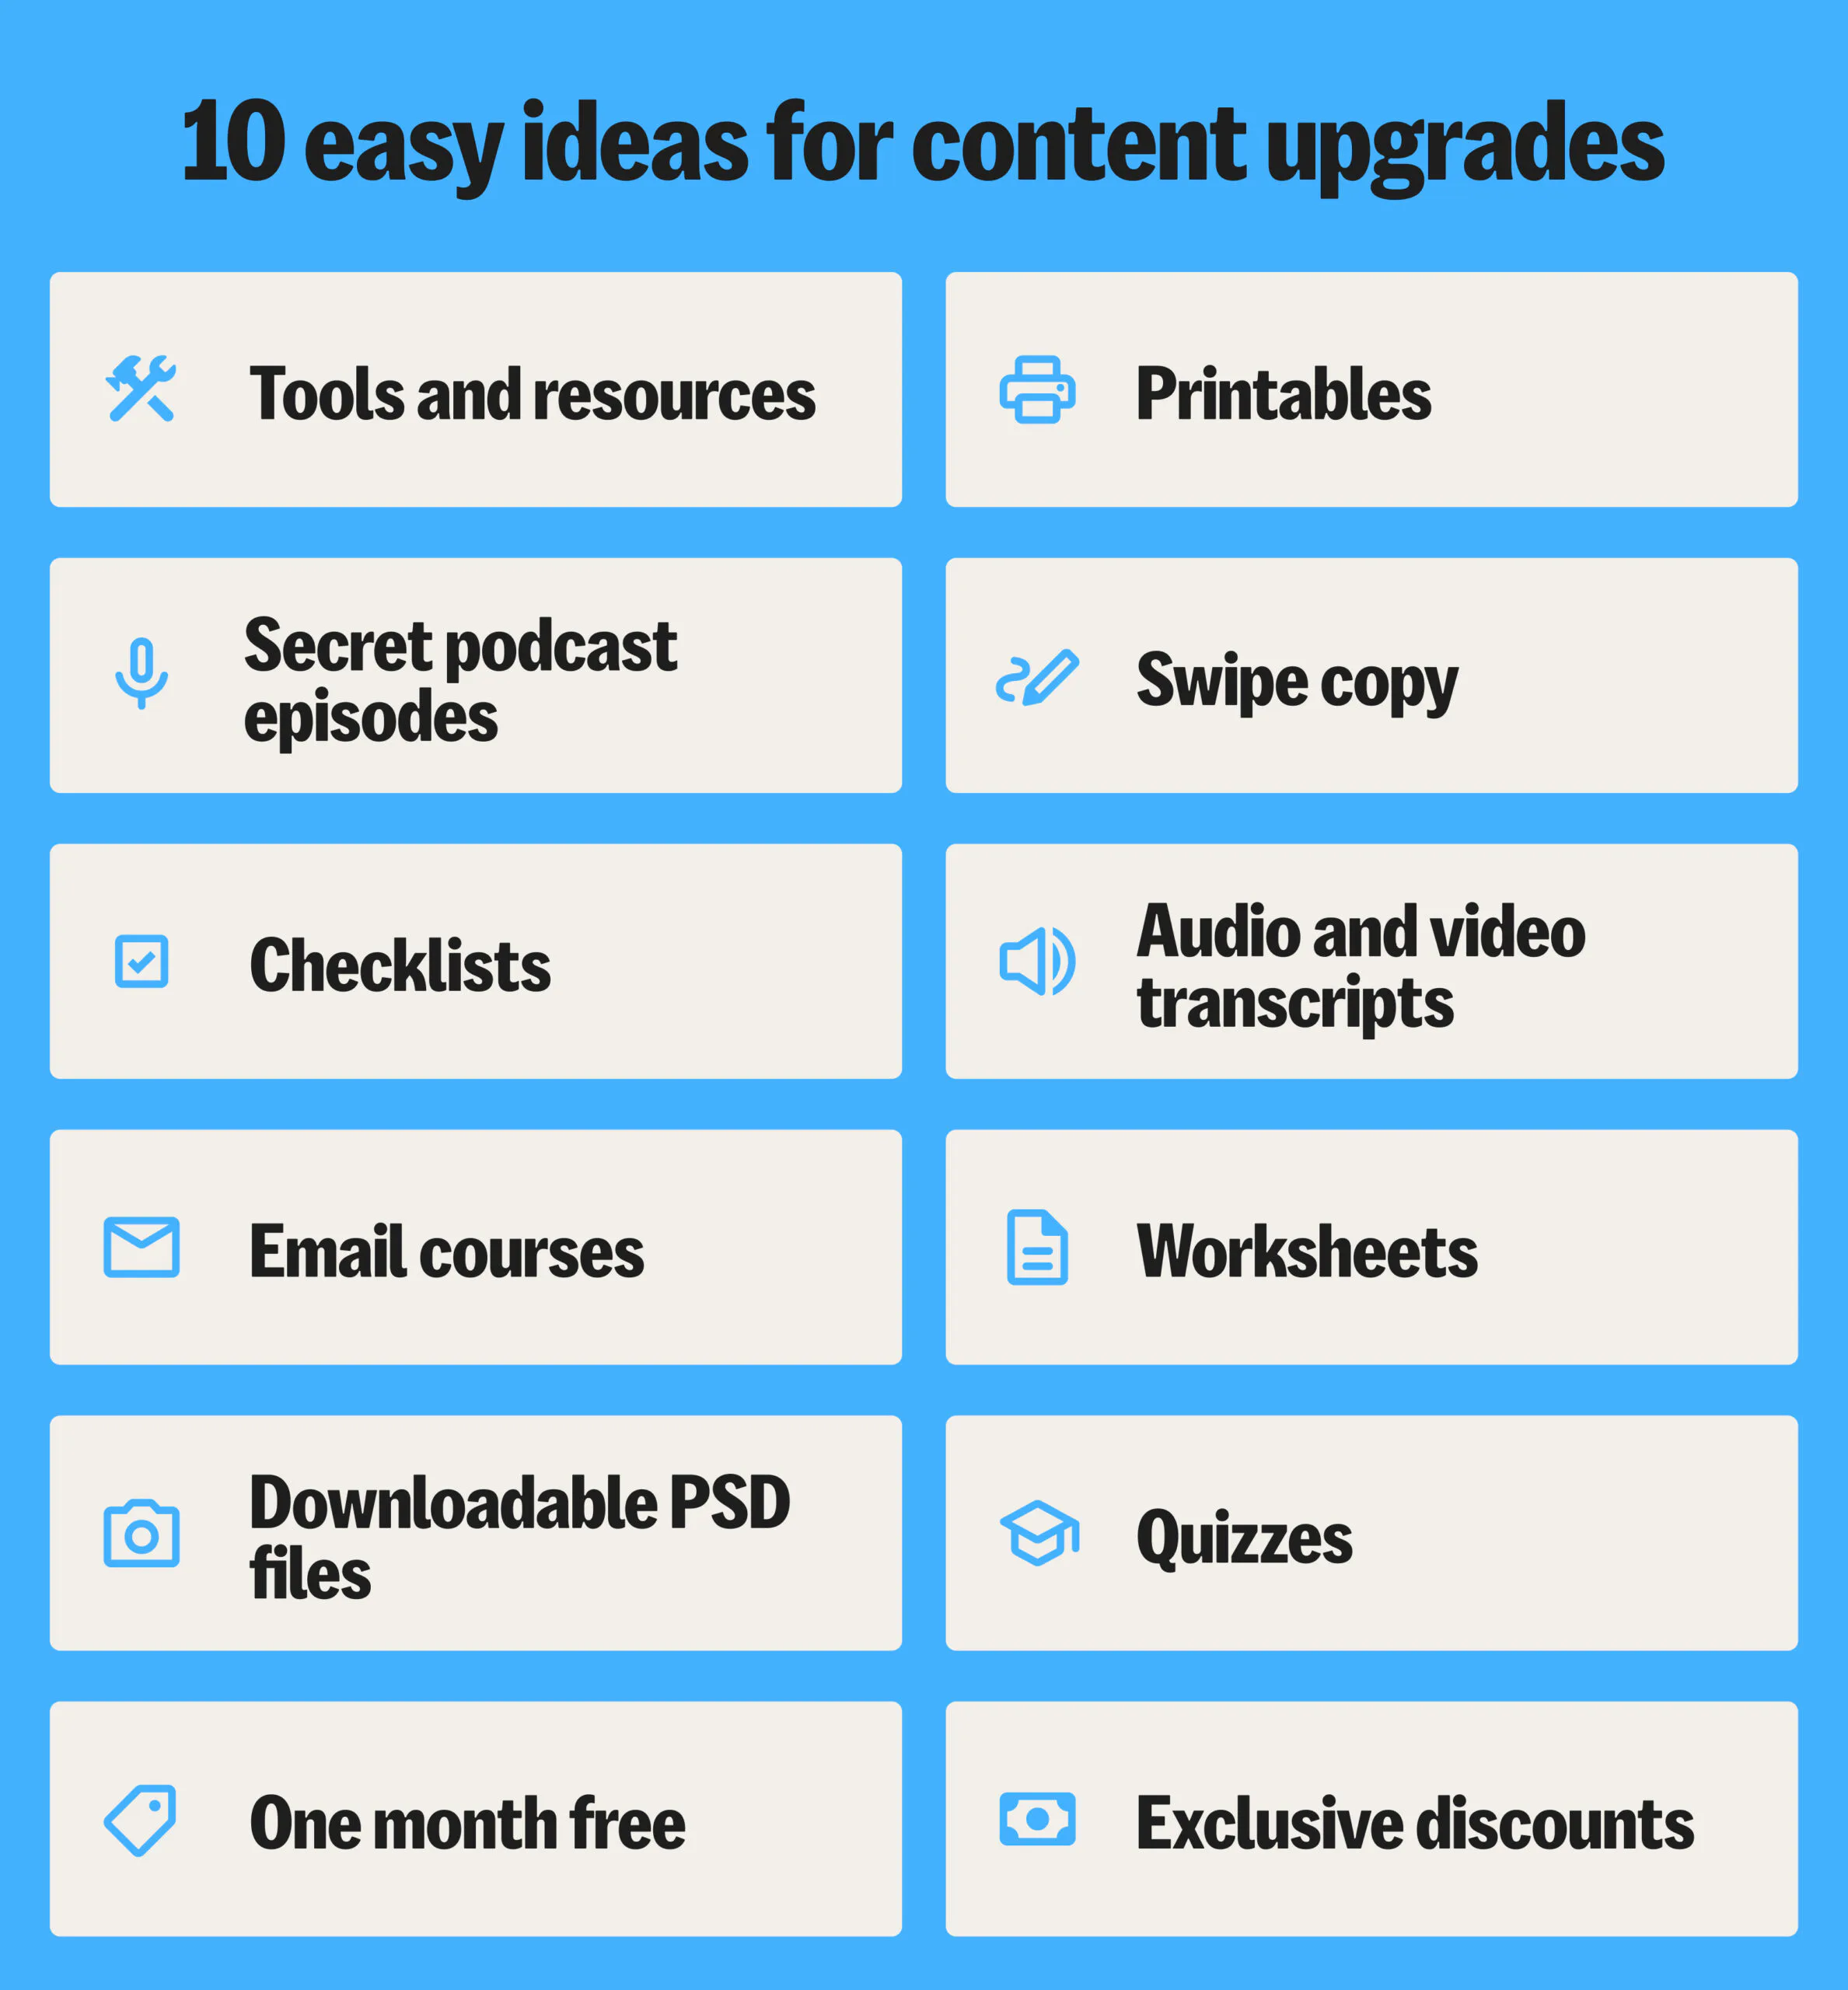
Top content upgrades for different kinds of creators
- Tools and resources list: Supplement how-to and DIY articles with tools and resource lists so readers know what they need to perform a specific task.
- Secret podcast episode: Share unpublished podcasts for blog posts that dive into a specific topic you have expertise in. Users can download your secret podcast to learn additional information they won’t find for free online.
- Checklists: Checklists are another content upgrade that works well for how-to content with lots of steps. They’ll help readers track their progress and follow your tutorial with ease.
- Email course: Consider an email course for blog posts that require additional teaching to understand a topic fully. Think of the blog post as an intro to the topic at hand and create an email course to fully dive in.
- Downloadable PSD files or other design assets: Give readers design files for blog posts centered around web or graphic design.
- One Month Free of your product or membership site: Offer free trials of your product on blog posts that relate to what you teach or sell. This way, users can take it for a spin and may be more likely to turn into paying customers.
- Printables: Printables are versatile content upgrades. They work for just about any type of blog post and range from things like planners or art work.
- Swipe copy: Adding swipe copy files to blog posts that teach users how to write can be incredibly enticing. Just make sure the swipe copy is relevant to the blog post. For example, if your blog is about writing emails, your swipe copy should also be related to emails.
- Transcripts for audio or video recordings: Recordings are another versatile content upgrade you can add to any blog post. Plus, they can attract a wider audience as everyone has different content consumption preferences.
- Worksheets: Add worksheets to complex tutorial blog posts. Readers can download the worksheet and follow along.
- Quizzes: Create quizzes for blog posts where a self-assessment might be useful. For example, a blog post about productivity could have a quiz that helps readers find their productivity style.
- Exclusive discounts: Add discounts to content that heavily features specific products. Readers who land on these posts are likely interested in the product and might need a little nudge to convert them into paying customers.
3. Create the content upgrade(s)
Create your content upgrade using free tools to keep costs low and focus on formats you’re comfortable with.
For example, if you’re interested in making printable workbooks but aren’t familiar with the process, put that idea on hold and start with formats you already know how to create.
You can create anything delivered in PDF format (worksheets, checklists, printables) for free using a tool like Canva. And Google Docs works well for text-heavy documents that don’t require much design.
Consider tools like Audacity (audio) and ClipChamp (video) for recordings.
Depending on your upgrade, you might even send the content in an email, like a free five-day email course delivered straight to your reader’s inbox.
4. Set up a Kit Form (and connect the upgrade to it)
Next you need an automatic way for people to enter their email and get your content upgrade.
The easiest way to achieve this is by creating an opt-in form that automatically sends an email with your upgrade when someone signs up.
Here’s how to do that in Kit.
Head into your account and click “Grow” > “Landing Pages & Forms.”

Click “+ Create new” and select “Form.” You’ll have four different forms to choose between. Inline forms work well for content upgrades because you can place them at well-timed moments within your blog posts. So, let’s select that one.

Then select your template on the next page. You can customize the template with colors, fonts, imagery, and copy in our form builder.
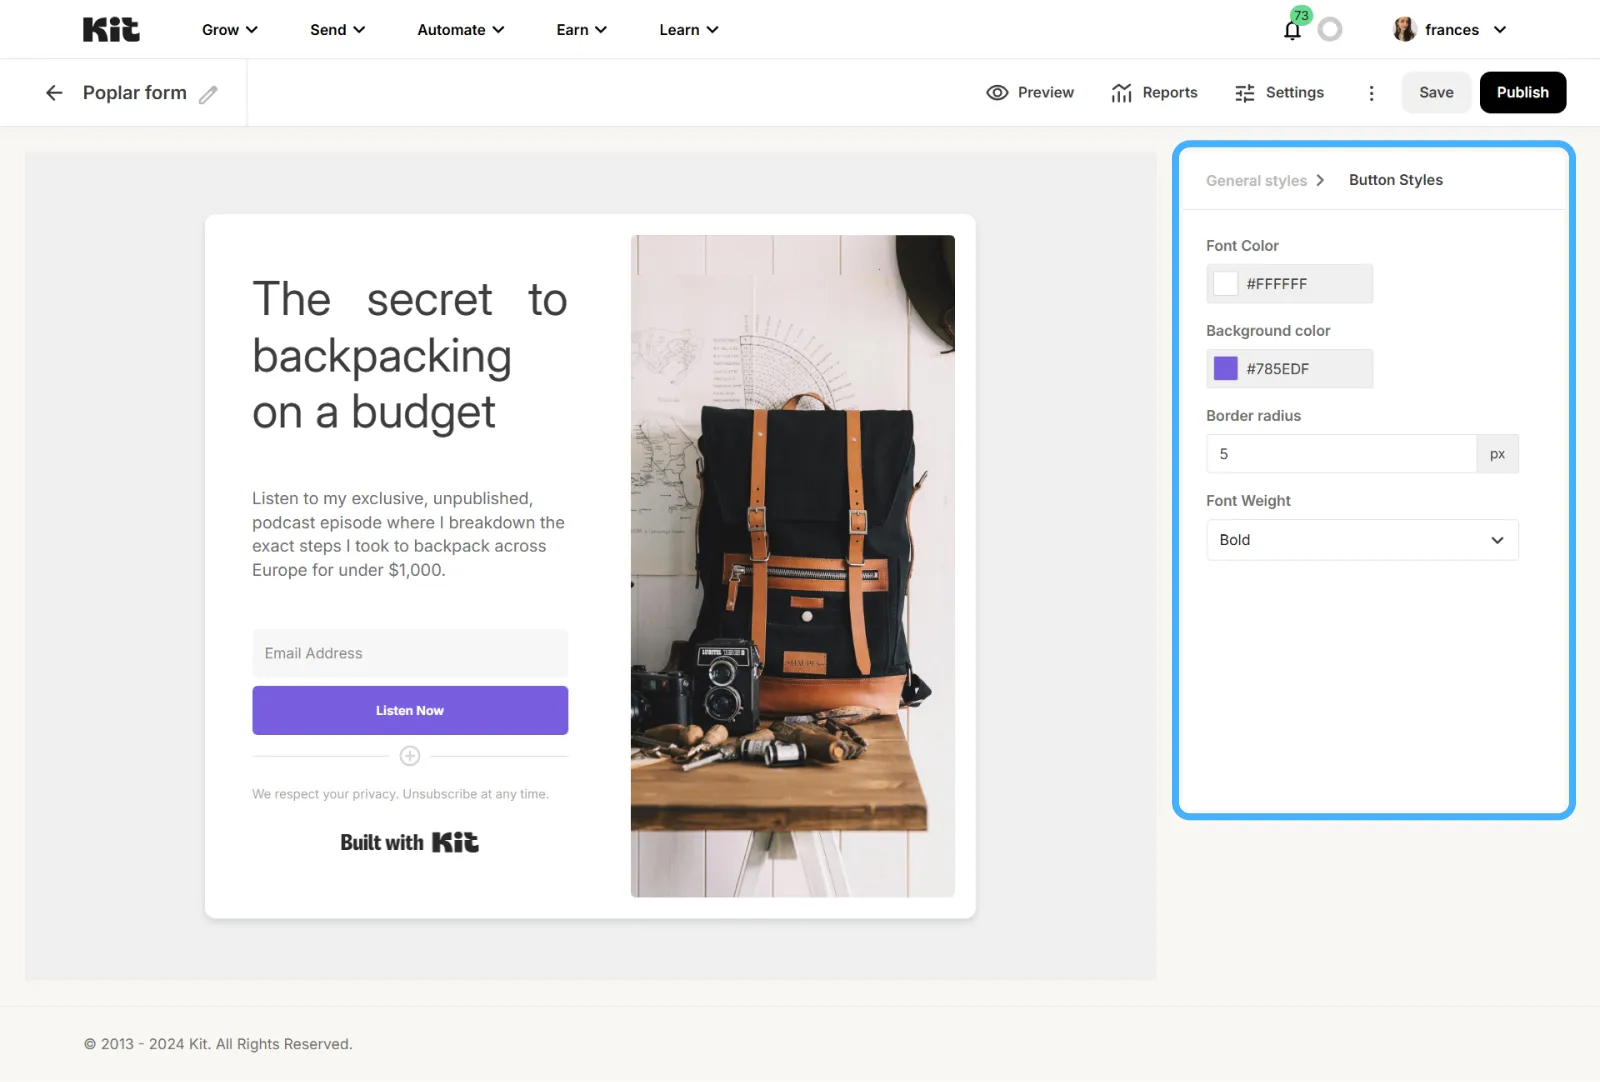
Give your form the best chance at turning readers into leads by:
- Add a clear and enticing headline
- Make it easy to fill out (avoid too many fillable fields—a first name and an email address are usually all you need)
- Include a clear CTA
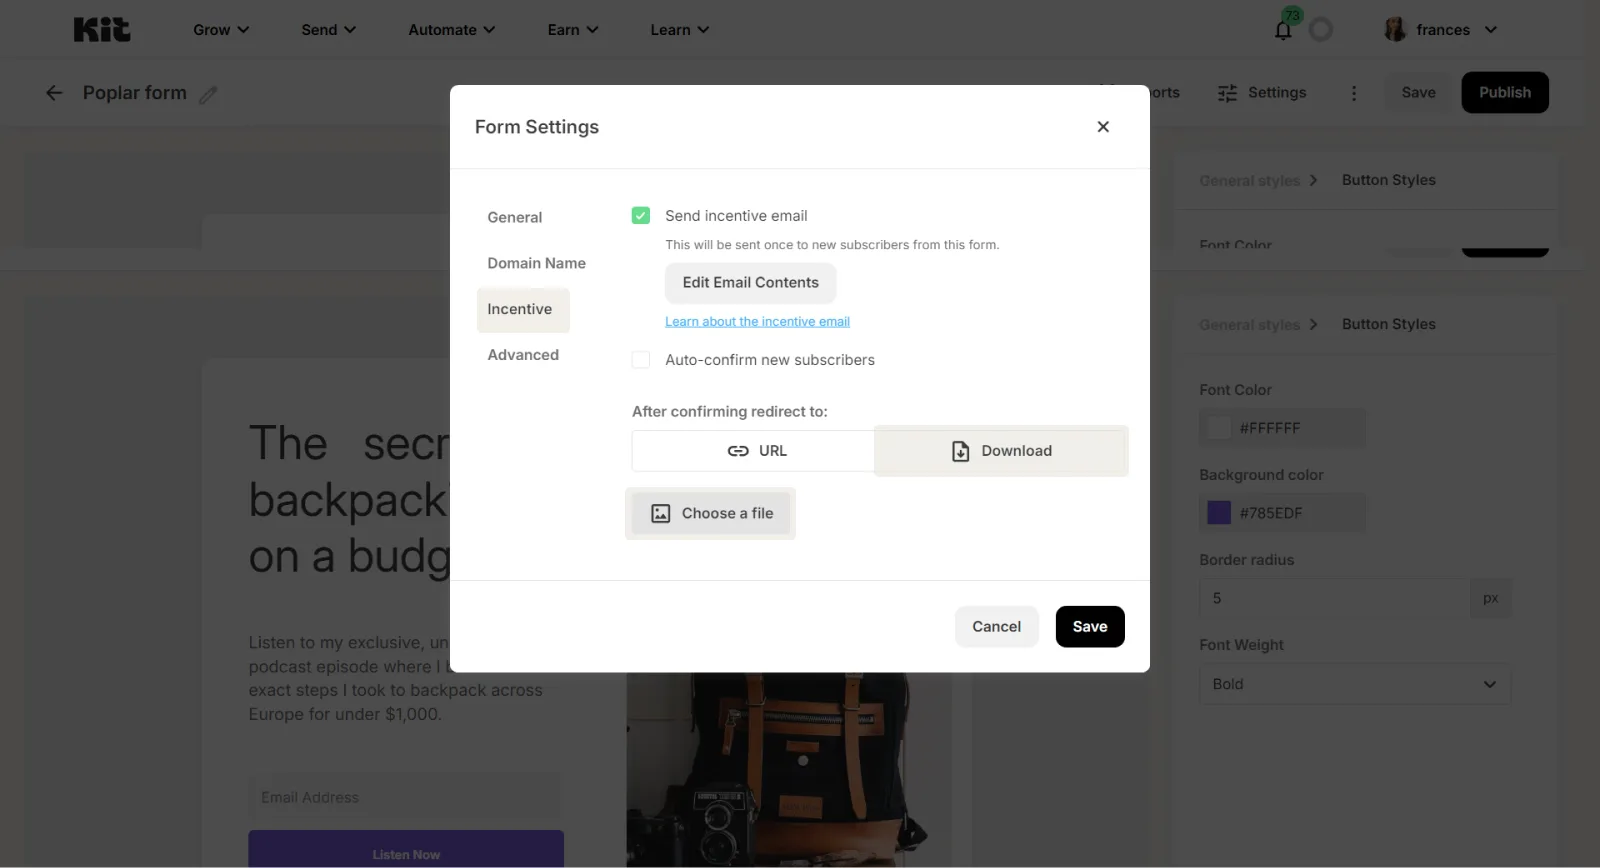
Lastly, attach your content upgrade to the form so that Kit can automatically send it to those who subscribe.
Click “Settings” > “Incentive” > “Download” and “Choose a file” to attach your content upgrade. You can also select “URL” if your upgrade is shareable via a link. Then click “Save.”
Finally, you’ll want to automatically tag subscribers who download your content upgrades for easy segmentation (in case you want to promote relevant products to them later on).
To do that, click “Automate” > “Rules.”

Click “+ New rule.” Select “Subscribes to a form” and choose your content upgrade’s form in the dropbox that appears.
Then select “Add tag” and create a new tag to help you identify those who download your upgrade. For our example above, we might take subscribers with the tag “backpacking podcast.”

Finally, click “Save Rule.”
Content upgrade form example by Tanya Harris
Food blogger Tanya Harris includes this opt-in form on air fryer recipes.
As a result, she was able to build a segment of her email list who were interested in air fryer recipes. And she made thousands of dollars when she launched her air fryer cookbook.
Content upgrade form example by Abbey Ashley
Virtual assistant (VA) coach Abbey Ashley has a free virtual assistant training upgrade she includes in a blog post that teaches people how to become a VA.
The free training, which teaches people how to get fully booked, is a natural addition to her blog post about becoming a VA.
Content upgrade form example by Elizabeth McCravy
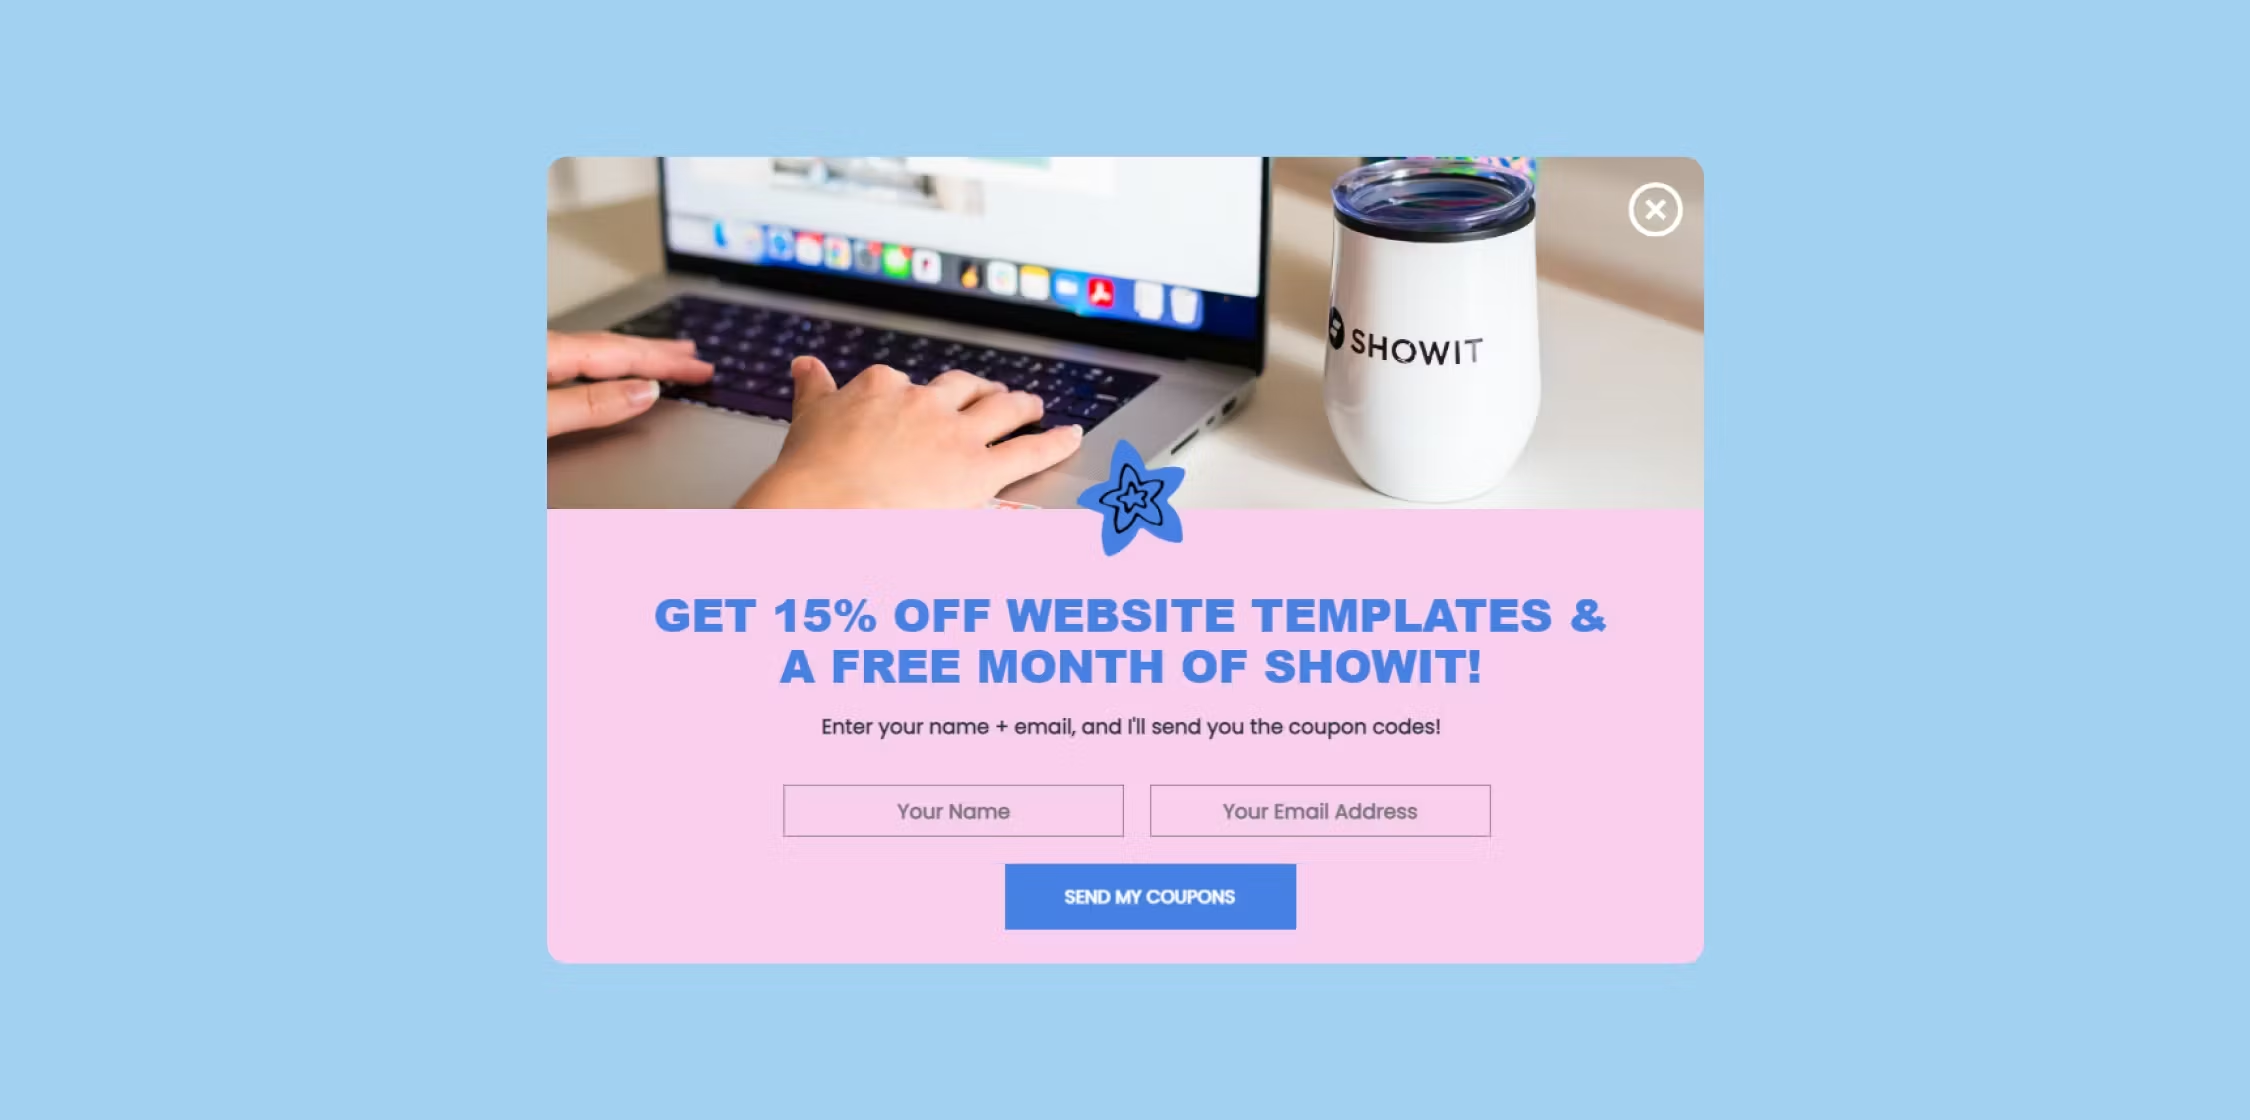
Designer Elizabeth McCravy’s blog post about website templates features a slide-in opt-in form offering a 15% off coupon specifically for templates and a free month of the website builder ShowIt.
5. Add the opt-in form to your blog posts
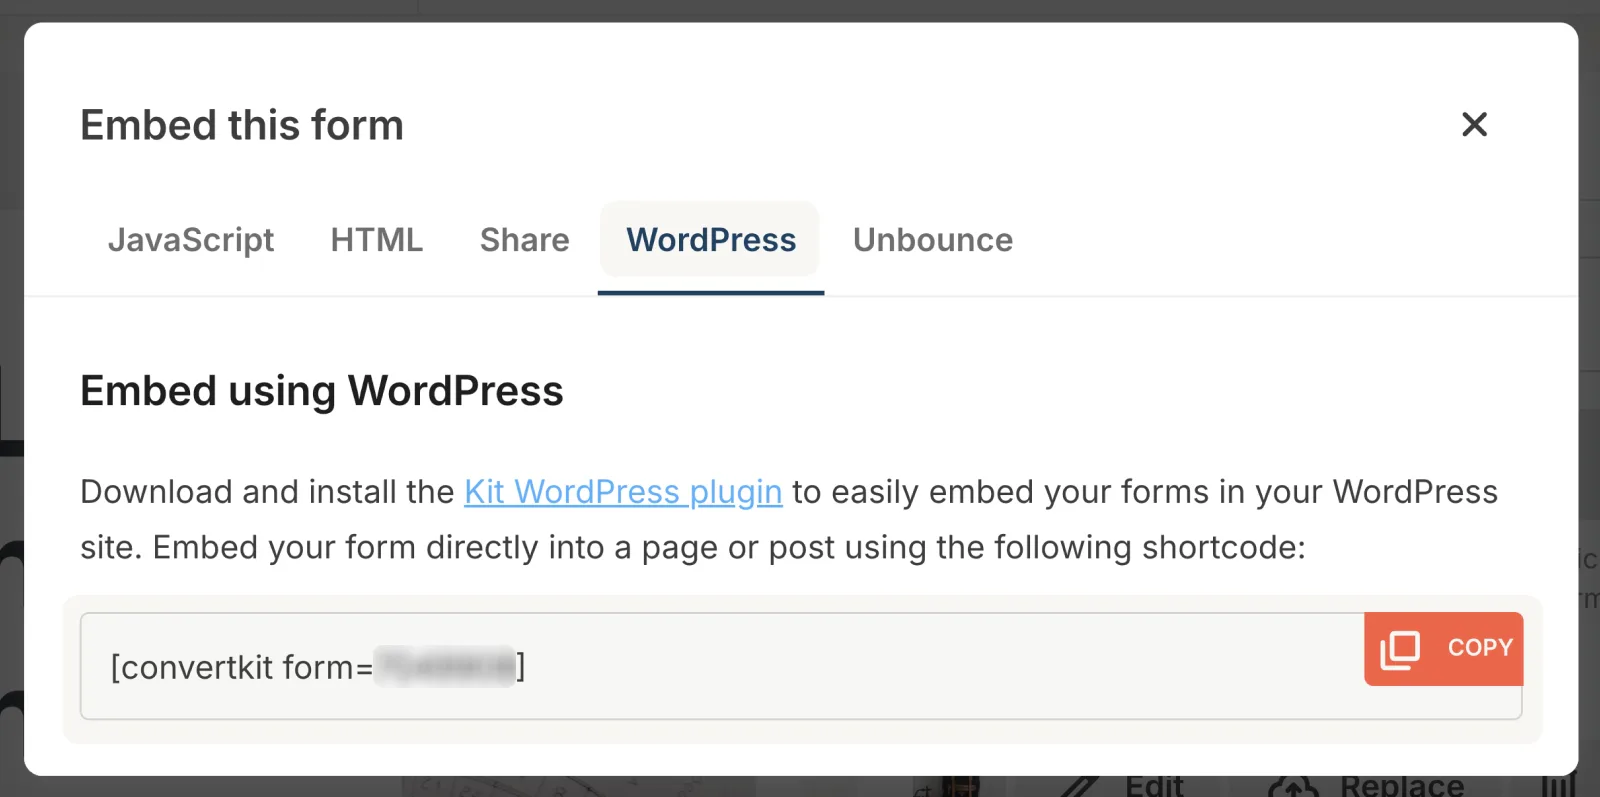
Head back into your opt-in form and click “Publish.” This displays the embed code for your form to plug it into relevant blog posts.

If you use WordPress, you can download our Kit x WordPress plugin. After installing the plugin, follow along with the setup Wizard to integrate your site to Kit.

One easy way to add Kit Forms to your WordPress site is through the shortcode. After the integration is complete, copy and paste your WordPress shortcode into your blog posts, found by clicking on the “WordPress” tab within your form’s share modal.
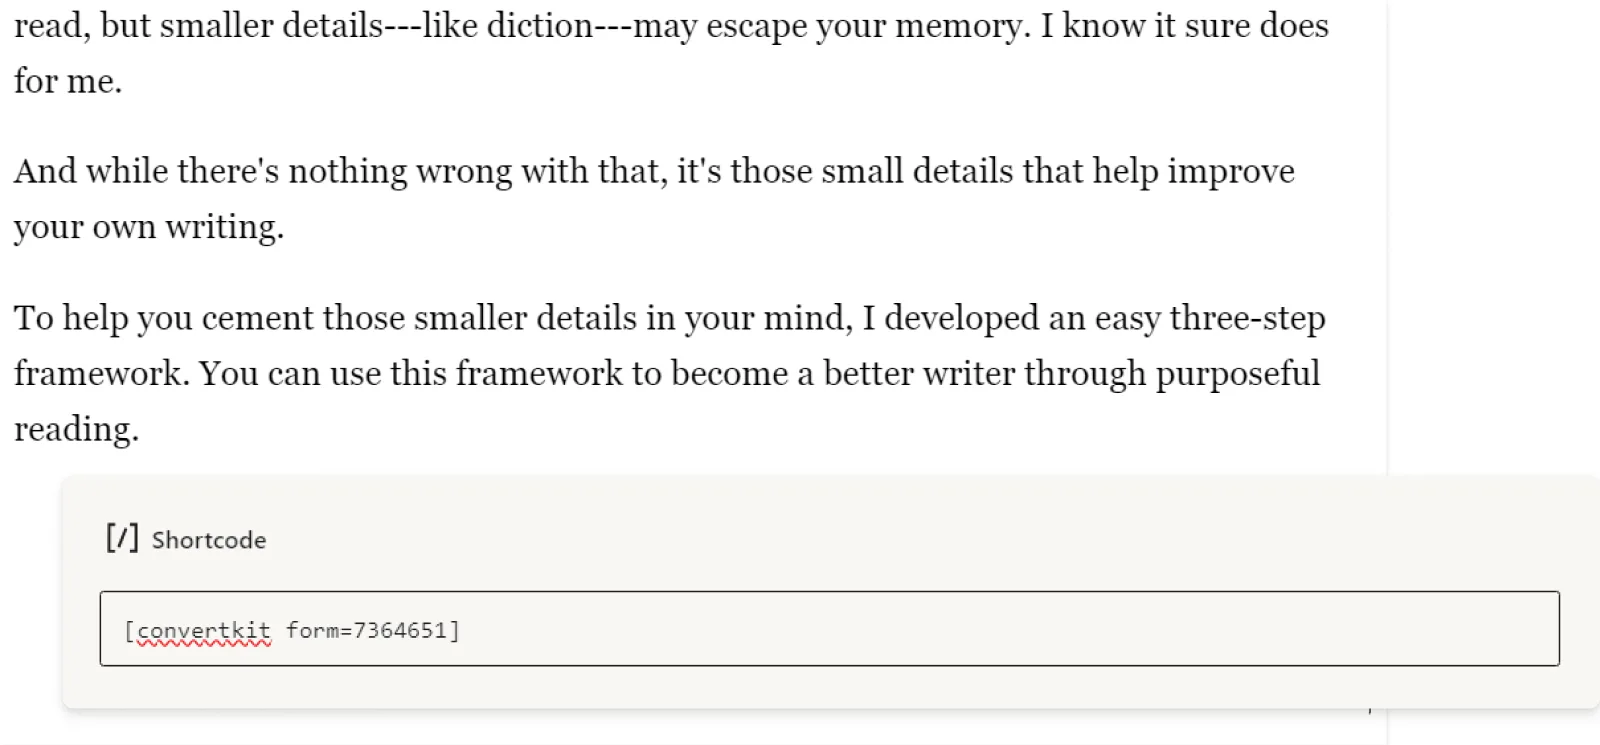
Paste the shortcode into your blog post (where you want the form to appear) using Gutenberg’s Shortcode block.
6. Update and optimize the blog post (if needed)
Add a few sentences leading up to your form so it fits naturally with your blog post. Also look to update:
- Out of date information like stats are no longer correct
- Old graphics that might need a refresh (i.e., they no longer reflect your brand)
- References to old trends that you can change to newer trends
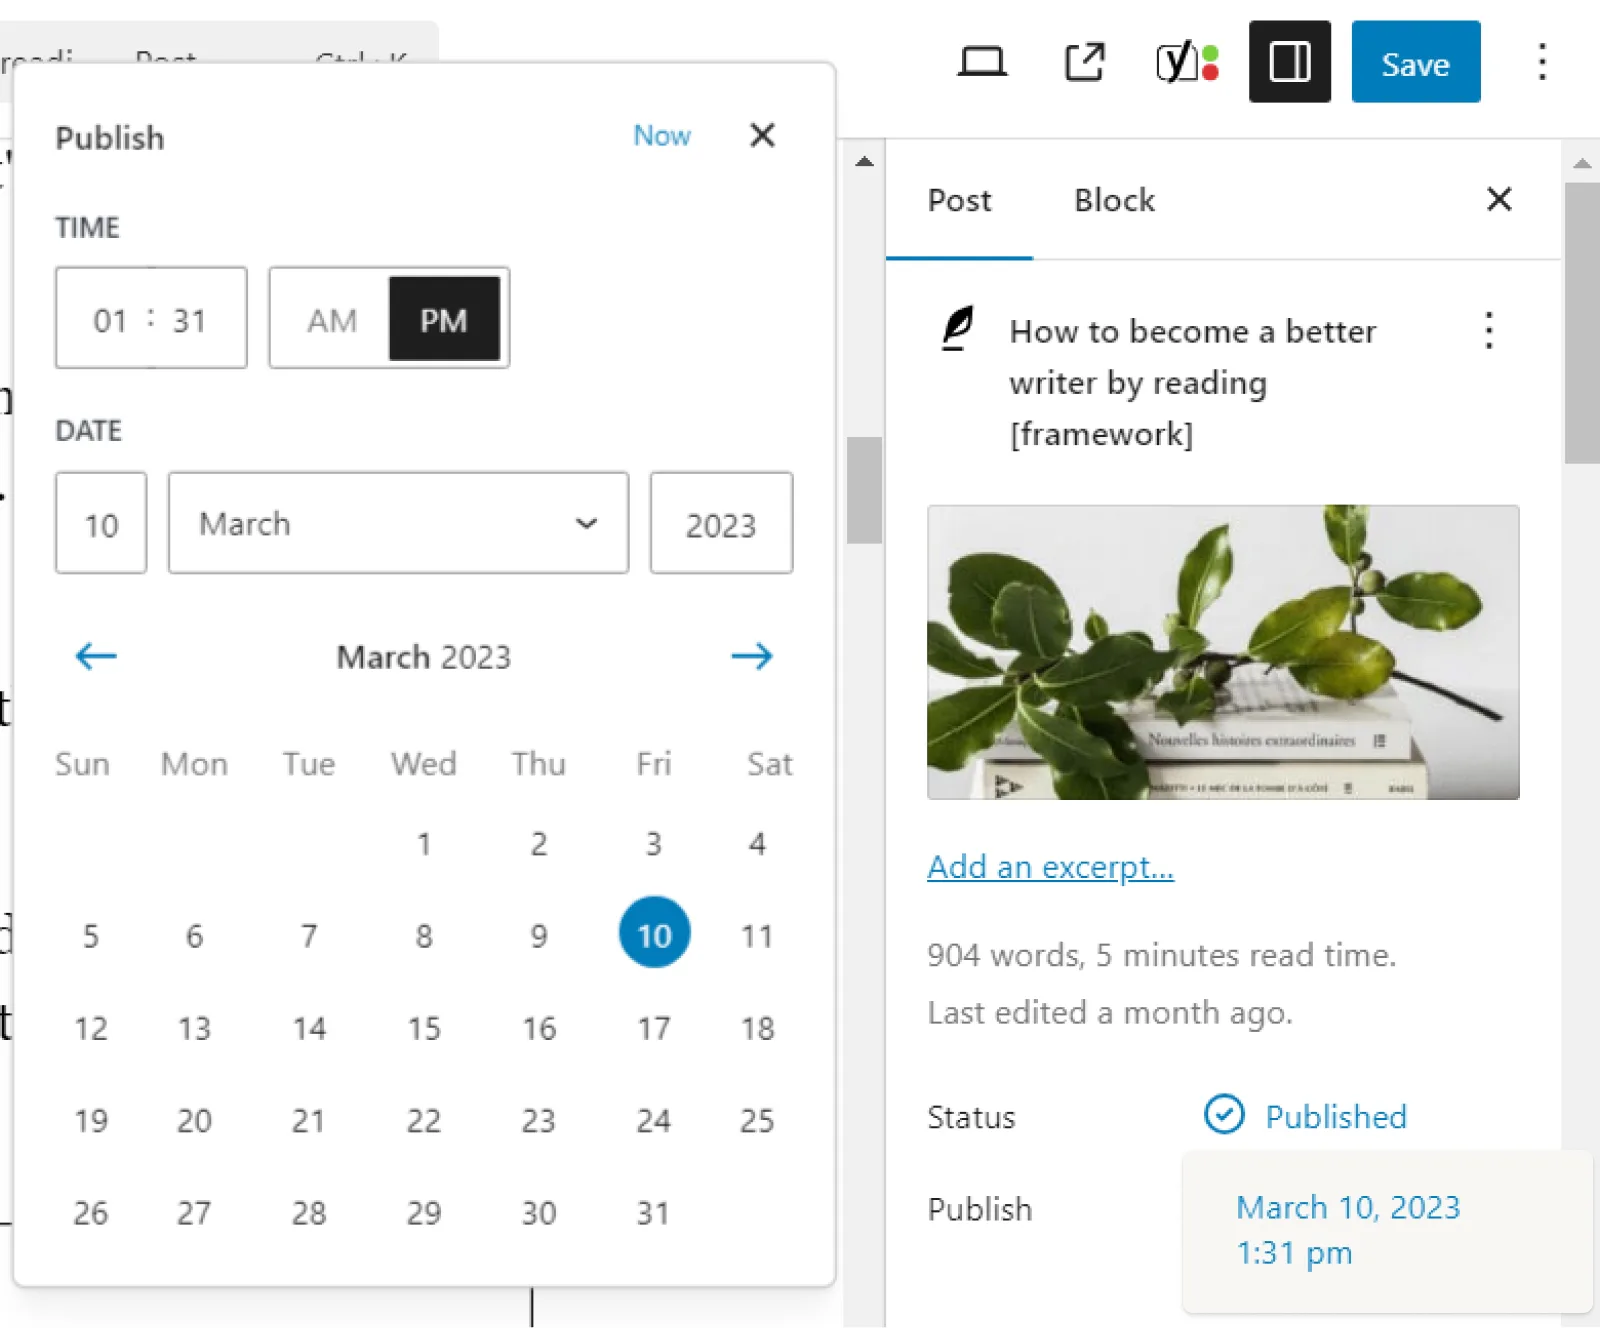
Then, change the publication date on your post so readers know it’s fresh.
7. Promote your improved blog post
Give your new blog post (and content upgrade) some love and promote it to your audience:
- Social media platforms: Encourage your social followers to check out your blog posts and turn them into leads. Add the link to your post in your social media bios, Stories, YouTube video descriptions, and any other places where users can easily find it.
- Existing email list: People on your list want useful content. Plus, if they sign up for content upgrades, you get the chance to learn more about them, segment them, and potentially sell them related products down the line.
- Podcast episodes: Give your blog post a shout-out on your podcast. Add the URL to your show notes so users can easily locate it.
8. Watch your email list grow
Keep an eye on your email list analytics to see which blog posts drum up the most leads. These are the ones you’ll want to share more frequently.
Kit’s Insights dashboard gives you a detailed look into things like where subscribers come from, how much they spend, and their engagement rate.

9. Continue to engage the subscribers on that specific topic
While it’s widely touted that content upgrades are a quick way to grow your list, there’s a secret next step that most people don’t take advantage of to make the most of those new subscribers.
That secret? Continue engaging subscribers on your upgrade’s topic.
Nurturing and engaging your new leads helps them warm up to you, so when it comes time to pitch your offers, they’re more willing to buy.
Here are some ideas:
- Educational email automation: Help your readers deepen their expertise by creating a series of automatic educational emails (using Kit’s Automations) on your content upgrade topic.
- Evergreen webinar: Film an evergreen webinar (or repurpose multiple videos by combining them into one) and position yourself as an authority on the topic.
- Email challenge: Create an email list challenge that spans a few days and help readers reach a goal they might have that relates to your upgrade.
- Private online group: Give subscribers a chance to connect with you and one another by hosting a private online community. This lets you further position yourself as an expert in your space while also learning more about what people who support your business.
10. Upsell a related product
Engaging your list gets them primed to buy related offers. So, your last step is to create—and sell—a product relevant to your upgrade.
Email copywriter Val Geisler launched a live workshop only two weeks after adding her content upgrade to her blog post. Since she had a segment of interested folks, she was able to sell out her workshop within 48 hours using this email:
Kit makes delivering your content upgrades simple
Kit gets your upgrades into your subscribers’ inboxes, tags them for easy segmentation, and sells your products to people eager to buy.
All you need to do is complete the above steps and create your upgrades.
Ready to try it for yourself? Try Kit today.
